Razer Mouse Grants Windows Admin Privileges

As the common saying goes, “all networked computers are vulnerable to exploits, but some networked computers are more vulnerable than others”. While not the exact wording from Animal Farm, the saying does have plenty of merit nonetheless. Sure, there are some viruses and issues with Linux distributions but by far most of the exploits target Windows, if only because more people use it daily than any other operating system. The latest Windows 10 exploit, discovered by [jonhat], is almost comically easy too, and involves little more than plugging in a mouse.

While slightly comforting in that an attacker would need physical access to the device rather than simple network access, it is very concerning how simple this attack is otherwise. Apparently plugging in a Razer mouse automatically launches Windows Update, which installs a driver for the mouse. The installation is run with admin privileges, and a Power Shell can be opened by the user simply by pressing Shift and right-clicking the mouse. While [jonhat] originally tried to let the company know, they weren’t responsive until he made the exploit public on Twitter, and are now apparently working on solving the issue.

Others have confirmed the exploit does in fact work, so hopefully there is a patch released soon that solves the issue. In the meantime, we recommend not allowing strangers to plug any devices into your personal computers as a general rule, or plugging in anything where its origins are unknown. Also remember that some attacks don’t required physical or network access at all, like this one which remotely sniffs keystrokes from a wireless keyboard with less than stellar security, also coincidentally built by Microsoft.

Sneak Thieves Beware: A Pi Watcheth

Ever have that strange feeling that somebody is breaking into your workshop? Well, Hackaday.io user [Kenny] has whipped up a tutorial on how to scratch that itch by turning a spare Raspberry Pi you may have kicking around into a security camera system that notifies you at a moment’s notice.

The system works like this: a Raspberry Pi 3 and connected camera module remain vigilant, constantly scanning for motion and recording video. If motion is detected, it immediately snaps and sends a picture to the user’s mobile via PushBullet, then begins recording video. If there is still movement after a few seconds, the process repeats until the area is once again devoid of motion. This also permits a two-way communication with your Pi security system, so you can check in on the live feed whenever you feel the urge.

To get this working for you — assuming that your Pi has been recently updated — setup requires setting up a PushBullet account as well as installing it on your mobile and  linking it with an API. For your Pi, you can go ahead with setting up some Python PushBullet libraries, installing FFmpeg, Pi Camera Notifier, and others. Or, install the ready-to-go image [Kenny] has prepared. He gets into the nitty-gritty of the code in his guide, so check that out or watch the tutorial video after the break.

Continue reading “Sneak Thieves Beware: A Pi Watcheth”

Saving An Alarm System Remote And $100

[Simon] has been using his home alarm system for over six years now. The system originally came with a small RF remote control, but after years of use and abuse it was finally falling apart. After searching for replacement parts online, he found that his alarm system is the “old” model and remotes are no longer available for purchase. The new system had similar RF remotes, but supposedly they were not compatible. He decided to dig in and fix his remote himself.

He cracked open the remote’s case and found an 8-pin chip labeled HCS300. This chip handles all of the remote’s functions, including reading the buttons, flashing the LED, and providing encoded output to the 433MHz transmitter. The HCS300 also uses KeeLoq technology to protect the data transmission with a rolling code. [Simon] did some research online and found the thew new alarm system’s remotes also use the same KeeLoq technology. On a hunch, he went ahead and ordered two of the newer model remotes.

He tried pairing them up with his receiver but of course it couldn’t be that simple. After opening up the new remote he found that it also used the HCS300 chip. That was a good sign. The manufacturer states that each remote is programmed with a secret 64-bit manufacturer’s code. This acts as the encryption key, so [Simon] would have to somehow crack the key on his original chip and re-program the new chip with the old key. Or he could take the simpler path and swap chips.

A hot air gun made short work of the de-soldering and soon enough the chips were in place. Unfortunately, the chips have different pinouts, so [Simon] had to cut a few traces and fix them with jumper wire. With the case back together and the buttons in place, he gave it a test. It worked. Who needs to upgrade their entire alarm system when you can just hack the remote?

RasPi Doorbell

Raspberry Pi Doorbell Is Fully Featured

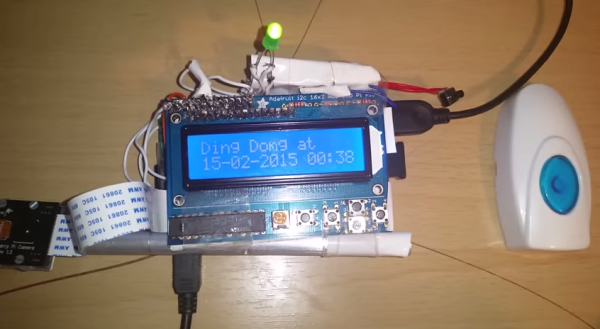
When you think of a doorbell, you typically don’t think of anything very complicated. It’s a button that rings a bell inside your home. That’s about it. [Ahmad] decided he wanted to turn his doorbell up to eleven (Google Doc) with this build. Using a Raspberry Pi, he was able to cram in loads of features.

When the doorbell button is pressed, many different events can be triggered. In the demo video, [Ahmad] shows how his phone receives a text message, and email, and a tweet. The system can even be configured to place a voice call via Google Hangouts using a USB microphone. [Ahmad] demonstrates this and shows how the voice call is placed almost instantly when the button is pressed. This may be a bit overkill, but it does demonstrate many different options depending on your own needs.

For the hardware side of things, [Ahmad] purchased a wireless doorbell. He opened up the ringer unit and hooked up the speaker wires to a couple of pins on the Raspberry Pi through a resistor. The doorbell unit itself is powered off of the 3.3V supply from the Pi. The Pi also has a small LCD screen which shows helpful information such as if the Internet connection is working. The screen will also display the last time and date the doorbell was pressed, in case you weren’t home to answer the door.

On top of all of that, the system also includes a Raspberry Pi camera module. This allows [Ahmad] to take a photo of the person ringing the doorbell as a security measure. He can even view a live video feed from the front door by streaming directly to YouTube live. [Ahmad] has provided a link to his Pi image in the Google Doc so others can use it and modify it as they see fit. Continue reading “Raspberry Pi Doorbell Is Fully Featured”

Super Simple Arduino Setup Lowers Electricity Bills

An Arduino with 40 lines of code, a temperature resistor, and servo are all that’s truly needed to save some dough with this thermostat by [Peter Hamilton]. LEDs and a potentiometer are added as well to help set and read the desired temperature. With or without said additional parts, the hack is still ridiculously simple and we’re wondering why we didn’t have a similar setup on our blisteringly cold office AC system before seeing it.

Though, we’re going a bit further with our version, plans are in the making to add timers to turn off the system for extended hours while no one is at the office. What would you add?