THP Entry: An Affordable Metal 3D Printer

metalFor years now, people have been trying to develop an affordable, RepRap-derived 3D printer that will create objects in metal. There has been a lot of work with crazy devices like high-powered lasers, and electron beams, but so far no one has yet developed a machine that can print metal objects easily, cheaply and safely. For The Hackaday Prize, [Sagar] is taking a different tack for his metal 3D printer: he’s extruding low temperature alloys just like a normal 3D printer would extrude plastic.

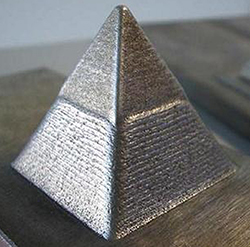
[Sagar]’s printer is pretty much a carbon copy of one of the many ‘plastic-only’ 3D printers out there, the only change being in the extruder and hot end. As a material, he’s using an alloy of 95.8% tin, 4% copper, and 0.2% silver in a 3mm diameter spool. This alloy melts at 235° C, about the same temperature as the ABS plastic these printers normally use.

The only real problems with this build are the extruder and nozzle. [Sagar] is milling his own nozzle and hot end out of stainless steel; a challenging bit of machining, but still within the realm of a hobbyist. He has some doubts about the RepRap derived plastic geared extruder being able to handle metal, so he’s also looking at designing a new version and milling that out of stainless as well.

It’s an awesome project, and we hope we’ll be seeing some updates to the project shortly. While a 3D printer that produces objects out of a low temperature alloy won’t be building rocket engines any time soon, it could be a great way to fabricate some reasonably high-strength parts at home.


SpaceWrencherThe project featured in this post is an entry in The Hackaday Prize. Build something awesome and win a trip to space or hundreds of other prizes.

Super Affordable LED Lighting Ready To Go Off Mains Voltage

lights

If you’re looking for a super cheap way to add LED lighting accents to your house, then this hack is for you! Corn-cob style LED light bulbs can be had for a few dollars. The bulbs include driver circuitry, and 8 LED arrays! All you have to do is take it apart.

[Martin Raynsford] stumbled upon this idea when trying to think of a way to light his laser engraving enclosure. It originally came with a regular light bulb, but it didn’t distribute light nicely and was in the way for some of his other planned upgrades.

Not wanting to add another DC power supply to the mix he remembered an old corn-cob LED light bulb he had — as it turns out, they’re pretty easy to take apart! Solder some longer leads on (take note of how they are wired, some are in series, some in parallel) and you’ve just made yourself some easy to use LED accent lighting!

Of course you could just buy those cheap LED rolls from China nowadays for next to nothing for your accent lighting.

[via Hacked Gadgets]

Frozen Pi — An Affordable Bullet Time Recorder

What happens when you strap 48 Raspberry Pi cameras together with nearly half a kilometer of network cables? You get your own bullet time capture rig.

Originally inspired by the unique film effect of the  Matrix and an old BBC documentary called Supernatural: The Unseen Powers of Animals, the owner of PiFace decided to try re-creating the bullet time effect himself.

To create the rig they’ve taken 48 Raspberry Pis, each with a PiFace controller board and the standard camera. The controller board allows the Raspberry Pi to be used without a keyboard or mouse, so all the network cables have to do is send a simple code to each pi in order to take the pictures. A simple laser cut wood profile is used to snap them all together into a giant ring.

While 48 Raspberry Pis is a lot, they think this is a reasonable project for a classroom environment — besides, how cool would it be to go to school and film your own bullet time stunts?

Continue reading “Frozen Pi — An Affordable Bullet Time Recorder”

An Affordable Full Body Studio Grade 3D Scanner

Looking for a professional 3D scanning setup for all your animation or simulation needs? With this impressive 3D scanning setup from the folks over at [Artanim], you’ll be doing Matrix limbos in no time!  They’ve taken 64 Canon Powershot A1400 cameras to create eight portable “scanning poles” set up in a circle to take 3D images of, well, pretty much anything you can fit in between them! 

Not wanting to charge 64 sets of batteries every time they used the scanner or to pay for 64 official power adapters, they came up with a crafty solution: wooden batteries. Well, actually, wooden power adapters to be specific. This allows them to wire up all the cameras directly to a DC power supply, instead of 64 wall warts.

To capture the images they used the Canon Hack Development Kit, which allowed them to control the cameras with custom scripts. 3D processing is done in a program called Agisoft Photoscan, which only requires a few tweaks to get a good model. Check out [Artanim’s] website for some excellent examples of 3D scanned people.

Continue reading “An Affordable Full Body Studio Grade 3D Scanner”

[Charles] Tears Into A Ford Fusion Battery

Any time we hear from [Charles Z. Guan], we know it’s going to be a good feature. When he’s linking us to a blog post with phrases like “If you touch the wrong spots, you will commit suicide instantly”, we know it will be a really good feature. [Charles] is no stranger to Hackaday – we’ve featured his GoKarts, Quadcopters, and scooters before. He was even generous enough to let a couple of Hackaday writers test drive ChibiKart around Maker Faire New York last year.

This time around, [Charles] is working on a power system for chibi-Mikuvan, his proposed entry of the Power Racing Series. He’s decided to go with a used battery from a hybrid vehicle. As these vehicles get older, the batteries are finally becoming available on the used market. [Charles] was able to pick up a 2010 Ford Fusion NiMh battery for only $300. These are not small batteries. At 20” wide by 48” long, and weighing in at 150 pounds, you’ll need 2 or 3 people to move one. They also pack quite a punch: 2.1kWh at 275V. It can’t be understated, taking apart batteries such as these gives access to un-fused lethal voltages. Electrocution, arcs, vaporized metal, fire, and worse are all possibilities. If you do decide to work with an EV or hybrid battery, don’t say we (and [Charles]) didn’t warn you.

As [Charles] began taking apart the battery, he found it was one of the most well thought out designs he’d ever seen. From the battery management computers to the hydrogen filled contactors, to the cooling fan controller, everything was easy to work on. The trick to disassembly was to pull the last module out first. Since all the modules are wired in series, removing the last module effectively splits the pack in half, making it much safer to work on. The battery itself is comprised of 28 modules. Each module contains two 4.8V strings of “D” cell sized NiMh batteries. The battery’s capacity rating is 8000 mAh, and [Charles] found they still took a full charge. Since he doesn’t need the pack just yet, [Charles] removed the final bus bars, rendering it relatively safe. Now that he has a power source, we’re waiting to see [Charles’] next stop on the road to chibi-Mikuvan.

Fail Of The Week: CAN-Bus Attached HUD For Ford Mustang

This edition of Fail of the Week is nothing short of remarkable, and your help could really get the failed project back on track. [Snipor Bob] wanted to replace all of the dashboard readouts on his Mustang and got the idea of making the hacked hardware into a Heads-Up Display. What you see above is simply the early hardware proof of concept for tapping into the vehicle’s data system. But there’s also an interesting test rig for getting the windshield glass working as a reflector for the readout.

Continue reading “Fail Of The Week: CAN-Bus Attached HUD For Ford Mustang”

Hacking The Computer Interface Of A Ford Focus Mk2

You can do some neat stuff to the way your Ford Focus Mk2 works, but first you have to gain access to the data system. If you know some Russian, and don’t mind a bit of dongle rewiring, this guide will have you hacking the car’s CAN bus in no time. It was written by [Preee] and he has already added Radio RDS and CD Track information to the speedometer display panel, implemented hands free control for his cellphone, disabled the sounds the car makes when he goes into reverse, changed the door locking speed from 5mph to 10mph, and much more.

To gain access to the system you need hardware to bridge from a computer to the CAN bus. He hit eBay and bought an ELM327 cable which plugs into the On-Board Diagnostics port (ODBII). There are two different ways these dongles can be configured and since this isn’t the right one for the Focus he had to alter it. His hardware changes are illustrated in the second post of the forum thread. Instead of just switching over to the other configuration, he wired up a toggle switch to select between the two.

With hardware in place he grabbed some software and started hacking away. But as we hinted above, it’s not as simple as you might think. The software is in Russian. [Preee] did his best to add translations to a few screenshots, but it’s still going to be a bit of a bother trying to find your way around the GUI.

[Thanks Fred]