[Charles] Tears Into A Ford Fusion Battery

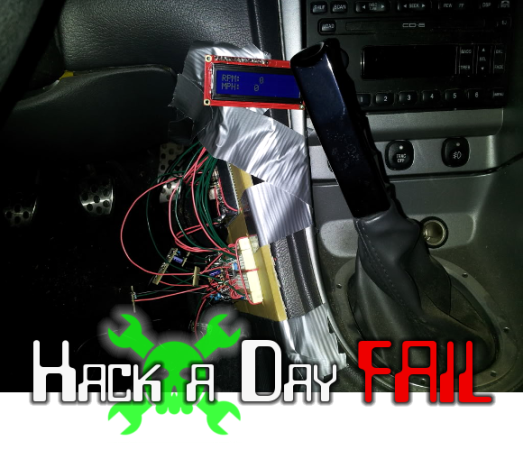
Any time we hear from [Charles Z. Guan], we know it’s going to be a good feature. When he’s linking us to a blog post with phrases like “If you touch the wrong spots, you will commit suicide instantly”, we know it will be a really good feature. [Charles] is no stranger to Hackaday – we’ve featured his GoKarts, Quadcopters, and scooters before. He was even generous enough to let a couple of Hackaday writers test drive ChibiKart around Maker Faire New York last year.

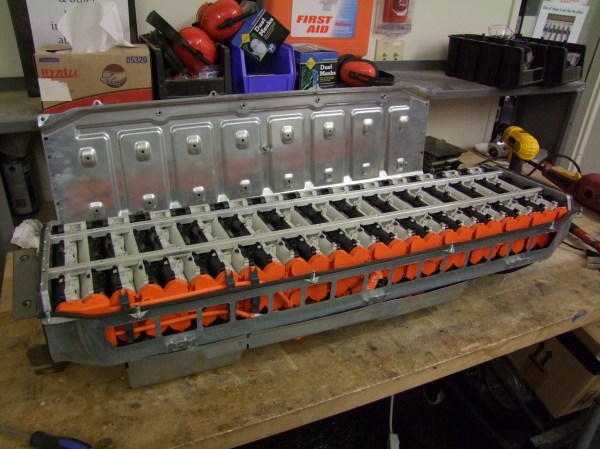
This time around, [Charles] is working on a power system for chibi-Mikuvan, his proposed entry of the Power Racing Series. He’s decided to go with a used battery from a hybrid vehicle. As these vehicles get older, the batteries are finally becoming available on the used market. [Charles] was able to pick up a 2010 Ford Fusion NiMh battery for only $300. These are not small batteries. At 20” wide by 48” long, and weighing in at 150 pounds, you’ll need 2 or 3 people to move one. They also pack quite a punch: 2.1kWh at 275V. It can’t be understated, taking apart batteries such as these gives access to un-fused lethal voltages. Electrocution, arcs, vaporized metal, fire, and worse are all possibilities. If you do decide to work with an EV or hybrid battery, don’t say we (and [Charles]) didn’t warn you.

As [Charles] began taking apart the battery, he found it was one of the most well thought out designs he’d ever seen. From the battery management computers to the hydrogen filled contactors, to the cooling fan controller, everything was easy to work on. The trick to disassembly was to pull the last module out first. Since all the modules are wired in series, removing the last module effectively splits the pack in half, making it much safer to work on. The battery itself is comprised of 28 modules. Each module contains two 4.8V strings of “D” cell sized NiMh batteries. The battery’s capacity rating is 8000 mAh, and [Charles] found they still took a full charge. Since he doesn’t need the pack just yet, [Charles] removed the final bus bars, rendering it relatively safe. Now that he has a power source, we’re waiting to see [Charles’] next stop on the road to chibi-Mikuvan.

Fail Of The Week: CAN-Bus Attached HUD For Ford Mustang

This edition of Fail of the Week is nothing short of remarkable, and your help could really get the failed project back on track. [Snipor Bob] wanted to replace all of the dashboard readouts on his Mustang and got the idea of making the hacked hardware into a Heads-Up Display. What you see above is simply the early hardware proof of concept for tapping into the vehicle’s data system. But there’s also an interesting test rig for getting the windshield glass working as a reflector for the readout.

Continue reading “Fail Of The Week: CAN-Bus Attached HUD For Ford Mustang”

Hacking The Computer Interface Of A Ford Focus Mk2

You can do some neat stuff to the way your Ford Focus Mk2 works, but first you have to gain access to the data system. If you know some Russian, and don’t mind a bit of dongle rewiring, this guide will have you hacking the car’s CAN bus in no time. It was written by [Preee] and he has already added Radio RDS and CD Track information to the speedometer display panel, implemented hands free control for his cellphone, disabled the sounds the car makes when he goes into reverse, changed the door locking speed from 5mph to 10mph, and much more.

To gain access to the system you need hardware to bridge from a computer to the CAN bus. He hit eBay and bought an ELM327 cable which plugs into the On-Board Diagnostics port (ODBII). There are two different ways these dongles can be configured and since this isn’t the right one for the Focus he had to alter it. His hardware changes are illustrated in the second post of the forum thread. Instead of just switching over to the other configuration, he wired up a toggle switch to select between the two.

With hardware in place he grabbed some software and started hacking away. But as we hinted above, it’s not as simple as you might think. The software is in Russian. [Preee] did his best to add translations to a few screenshots, but it’s still going to be a bit of a bother trying to find your way around the GUI.

[Thanks Fred]

Upgrading A Rockford Fosgate Punch 601s To An 801s With Just A Handful Of Parts

[Simon] had a Rockford Fosgate Punch 601s amplifier in his car, and while it was a great piece of equipment, he wanted a little more power behind his stereo system. It turns out that with just a handful of parts and a bit of soldering work, he was able to increase his amplifier’s output by 200 watts, putting it on par with a Punch 801s.

The main board in each amp is laid out identically, making the conversion a relatively easy process. A handful of MOSFETs need to be added, along with some resistors and capacitors. Most of the work can be done with a decent soldering iron, though you might want a hot air reflow station to handle the smaller resistors – it all depends on your skill set.

We’re really not sure how big the price difference is between the two amps, but we’re pretty certain that the conversion would be worth it. [Simon] sells conversion kits on his web site for under $60, but you may be able to find the parts for a bit less if you hunt around.

Hard Resetting Your Ford Touch System The Easy Way

ford-sync-reset

[Jeff Clymer] owns a Ford Focus, and while he’s generally happy with the car, the “My Ford Touch/Sync” system can be buggy at times. He spends a lot of time in the car each day, so when the entertainment center locks up as it is frequently known to do, he has to turn off the car and pull a fuse to reset the system. Since pulling a fuse while on the road is pretty impractical, he decided to install a reset button, making system reboots a breeze.

He started by disassembling various fuses until he found one with an easy to remove fusible link. Once it was in pieces, he soldered a pair of wires to the fuse terminals and connected everything to a normally closed momentary pushbutton switch. After adding an inline fuse holder and reinserting the original fuse, he installed the button into the back of his glove box

Now instead of physically removing the fuse each time his stereo locks up, he can simply push a button and be on his way. Here’s hoping a software fix is coming for [Jeff’s] car sooner rather than later!

OpenPnP Working To Create An Affordable And Completely Open Pick And Place Machine

open-pick-and-place

If you happen to do a lot of SMD work, a pick and place machine is an incredible time saver. The problem is that most automated pick and place solutions are well outside of the “small outfit” price range, let alone the budget of a hobbyist.

We have seen some great DIY pick and place implementations around here, though most are lacking professional features or the sort of documentation that would make it easy for others to replicate. The OpenPnP project is looking change things, with a completely open source hardware and software solution with a price target of under $1,000.

Things are already well under way, with plenty of details available in the project’s wiki. According to the development page, a prototype should go into construction in the near future, and development of the pick and place’s control software is coming along nicely.

While things are looking great for the OpenPnP project, they can always use some help to keep things moving. Be sure to check out the project page if you are interested in lending a hand.

To see some of the progress being made, stick around to see a short demo video of the control software and camera in action.

[via Make]

Continue reading “OpenPnP Working To Create An Affordable And Completely Open Pick And Place Machine”

Stanford’s Stickybot3

[youtube=http://www.youtube.com/watch?v=0y2MVuSyQlg]

Stickybot has gone through a pretty radical upgrade.  You may recall the gecko looking glass walking bot from all over the net. While it was pretty cool, the technology has gone much further. Not only is it designed to look like a gecko, the feet are actually made to adhere to surfaces in the same manner. They are using an adhesive system based off Van Der Waals forces.  Though the stickybot 3 doesn’t walk yet,  the feet are already impressive. Look how little of the foot is actually making contact with the glass. See how easily he can remove and re-adhere it? Simply amazing.