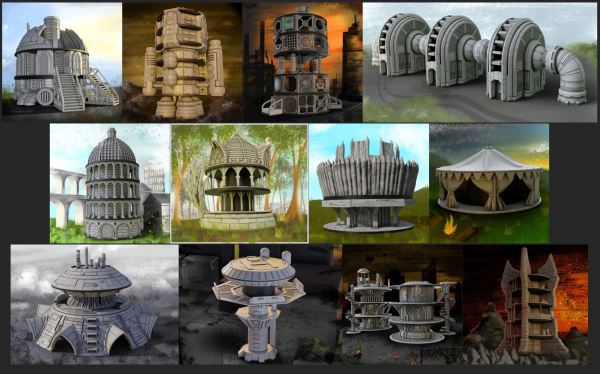
3D Printer Upcycles Computer Case To DAS

Storage technologies are a bit of an alphabet soup, with NAS, SAN, and DAS systems being offered. That’s Network Attached Storage, Storage Area Network, and Direct Attached Storage. The DAS is the simplest, just physical drives attached to a machine, usually in a separate box custom made for the purpose. That physical box can be expensive, particularly if you live on an island like [Nicholas Sherlock], where shipping costs can be prohibitively high. So what does a resourceful hacker do, particularly one who has a 3d printer? Naturally, he designs a conversion kit and turns an available computer case into a DAS.

There’s some clever work here, starting with the baseplate that re-uses the ATX screw pattern. Bolted to that plate are up to four drive racks, each holding up to four drives. So all told, you can squeeze 16 drives into a handy case. The next clever bit is the Voronoi pattern, an organic structure that maximizes airflow and structural strength with minimal filament. A pair of 140mm fans hold the drives at a steady 32C in testing, but that’s warm enough that ABS is the way to go for the build. Keep in mind that the use of a computer case also provides a handy place to put the power supply, which uses the pin-short trick to provide power.

Data is handled with 4 to 1 SATA to SAS breakout cables, internal to external SAS converters, and an external SAS cable to the host PC. Of course, you’ll need a SAS card in your host PC to handle the connections. Thankfully you can pick those up on ebay for $20 USD and up.

If this looks good, maybe check out some other takes on this concept!

Hand-Cranked Doodler Made Using A 3D Printer

3D printers are great at creating complex geometry out of plastic, and that geometry can often pull off some impressive tricks. [DaveMakesStuff] found a way to generate geometry that draws 2D shapes with a pen and some fancy cams, and it’s really fun to watch.

The build is relatively simple. It consists of a frame which holds a 3D-printed cam turned by a hand crank. That cam controls the movement of a pen in two dimensions, letting it draw all manner of shapes. Videos on Reddit demonstrate it drawing squares, figure eights, and stars, while on YouTube, it writes the phrase “CAM I AM.”

According to [DaveMakesStuff], he figured out how to create the cams with “hours and hours of tedious CAD work.” We imagine there’s a way to do this with maths instead in parametric modelling software, and await such a build on the Hackaday tipsline. Those eager to recreate the build can explore the files on Thingiverse.

We’ve seen some great 3D-printed mechanisms before, too, like this zig-zag cam for a sewing machine. Video after the break.

Continue reading “Hand-Cranked Doodler Made Using A 3D Printer”

A 2D Image Makes A 3D Print

When you imagine 3D printed art, it’s easy to envision the different kinds of sculptures and figurines posted online. While these projects take plenty of time and creativity on their own, [César Galera] shows us a different way to make 3D printed art by turning 2D images into fully textured 3D prints.

This project follows a similar technique that stems from lithophanes, which produces an image from light that passes through the object. [César] instead details in the video below the break how to use the ItsLitho tool to build completely opaque black and white images using a multicolored printer.

Lithophanes are built (or printed) by mapping topography to make light easier or harder to pass through in certain places. Areas that appear darker are thicker with more layers, and areas that appear lighter have less. It’s a nifty optical illusion, but these kinds of art blocks aren’t actually multicolored themselves.

The trick is to develop the 3D model using the lithophane tool first to create the different elevations (ensuring that the lowest elevation is still thick enough to be opaque), but retain the different colors on the model when it’s exported. Multi-colored 3D printers will then be able to add gray and black filament as it prints higher and higher elevation. If you don’t have a multi-colored printer, you can add pauses on the 3D print file to switch out filaments after a few layers to achieve a similar effect.

We’re always on the lookout to see the different things we can print, and being able to turn digital artwork into a 3D model is a great example!

Continue reading “A 2D Image Makes A 3D Print”

Resin Cleanup: A Sticky Situation

We’ll admit it. We like the results of resin 3D printing, but we don’t always care for the mess. We aren’t alone, and a common issue is to have drips of resin on your LCD screen — a potential disaster. You ought to have a screen protector, but yeah… you should back up hard drives, too. [Jessy] has the same problem and he has heard that you can easily clean cured resin from the screen using wood glue. Does it work? Check out the results of three glues in the video below.

We winced to see glue going on the screens. [Jessy] cured some resin on the screens deliberately for a test. He used Elmer’s wood glue, Gorilla wood glue, and Titebond II wood glue. While there is a bit of a price difference between the options, they are all fairly inexpensive.

Continue reading “Resin Cleanup: A Sticky Situation”

3D Printing For Textile Work

While it isn’t for everyone, some of the best creators we know are experts at working with textiles. While the art is ancient, it isn’t easy and requires clever tools. [Lauren] collected a few 3D prints that can help you with knitting, crochet, and even a knitting loom.

Some of the designs are pretty basic like the yarn bowl, or pretty easy to figure out like the simple machine for re-spooling wool. We were frankly surprised that you can 3D print a crochet hook, although the post does mention that breaking them is a real problem.

We were really impressed though, with the sock knitting machine. There are actually a few of these out there, and you can see a similar one in the video below. Of course, like a RepRap printer, it needs “vitamins” in the form of metal rods, fasteners, and the like. There’s also a  portable knitting loom which looked interesting.

We aren’t adept enough with fabric arts to know if these tools are serious contenders compared to commercial products, but we have to admit the sock knitting machine looks like it could be. We recently saw a sophisticated loom, although that might be a bit more than most people need. We have looked at open-source knitting machines, too. Of course, if you’d rather not create with textiles, you can always 3D print on them, instead.

Continue reading “3D Printing For Textile Work”

Full Transparency: Stronger FDM Prints

We always look forward to [Stefan’s] CNC Kitchen videos. They are usually useful, but always carefully thought out and backed with experimental data. His latest is about creating transparent and strong FDM prints. You normally don’t associate the FDM process with clear prints even with clear filament. The problem is the filament doesn’t lay down in a particular structure, so light scatters producing a sort of white color. However, [Stefan] found a post on Printables called “How to Print Glass” which changes the structure of the part and, of course, [Stefan] wanted to see if the process also led to stronger parts.

The process is slow and the basic idea is to use no top and bottom layers. The entire part is essentially infill. You also need to set the infill to go in the same direction for each layer. As [Stefan] mentions, there have been other efforts to make transparent parts, especially in vase mode. Of course, you can also get transparent parts using resin printing, although it isn’t always as easy as you might think.

Continue reading “Full Transparency: Stronger FDM Prints”

The Filamentmeter: For When You Absolutely Want To Count Every Meter Used

[ArduinoNmore] took an interesting approach to designing a counter intended to accurately display how many meters of filament a 3D printer has used. The Filamentmeter looks a little bit like a 3D printed handheld tally counter (or lap counter) but instead of a button to advance each digit, the readout represents how many meters of filament have gone through the extruder.

Driving the digit rotation from the extruder motor itself means that even retractions are accounted for.

At first glance it may look like there is a motor hidden inside, or that the device is somehow sensing the filament directly. But it’s actually the movement of the extruder motor that drives the device. A small spur gear attached to the printer’s extruder drives a series of gears that advance the digits. This means that retractions  — small reverses of the extruder motor during printing — are properly accounted for in the total, which is a nice touch.

[ArduinoNmore] designed this for the Ender 3, and the Filamentmeter relies on a specific extruder design and orientation to work properly. Of course, since it’s 3D printed, modifying the design for your own purposes should be pretty straightforward.

Curious? The design is being sold for a few bucks, and there is a free test piece one can print and use to confirm whether the design will work before mashing the buy button. Non-free printable 3D models can be a world of buyer beware, but test pieces and solid documentation are good ways to give buyers confidence in your work.

The insides of the unit are really quite intricate, with a clockwork-type elegance to them. You can see it all in the short video, embedded below.

Continue reading “The Filamentmeter: For When You Absolutely Want To Count Every Meter Used”