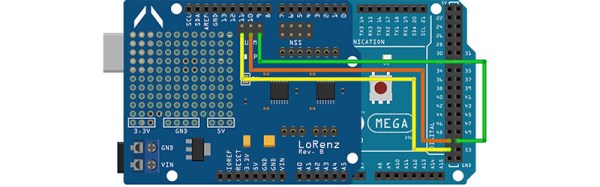
Keep An Eye On The Sky With RDuinoScope

We’ve all enjoyed looking up at a clear night sky and marveled at the majesty of the stars. Some of us have even pointed telescopes at particular celestial objects to get a closer view. Anyone who’s ever looked at anything beyond Jupiter knows the hassle involved.  It is most unfortunate that the planet we reside on happens to rotate about a fixed axis, which makes it somewhat difficult to keep a celestial object in the view of your scope.

It doesn’t take much to strap a few steppers and some silicon brains to a scope to counter the rotation of earth, and such systems have been available for decades. They are unfortunately quite expensive. So [Dessislav Gouzgounov] took matters into his own hands and developed the rDuinoScope – an open source telescope control system.

Based on the Arduino Due, the systems stores a database of 250 stellar objects. Combined with an RTC and GPS, the rDunioScope can locate and lock on to your favorite nebula and track it, allowing you to view it in peace. Be sure to grab the code and let us know when you have your own rDuinoScope set up!


Wireless Nunchuck R/C Remote!

[Dan], admirably rose to the occasion when his son wanted a new toy. Being a dedicated father — and instead of buying something new — he took the opportunity to abscond to his workbench to convert a Wiimote Nunchuck into a fully wireless controller for his son’s old r/c car — itself, gutted and rebuilt some years earlier.

Unpacking the nunchuck and corralling the I2C wires was simply done. From there, he combined a bit of code, an Arduino pro mini, and two 1K Ohm resistors to make use of an Aurel RTX-MID transceiver that had been lying around. Waste not, want not.

A TI Stellaris Launchpad is the smarts of the car itself, in concordance with a TB6612FNG motor controller. The two Solarbotics GM9 motors with some 3D printed gears give the car some much needed gusto.

Continue reading “Wireless Nunchuck R/C Remote!”

Everyone Loves Faster ESP8266 TFT Libs

Reader [Jasper] writes in with glowing praise for the TFT_eSPI library for the ESP8266 and the various cheap 480×320 TFT displays (ILI9341, ILI9163, ST7735, S6D02A1, etc.) that support SPI mode. It’s a drop-in replacement for the Adafruit GFX and driver libraries, so you don’t need to rework your code to take advantage of it. If you’re looking to drive an LCD screen with an ESP8266 and Arduino, check this out for sure.

As a testbed, [Jasper] ported his Tick Tock Timer project over to the new library. He got a sevenfold increase in draw speed, going from 500 ms to 76 ms. That’s the difference between a refresh that’s visibly slow, and one that looks like it happens instantly. Sweet.

Improving software infrastructure isn’t one of the sexiest or most visible hacks, but it can touch the lives of many hackers. How many projects have we featured with an ESP8266 and a screen? Thanks, [Bodmer] for the good work, and [Jasper] for bringing it to our attention.

Star Trek Desktop Viewer In The Palm Of Your Hand!

There’s building small computers — like the Raspberry Pi — and then there’s building small computers — like this Desktop Viewer from Star Trek.

[Monta Elkins] is using a Beetle for this project; it’s an Arduino clone, hosting the ATMega32U4 microcontroller, with a unique feature that allows you to twist connecting wires to secure them to the board. Instead, [Elkins] went with the logical choice of soldering them. For a display, he used a SPI serial OLED 128 x 64 monochrome screen which he has cycling through a number of iconic Star Trek TOS symbols and animations. The images were converted into PROGMEM  — which gets loaded into flash memory — before finally being uploaded to the Beetle.

Following some fine 3D print work in ABS plastic which rendered the Desktop Viewer’s case, [Elkins] used acetone to solvent-weld the pieces together and applied a quick coat of paint to finish it off. This little replica would make a great desktop gadget as it requires a micro-USB to power the device.

Continue reading “Star Trek Desktop Viewer In The Palm Of Your Hand!”

PlatformIO And Visual Studio Take Over The World

In a recent post, I talked about using the “Blue Pill” STM32 module with the Arduino IDE. I’m not a big fan of the Arduino IDE, but I will admit it is simple to use which makes it good for simple things.

I’m not a big fan of integrated development environments (IDE), in general. I’ve used plenty of them, especially when they are tightly tied to the tool I’m trying to use at the time. But when I’m not doing anything special, I tend to just write my code in emacs. Thinking about it, I suppose I really don’t mind an IDE if it has tools that actually help me. But if it is just a text editor and launches a few commands, I can do that from emacs or another editor of my choice. The chances that your favorite IDE is going to have as much editing capability and customization as emacs are close to zero. Even if you don’t like emacs, why learn another editor if there isn’t a clear benefit in doing so?

There are ways, of course, to use other tools with the Arduino and other frameworks and I decided to start looking at them. After all, how hard can it be to build Arduino code? If you want to jump straight to the punch line, you can check out the video, below.

Continue reading “PlatformIO And Visual Studio Take Over The World”

Flux Capacitor Prop With Christopher Lloyd’s Stamp Of Approval

We love our props here at Hackaday, and whenever we come across a piece from the Back To The Future fandom, it’s hard to resist showcasing it. In this case, [Xyster101] is showing of his build of Doc Brown’s Flux Capacitor.

[Xyster101] opted for a plywood case — much more economical than the $125 it would have cost him for a proper electrical box. Inside, there’s some clever workarounds to make this look as close as possible to the original. Acrylic rods and spheres were shaped and glued together to replicate the trinity of glass tubes, 3/4″ plywood cut by a hole saw mimicked the solenoids, steel rods were sanded down for the trio of points in the centre of the device and the spark plug wires and banana connectors aren’t functional, but complete the look. Including paint, soldering and copious use of hot glue to hold everything in place, the build phase took about thirty hours.

The LEDs have multiple modes, controlled by DIP switches hidden under a pipe on the side of the box. There’s also motion sensor on the bottom of the case that triggers the LEDs to flicker when you walk by. And, if you want to take your time-travel to-go, there’s a nine volt plug to let you show it off wherever — or whenever — you’re traveling to. Check out the build video after the break.

Continue reading “Flux Capacitor Prop With Christopher Lloyd’s Stamp Of Approval”

Hackaday Prize Entry: [Nardax] Shoots Fireballs

If you’re looking for a high entertainment value per byte of code, [Nardax] has you covered with his wearable spellcasting controller. With not much effort, he has built a very fun looking device, proving what we’ve always known: a little interaction can go a long way.

[Nardax] originally intended his glorified elbow-mount potentiometer to be a fireworks controller. Ironically, he’s now using it to throw virtual fireballs instead. Depending on the angle at which he holds his elbow before releasing it, he can cast different spells in the game World of Warcraft. We’re not at all sure that it helps his gameplay, but we’re absolutely sure that it’s more fun that simply mashing different keys.

There’s a lot of room for expansion here, but the question is how far you push it. Sometimes the simplest ideas are the best. It looks like [Nardax] is enjoying his product-testing research, though, so we’ll keep our eyes out for the next iterations of this project.

We’ve seen a number of high-tech competitors to the good old power glove, and although some are a lot more sophisticated than a potentiometer strapped to the elbow, this project made us smile. Sometimes, it’s not just how much tech you’ve got, but how you use it. After all, a DDS pad is just a collection of switches under a rug.