Bring Home A Classic Synth With The DIY Fairlight CMI

[Davearneson] built a modern version of a classic synthesizer with his DIY Fairlight CMI. If there were a hall of fame for electronic instruments, the Fairlight CMI would be on it. An early sampling synth with a built-in sequencer, the Fairlight was a game changer. Everyone from A-ha to Hans Zimmer has used one. The striking thing about the Fairlight was the user interface. It used a light pen to select entries from text menus and to interact with the audio waveform.

The original Fairlight units sold for £18,000 and up, and this was in 1979. Surviving units are well outside the price range of the average musician. There is an alternative though – [Peter Vogel] has released an iOS app which emulates the Fairlight.

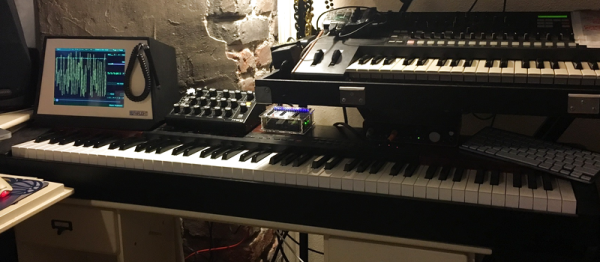
[Davearneson] had an old iPad 2 lying around. Too slow to run many of the latest apps, but just fast enough to run the Fairlight app. An iPad doesn’t exactly look like a classic instrument though. So he broke out the tools and created a case that looked the part.

The front of the case is made of framing mat board. The rest of the shell is wood. [Davearneson] used Plasti-Dip spray to replicate the texture of 1970’s plastics. The audio interface is a Griffon unit, which provides audio and MIDI connections. [Davearneson] extended the connections from the Griffon to the rear of the case, making for a clean interface.

The iPad doesn’t exactly support a light pen, so a rubber tipped stylus on a coil cord takes it place. The result is a device that looks and works like a Fairlight – but doesn’t need a steady diet of 8″ floppy discs to operate.

Interested in classic digital synthesizers that are a bit more budget friendly? Check out Al Williams’ article on the SID chip, or this 3D printed synth based upon the 4046 PLL chip.

Run From The Sound Of Footsteps In Blind Game Of Tag

The human auditory system is a complex and wonderful thing. One of its most useful features is the ability to estimate the range and direction of sound sources – think of the way people instinctively turn when hearing a sudden loud noise. A team of students have leveraged this innate ability to produce a game of tag based around nothing but sound.

The game runs on two FPGAs, which handle the processing and communication required. The chaser is given a screen upon which they can see their own location and that of their prey. The target has no vision at all, and must rely on the sounds in their stereo headphones to detect the location of the chaser and evade them as long as possible.

The project documentation goes into great detail about the specifics of the implementation. The game relies on the use of the Head Related Transfer Function – a function related to how the ear picks up sounds relative to their position. This allows the FPGA to simulate the chaser’s footsteps, and feed the audio to the target who perceives the chaser’s position purely by sound.

It’s a great example of a gameplay mechanic that we’d love to see developed further. The concept of trying to find one’s way around by hearing alone is one which we think holds a lot of promise.

With plenty of processing power under the hood, FPGAs are a great choice for complex audio projects. A great project to try might be decoding MP3s.


Google Home Meets ESP8266

[Luc Volders] is building his own smart house with the help of Google Home and an ESP-8266. Inspired by the house computers from the TV show, Eureka [Luc] created an IoT ecosystem using a mix of off the shelf devices and open source software.

There are about a thousand ways to create a DIY smart home these days. All of them involve setting up a command receiver (like Amazon’s Echo or Google Home), some sort of cloud connection, and an end device controller. This can get complex for the beginner. [Luc’s] article is great because he walks is through each step tutorial style. He even keeps things simple by programming the ESP8266 using BASIC with ESP-BASIC.

[Luc] uses If This Then That (IFTT) as his cloud service. IFTT is the glue between Google’s cloud service and the ESP8266 connected to his home WiFi network. Speaking of which, [Luc] shows how to set up port forwarding on the router so all accesses to port 8085 go to the ESP8266. Not exactly strong security – but it’s better than opening the entire home network.

You don’t need a real Google home device for this hack. You can build your own with a Raspberry Pi. Once that is set up you can do everything from turning on lights to watering your lawn.

Continue reading “Google Home Meets ESP8266”

Arise, Chicken, Arise!

A couple of months ago, [Mike] started saving bones from all the fried chicken he had been eating. If that’s the opening line, you know it’s going to be good.

This Cyborg Chicken project grew out of [Mike]’s love for battlebots, and an immense dearth of battleborgs. The difference, though small, is distinct: a robot is simply a machine that carries out instructions either automatically or via remote control. A cyborg, on the other hand, contains both organic and biomechatronic body parts. Since [Mike] was saving chicken bones, he stumbled upon the idea of creating a cyborg out of trash, a few servos, an MSP430, and some other parts sitting around in his junk drawer.

A continuation of an earlier remote controlled food project, the capabilities of these chicken battleborgs are about what you would expect: they roll around on wheels and flail their drumsticks wildly. [Mike] has already built at least two of these devices, and the result is accurately described as Rock ’em Sock ’em Borgs. Check out the video below for the action.

On the hardware side of things, [Mike] picked up an MSP430, and whipped up a bit of code in Java. Three billion enterprise computing systems and, now, two cyborg chickens run Java. The motors and drivers come from Pololu, and control is provided over IR with a pair of Atari joysticks.

You can check out the videos of these cyborg chickens below. If you have to ask why, the answer is always, ‘because’.

Continue reading “Arise, Chicken, Arise!”

Hackaday Prize Entry: Rangefinder + Camera = SmartZoom

The interesting thing about submissions for The Hackaday Prize is seeing unusual projects and concepts that might not otherwise pop up. [ken conrad] has a curious but thoughtfully designed idea for Raspberry Pi-based SmartZoom Imaging that uses a Pi Zero and camera plus some laser emitters to create a device with a very specific capability: a camera that constantly and dynamically resizes the image make the subject appear consistently framed and sized, regardless of its distance from the lens. The idea brings together two separate functions: rangefinding and automated zooming and re-sampling of the camera image.

The Raspberry Pi uses the camera board plus some forward-pointing laser dots as a rangefinder; as long as at least two laser dots are visible on the subject, the distance between the device and the subject can be calculated. The Pi then uses the knowledge of how near or far the subject is to present a final image whose zoom level has been adjusted to match (and offset) the range of the subject from the camera, in effect canceling out the way an object appears larger or smaller based on distance.

We’ve seen visible laser dots as the basis of rangefinding before, but never tied into a zoom function. Doubtlessly, [ken conrad] will update his project with some example applications, but in the meantime we’re left wondering: is there a concrete, practical use case for this unusual device? We have no idea, but we’d certainly have fun trying to find one.

The Textile Bench

What’s on your bench? Mine’s mostly filled with electronic test equipment, soldering kit, and computers. I’m an electronic engineer by trade when I’m not writing for Hackaday, so that’s hardly surprising. Perhaps yours is like mine, or maybe you’ve added a 3D printer to the mix, a bunch of woodworking tools, or maybe power tools.

So that’s my bench. But is it my only bench? On the other side of the room from the electronics bench is a sturdy folding dining table that houses the tools and supplies of my other bench. I’m probably not alone in having more than one bench for different activities, indeed like many of you I also have a messy bench elsewhere for dismantling parts of 1960s cars, or making clay ovens.

My textile bench, with a selection of the equipment used on it.

The other bench in question though is not for messy work, in fact the diametric opposite. This is my textile bench, and it houses the various sewing machines and other equipment that allow me to tackle all sorts of projects involving fabric. On it I’ve made, modified, and repaired all sorts of clothing, I’ve made not-very-successful kites, passable sandals, and adventurous tent designs among countless other projects.

Some of you might wonder why my textile bench is Hackaday fodder, after all it’s probably safe to assume that few readers have ever considered fabricating their own taffeta ball gown. But to concentrate only on one aspect of textile work misses the point, because the potential is there for so much cross-over between these different threads of the maker world. So I’m going to take you through my textile bench and introduce you to its main tools. With luck this will demystify some of them, and maybe encourage you to have a go.

Continue reading “The Textile Bench”

Go Big Or Go Home: A Tablecloth Touchpad

Phone screens keep getting bigger. Computer screens keep getting bigger. Why not a large trackpad to use as a mouse? [MaddyMaxey] had that thought and with a few components and some sewing skills created a trackpad in a tablecloth.

The electronics in this project are right off the shelf. A Flora board for the brains and 4 capacitive touch boards. If you haven’t seen the Flora, it is a circular-shaped Arduino made for sewing into things. The real interesting part is the construction. If you haven’t worked with conductive fabric and thread, this will be a real eye-opener. [Maddy’s] blog has a lot of information about her explorations into merging fabric and electronics and also covers things like selecting conductive thread.

As an optional feature, [MaddyMaxey] added vibration motors that provide haptic feedback to her touchpad. We were hoping for a video, but there doesn’t seem to be one. The code is just the example program for the capacitive sensor boards, although you can see in a screenshot the additions for the haptic motors.

We’ve covered the Flora before, by the way. You could also make a ridiculously large touch surface using tomography, although the resolution isn’t quite good enough for mouse purposes.