Defeating Chip And PIN With Bits Of Wire

One of many ways that Americans are ridiculed by the rest of the world is that they don’t have chip and PIN on their credit cards yet; US credit card companies have been slow to bring this technology to millions of POS terminals across the country. Making the transition isn’t easy because until the transition is complete, the machines have to accept both magnetic stripes and chip and PIN.

This device can disable chip and PIN, wirelessly, by forcing the downgrade to magstripe. [Samy Kamkar] created the MagSpoof to explore the binary patterns on the magnetic stripe of his AmEx card, and in the process also created a device that works with drivers licenses, hotel room keys, and parking meters.
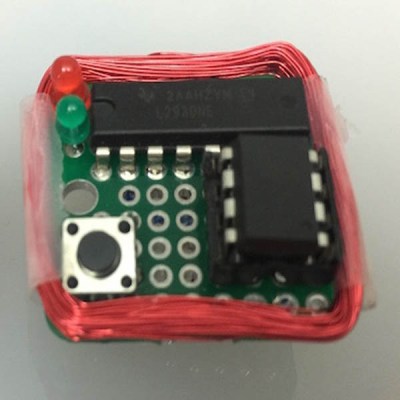
magspoofThe electronics for the MagSpoof are incredibly simple. Of course a small microcontroller is necessary for this build, and for the MagSpoof, [Samy] used the ATtiny85 for the ‘larger’ version (still less than an inch square). A smaller, credit card-sized version used an ATtiny10. The rest of the schematic is just an H-bridge and a coil of magnet wire – easy enough for anyone with a soldering iron to put together on some perfboard.
By pulsing the H-bridge and energizing the coil of wire, the MagSpoof emulates the swipe of a credit card – it’s all just magnetic fields reversing direction in a very particular pattern. Since the magnetic pattern on any credit card can be easily read, and [Samy] demonstrates that this is possible with some rust and the naked eye anyway, it’s a simple matter to clone a card by building some electronics.

[Samy] didn’t stop there, though. By turning off the bits that state that the card has a chip onboard, his device can bypass the chip and PIN protection. If you’re very careful with a magnetized needle, you could disable the chip and PIN protection on any credit card. [Samy]’s device doesn’t need that degree of dexterity – he can just flip a bit in the firmware for the MagSpoof. It’s all brilliant work, and although the code for the chip and PIN defeat isn’t included in the repo, the documents that show how that can be done exist.

[Samy]’s implementation is very neat, but it stands on the shoulders of giants. In particular, we’ve covered similar devices before (here and here, for instance) and everything that you’ll need for this hack except for the chip-and-PIN-downgrade attack are covered in [Count Zero]’s classic 1992 “A Day in the Life of a Flux Reversal“.

Thanks [toru] for sending this one in. [Samy]’s video is available below.

Continue reading “Defeating Chip And PIN With Bits Of Wire”

Electronic Float Valve Keeps The Horse’s Feet Dry

[Bob] built this simple device that can best be described as an electronic float valve. He was wasting a lot of water from overflowing water troughs and buckets around his farm. He would usually put the hose in the container, turn on the water valve and carry on with his work. By the time he remembered to come back, the area would be flooded. It’s obvious that there’s many different ways to solve a problem. For example, a simple mechanical float valve might have worked, but it’s not horse friendly and liable to get damaged soon.

The electronics is unabashedly minimal. An ATtiny85 controls a relay via a common variety NPN transistor. The relay in turn switches the solenoid valve. A push-button tells the microcontroller to start the water flowing, and when the water level gets high enough that it touches two hose clamps, the micro shuts it off again.

There’s some ghetto engineering going on here. The electronics is driven by a 9V battery, although the relay and the solenoid valve that [Bob] used are both rated for 12V. He’s not even using any sort of voltage regulation for the ATtiny, but instead dropping the voltage with a resistor divider. (We wonder about battery life in the long run.)

He built all of it on perf board and stuffed it inside a small enclosure, with two wires coming out for the level sensor and another two for the solenoid, and it seems to work. Check the video below where [Bob] walks through his build.

While some may point out the many short comings in this build, [Bob] found the one solution that works for him. Sometimes the right solution is what you’ve got on hand, and we’re glad he’s hacking away and sharing his work. And check out this wireless water level sensor that he built some time back.

Continue reading “Electronic Float Valve Keeps The Horse’s Feet Dry”

Teach An ATTiny 85 To Swear

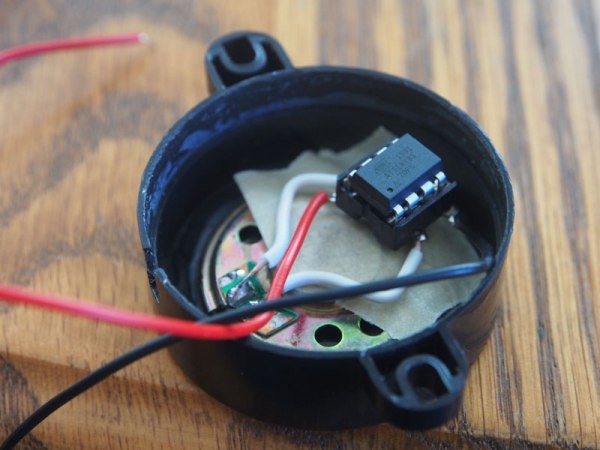
Let’s be honest here: one of the first things we all did when we came across speech synthesizers like the Speak-n-spell was to try swear words. [Alec Smecher] has taken this to heart, building a simple buzzer mechanism driven by an ATTiny 85 that swears repeatedly when you connect it. It is a rather simple project (or, as [Alec] himself says, it is “a satisfyingly minimalist build”), but it is quite nicely done.

The 8kHz speech sample (taken from Google Translate) is stored in the code, and written out to one of the PWM outputs of the ATTiny85 from a timing loop to directly drive the small speaker. So, all that is needed is the buzzer case, a small speaker, the ATTiny85, a power source and a few bits of wire. It’s a great example of a minimalist design: the ATTiny85 can just about drive the speaker directly, and can be run directly from batteries without requiring a power controller. Sometimes it pays to keep things simple, especially when it comes to swearing. 

Continue reading “Teach An ATTiny 85 To Swear”

A Thousand LED Lights For Your Room

Sure, you could get a regular light fixture like a normal person… Or you could use close to a thousand RGB LEDs to light your room!

That’s what [Dmitry] decided to do after trying to figure out the best way to light his pad. You see, his room is 4 by 4 meters, and WS2812 RGB LED strips happen to come in 4 meter lengths… Coincidence? We think not.

The problem with using 16 meters of LED strips is powering them… You see, at 16 meters, you’re looking at about 5V @ 57.6A — and we’re guessing you probably don’t have a 5V 60A power supply handy. Not to mention if you run them in series, the resistance of the system is going to kill your efficiency and the last LEDs probably won’t even work… So [Dmitry] had to break the system up. He has two power supplies feeding the strips from the middle of each pair — that way, he doesn’t have to worry about any voltage drops due to the length of the strips.

Continue reading “A Thousand LED Lights For Your Room”

relay

Controlling Mains Power Rube Goldberg Style

[g3gg0] has some nice radio equipment including an AOR AR-5000 receiver and a HiQ SDR. They are so nice that it appears they lack an on/off switch. [g3gg0] grew tired of unplugging the things, and decided to nerdify his desk with a switch that would turn his setup on and off for him. He decided to accomplish this task by emulating the Scroll, Number and Caps Lock LEDs on his keyboard via a Digispark board. He uses the LEDs to issue commands to the Digispark allowing him to control a 5V relay, which sits between it and the AC.

Starting off with some USB keyboard emulation code on the Digispark, he tweaked it so he could use the Scroll Lock LED as sort of a Chip Select. Once this is pressed, he can use the Caps Lock and the Number Lock LED to issue commands to the Digispark.

It’s programmed to only stay on for a total of 5 hours in case he forgets to turn it off. Let us know what you think about this interesting approach.

Sense Hat Lights Up Pi

One of our chief complaints about the Raspberry Pi is it doesn’t have a lot of I/O. There are plenty of add ons, of course to expand the I/O capabilities. The actual Raspberry Pi foundation recently created the Sense Hat which adds a lot of features to a Pi, although they might not be the ones we would have picked. The boards were made for the AstroPi project (the project that allowed UK schools to run experiments in space). They don’t appear to be officially for sale to the public yet, but according to their site, they will be selling them soon. Update: Despite some pages on the Raspberry Pi site saying they aren’t out yet, they apparently are.

Continue reading “Sense Hat Lights Up Pi”

A Tale Of Three Soldering Iron Controllers

[ZL2PD] needed to replace an old Weller soldering station and decided not to go with one of the cheap soldering stations you can find all over the Internet. He has a long story about why he had to design his own controller, but you never have to explain that to us. He kept detailed notes of his journey and in the end, he built three different controllers before settling on one.

He started with a Hakko hand piece that uses a thermistor for temperature measurements. The first iteration of the controller had analog controls. He wasn’t happy with the number of parts in the design and the simple LED display. That led him to replace the controller with an ATTiny CPU and a use a serial LCD.

Continue reading “A Tale Of Three Soldering Iron Controllers”