A while ago, [Steve] over at Big Mess ‘O Wires created a device that would emulate old Macintosh disk drives, storing all the data on an SD card. No, it’s not SCSI; the early Apples had a DB-19 connector for connecting 400 and 800kB disk drives. It’s a great piece of hardware for bootstrapping that old Mac you might have sitting around. Apple ][s, IIs, and //s use an extremely similar connector for their disk drives. A few rumors on some forums led [Steve] to experiment with some ancient bromide-stained boxes, and the results are interesting to say the least.
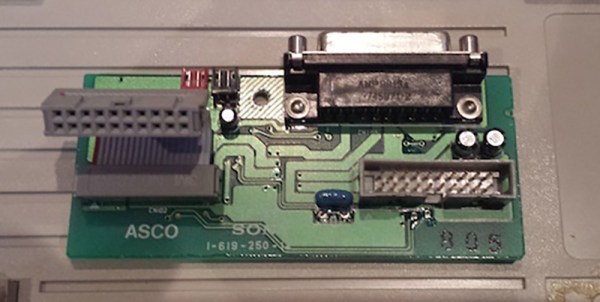
After pulling out an old //e and IIgs from storage, [Steve] found his Macintosh Floppy Emulator didn’t work with the Apples. This was due to the way Apples could daisy chain their disk drives. There’s an extra enable signal on the connector that either brings Drive 1 or Drive 2 into the circuit. Macs don’t care about this signal, but Apples do. Luckily the 800kB drives for the IIgs have an extra board that handles this daisy chain and drive eject circuitry.
After removing this extra board from a IIgs drive and connecting it to the Floppy Emu, everything worked beautifully. With schematics and a working circuit in hand, it’s now a piece of cake to build an adapter board for using the Macintosh Floppy Emu with Apples, or to build that circuit into a future revision of the Floppy Emulator.
Considering how much trouble [Steve] had bootstrapping these Apples without an SD card to Floppy drive emulator, we’re thinking this is great. The current way of making an Apple II useful is ADTPro, a program that uses audio to communicate with Apples over the cassette port. In case you haven’t noticed, microphone and headphone ports on laptops are inexplicably disappearing, making a hardware device like a SD card floppy emulator the best way to bring disk images to 30-year-old hardware.