A Proof Of Concept Flash Cart For The WonderSwan

Unless you’ve been to Japan or are fairly deep into the retro game collecting, you’ve probably never heard of the WonderSwan. It’s a handheld console, released after the Game Boy Color was beginning to show its age, and a bit before the introduction of the Game Boy Advance. It sold rather well in the only country it was released in, the game library is somewhat impressive, and there are quite a few homebrew games. Actually running these homebrew games is a challenge, though: each WonderSwan has a memory controller that maps the game ROM into the CPU’s memory. Without knowing how this controller chip works, the only way to run a homebrew cartridge is to turn on the machine with a real cart, go to the system menu, and swap the carts out. It turns out there’s a better solution, that includes programming CPLDs and looking at the output of a logic analyzer.

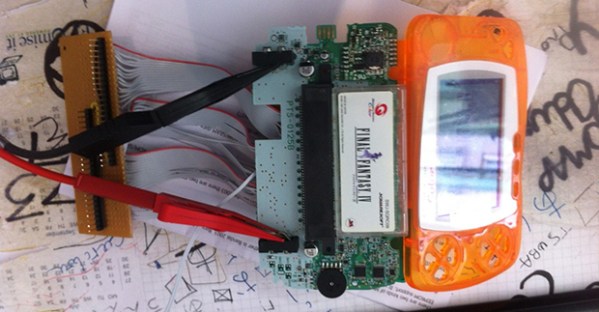
The first step towards [Godzil]’s efforts to create a Flash cart for the WonderSwan is to figure out the pinout of the cartridge connector – something that isn’t well documented for a system without a homebrew hardware scene. This was done in the usual way; with a lot of ribbon cable and patience This only provided an incomplete picture of how the WonderSwan interfaced with its carts, but after digging up an official development board, [Godzil] was able to make sense of all the signals.

After building a breakout board for the cartridge port, [Godzil] connected a DE0 Nano FPGA board and looked at all the signals. With just a little bit of VHDL, the memory controller could be reverse engineered and reimplemented. [Godzil] has his proof of concept working – video below – and the next part of his project will be to turn this into a proper Flash cart.

Continue reading “A Proof Of Concept Flash Cart For The WonderSwan”

This Home-Made 6-Axis Robotic Arm Is Quite The Looker

With a background in software engineering, [Kris Temmerman] decided to make a physical demonstration of his knowledge in the form of a six axis robotic arm… the final product is a delicious display of mechanical eye candy.

Built from mostly aluminum stock, [Kris] machined the bulk of his parts with a CNC mill which he picked up for cheap from China. These custom pieces coupled with some hefty stepper motors ensure the arm’s accuracy as it twists freely and slides along the gantry it’s mounted to. Though the majority of the arm is metal, the hand at the end of his robot was built with 3D printed parts and can be switched out with the future attachments [Kris] plans to design. This classic gripper piece is driven separately with its own Arduino brain controlling the individual servos in the fingers. loadcels

Each finger includes some load bearing sensors which [Kris] harvested from an old scale so that the gripper can tell whether or not it has a hold of an object without crushing it. To orchestrate the robot’s movement, he wrote some nice looking software in C++ which visualizes the inverse kinematics at work in each point of articulation. For the sake of demonstrating his creation in action, he whipped up a basic demo that can locate and move colored blocks laid at random on a surface. A small camera mounted on the hand determines the orientation of the blocks relative to the machine so that the wrist can rotate itself in the proper alignment in order to pick them up.

[Kris] documented the build of his robot in a fascinating speed video which includes footage of the finished arm in action at the end:

Continue reading “This Home-Made 6-Axis Robotic Arm Is Quite The Looker”

Make Flexible PCBs With Your 3D Printer

The last few years have seen great strides in budget printed circuit board manufacturing. These days you can have boards made in a week for only a few dollars a square inch. Flexible PCBs still tend to be rather expensive though. [Mikey77] is changing that by making flex circuits at home with his 3D printer. [Mikey77] utilized one of the properties of Ninjaflex Thermoplastic Elastomer (TPE) filament – it sticks to bare copper!

The TPE filament acts as an etch resist, similar to methods using laser printer toner. For a substrate, [Mikey77] lists 3 options:

.004″ thick “Scissor cut” copper clad board from Electronics Goldmine

.002″ thick pure copper polyester taffeta fabric from lessEMF.com

<.001″ Pyralux material from Adafruit, which is one of the materials used to make professional flex PCBs.

A bit of spray adhesive will hold the Flex PCB down on the printer’s bed. The only issue is convincing the printer to print a few thousandths of an inch higher than the actual bed level. Rather than change the home position on his Z axis, [Mikey77] used AutoDesk 123D to create 3D PCB designs. Each of his .stl files has a “spacer bar”, which sits at the bed level. The actual tracks to be printed are in the air a few thousandths of an inch above the bed – exactly the thickness of the substrate material. The printer prints the spacer bar on the bed, then raises its Z height and prints on the flexible PCB material. We’re sure that forcing the printer to print in mid-air like this would cause some printer software to throw errors, but the system worked for [Mikey77] and his Makerbot.

Once the designs have been printed, the boards are etched with standard etching solutions such as ferric chloride. Be careful though – these thin substrates can etch much faster than regular PCB.

Retrotechtacular: Fire Control Computers In Navy Ships

Here is a two-part Navy training film from 1953 that describes the inner workings of mechanical fire control computers. It covers seven mechanisms: shafts, gears, cams, differentials, component solvers, integrators, and multipliers, and does so in the well-executed fashion typical of the era.

Fire control systems depend on many factors that occur simultaneously, not the least of which are own ship’s speed and course, distance to a target, bearing, the target’s speed and course if not stationary, initial shell velocity, and wind speed and direction.

The mechanisms are introduced with a rack and pinion demonstration in two dimensions. Principally speaking, a shaft carries a value based on revolutions. From this, a system can be geared at different ratios.

Cams take this idea further, transferring a regular motion such as rotation to an irregular motion. They do so using a working surface as input and a follower as output. We are shown how cams change rotary motion to linear motion. While the simplest example is limited to a single revolution, additional revolutions can be obtained by extending the working surface. This is usually done with a ball in a groove.

Continue reading “Retrotechtacular: Fire Control Computers In Navy Ships”

New To The Store: Bulbdial Clock And Free Shipping Option

New to the Hackaday Store today is the Bulbdial Clock by Evil Mad Scientist Laboratories. I’ve had my eye on this kit for years and finally pulled the trigger after visiting [Lenore] and [Windell] at their shop a few weeks back. Assembling the beautifully-engineered kit was a delight, and I have a handful of hacks I’d like to try out — some of which I mentioned in the product description.

Free shipping based on order price

We always listen to what the Hackaday community has to say. After receiving several requests for better international shipping prices we came up with a way to ease the pain for orders no matter where they are headed. All domestic orders totaling $25 or more now receive free shipping. All international orders totaling $50 or more now receive free shipping.

Is there anything else you’d like to see different about the store? How about a hackable product you think we should stock? We’re listening via the store contact form.

GaTech's Invention Studio

Adventures In Hackerspacing: GA Tech’s Invention Studio

We feature hacker/makerspaces of all kinds here at Hackaday, and these days, encountering a hackerspace at a college or university isn’t uncommon. School-backed spaces are often mildly impressive, too, with plenty of room and better-than-most equipment.

Georgia Tech’s Invention Studio, however, is different. This space is nothing short of staggering.

Once you’ve walked past the wall of commercial-grade 3D printers lining the entryway, you’ll find yourself in the Electro-lounge, a general meeting and hangout room with some basic tools. Each room beyond has a specific purpose, and is packed full of equipment. We aren’t just going on a tour, though, because this is Adventures in Hackerspacing. Click through the break for a behind-the-scenes look at how this hackerspace provides a top-rate experience for its makers and how Invention Studio thrives with an entirely student-run leadership.

Continue reading “Adventures In Hackerspacing: GA Tech’s Invention Studio”

SAINTCON Badge (Badge Hacking For Mortals)

[Josh] attended his first SAINTCON this weekend before last and had a great time participating in the badge hacking challenge.

The 2014 SAINTCON is only the second time that the conference has been open to the public. They give out conference badges which are just an unpopulated circuit board. This makes a lot of sense if you figure the number of people who actually hack their badges at conferences is fairly low. So he headed off to the hardware hacking village to solder on the components by hand — it’s an Arduino clone.

This is merely the start of the puzzle. We really like that the published badge resources include a crash course on how to read a schematic. The faq also attests that the staff won’t solder it for you and to get your microcontroller you have to trade in your security screw (nice touch). Once up and running you need to pull up the terminal on the chip and solve the puzzles in the firmware’s menu system. This continues with added hardware for each round: an IR receiver, thermistor, EEPROM, great stuff if you’re new to microcontrollers.

[Josh] mentions that this is nothing compared to the DEFCON badge. Badge hacking at DEFCON is **HARD**; and that’s good. It’s in the top-tier of security conferences and people who start the badge-solving journey expect the challenge. But if you’re not ready for that level of puzzle, DEFCON does have other activities like Darknet. That is somewhere in the same ballpark as the SAINTCON badge — much more friendly to those just beginning to developing their crypto and hardware hacking prowess. After all, everyone’s a beginner at some point. If that’s you quit making excuses and dig into something fun like this!