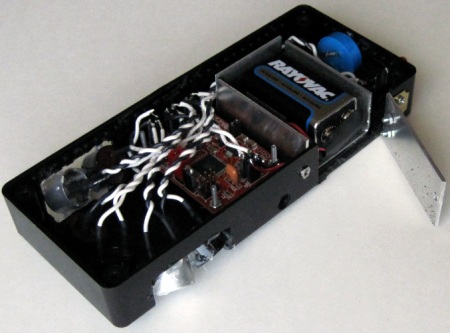
It’s possible that it was [Matt Meerian]’s awesome pun that won us over, not his ultrasonic bicycle dog defense system, but that would be silly. [Matt] wanted an elegant solution to a common problem when riding a bicycle, dogs. While, obscenities, ammonia, water, pepper spray, and others were suggested, they all had cons that just didn’t appeal to [Matt]. He liked the idea of using C02 powered high pressure sound waves to chase the dogs away with, but decided to choose a more electronic approach. He used a Atmel ATmega644 as the MCU, four 25kHz transmitters, and two 40kHz transmitters. When the rider sees a dog he simply flips a switch and it activates the transducers (along with, cleverly, a human audible horn so he doesn’t have to look down to know it’s working). So far [Matt] has not had a dog chase him in order to test it’s efficacy, but his cat clearly seems unaffected by the device as you can see after the break. Continue reading “Defense Against The Dog Arts”
classic hacks2801 Articles
Small RC Car, Full Size Controller
[Noah Farrington] sent in his latest hack over at his intensely interesting blog; converting a racing wheel arcade controller to a remote control for his RC car. He picked up the arcade controller for free, and decided it would be much cooler to control an RC car he had handy with it. He elected not to use an Arduino for this project *gasp* ,and do it all with hard logic. He did, however, use the Arduino in the design process *phew* in order to figure out the working of the RC control board. The final board is pretty simple compared to the Arduino solution, a few op-amps, a voltage regulator, and some passive components. Not bad at all for what [Noah] claims is one of his first big projects. Maybe he’ll post a video of it in action some time soon.
ATX Benchtop Conversion Retains Safety Features, Delivers Plenty Of Current.

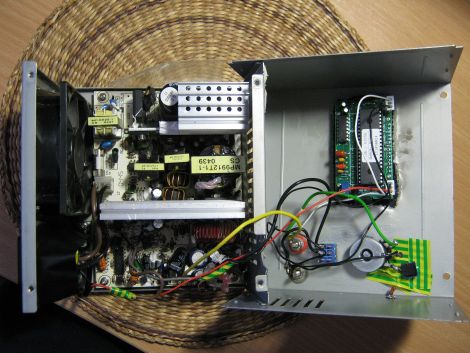
[Bogin] was looking to add a benchtop power supply to his array of tools, but he didn’t really find any of the online tutorials helpful. Most of what he discovered were simple re-wiring jobs utilizing LM317 regulators and shorted PS-ON pins used to keep the PSUs happily chugging along as if nothing had been changed. No, what [Bogin] wanted was a serious power supply with short circuit protection and loads of current.
He started the conversion by disassembling a 300 watt ATX power supply that uses a halfbridge design. After identifying the controller chip, a TL494 in this case, he proceeded to tweak the PWM feedback circuit which controls the supply’s output. A few snips here, a few passes with a soldering iron there, and [Bogin] was ready to test out his creation.
He says that it works very well, even under heavy load. His tutorial is specific to these sorts of PSUs, so we would be more than happy to feature similar work done with those that implement other design topologies. In the meantime, be sure to check out a video of the hacked power supply in action below.
Continue reading “ATX Benchtop Conversion Retains Safety Features, Delivers Plenty Of Current.”
Dealing With The Horrors Of PDFs By Binding Your Own Books

Looking at a few PDFs of data sheets, journal articles, or even complete books can be a pain. Not only do you have to deal with the torment of a PDF reader (we’re looking at you, Adobe), but a purely electronic document misses the beautiful tactile interface available in dead tree format. [samimy] put together an amazingly professional video showing us how to turn our convenient yet unwieldy PDFs into paperback books, perfect for a very accessible off-line reference.
[samimy]’s build is basically a few pieces of wood and C clamps designed to compress the printed PDF together. After drilling a few holes along the spine, he stitches the pages together with very strong thread and applies a little glue to the spine. After removing the pages from the press, [samimy] applied a piece of tape to the spine and had a very nice looking paperback book.
While [samimy] is using his binding jig for data sheets, we see no reason why a more prodigious tome couldn’t be created with his rig. A few pages of marbled paper and a leather cover would result in a beautiful and functional work of art that will be around long after you’re gone.
I Got 99 Volts And My Anodizing’s Done!

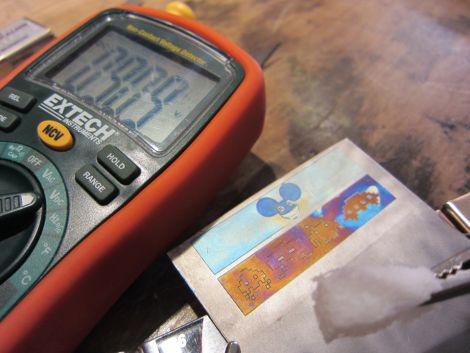
[POTUS31] had a need for anodized titanium, but the tried and true “submersion” method was not going to work out well for what he was trying to do. In order to create the look he wanted he had to get creative with some tape, a laser cutter, Coke, and a whole lot of 9v batteries.
His Ring-A-Day project has him creating customized rings based on reader feedback, and lately the requests have had him searching for a good way to color metal. Anodizing titanium was a sure bet, though creating detailed coloring on a small medium is not an easy task.
[POTUS31] figured that he could gradually anodize different areas of the ring by using laser-cut tape masks, allowing him to selectively oxidize different portions of his creations as he went along. Using the phosphoric acid prevalent in Coke as his oxidizing agent along with a constantly growing daisy-chain of 9-volt batteries, he had a firm grasp on the technique in no time. As you can see in the picture above, the anodizing works quite well, producing vivid colors on the titanium bands without the need for any sort of dye.
[POTUS31’s] favorite color thus far? A rich green that comes from oxidizing the metal at you guessed it – 99 volts.
[via Make]
Building A CRT And Bathing Yourself In X-rays

For the Milan design week held last April, [Patrick Stevenson Keating] made a cathode ray tube and exhibited it in a department store.
The glass envelope of [Keating]’s tube is a very thick hand-blown piece of glass. After coating the inside of the tube with a phosphorescent lining, [Keating] installed an electrode in a rubber plug and evacuated all the air out of the tube. When 45,000 Volts is applied to the electrode, a brilliant purple glow fills the tube and illuminates the phosphor.
Since the days of our grandfathers, CRTs have usually been made out of thick leaded glass. The reasoning behind this – and why your old computer monitor weighed a ton – is that electron guns can give off a substantial amount of x-rays. This usually isn’t much of a problem for simple devices such as a Crookes tube and monochrome CRTs. Even though [Keating] doesn’t give us any indication of what is being emitted from his tube, we’re fairly confident it’s safe for short-term exposure.
Despite being a one-pixel CRT, we can imagine using the same process to make a few very interesting pieces of hardware. The Magic Eye tube found in a few exceptionally high-end radios and televisions of the 40s, 50s, and 60s could be replicated using the same processes. Alternatively, this CRT could be used as a Williams tube and serve as a few bits of RAM in a homebrew computer.
You can check out the tube in action while on display after the break, along with a very nice video showing off the construction.
Continue reading “Building A CRT And Bathing Yourself In X-rays”
Tearing Through Floppy Drives To Build A Small-format Dot Matrix Printer
The accuracy which [Mario] achieved in his pen plotter dot matrix printer is very remarkable. He tore through a pile of floppy drives to get the parts he wanted, and chose to go with a fine-point Sharpie marker as a print head. In the video after the break he flatters us with a printout of the Hackaday logo, but you also get a look at one problem with the build. The ink doesn’t always flow from the felt tip and he has to coax it (almost like priming a pump) with a piece of scrap paper.
He was inspired by the pen printer we featured back in June. This rendition features a printing area of 1.5×1.5 inches that can accommodate 120×120 black and white pixels. He’s not a microcontroller type of guy and is driving the printer from the parallel port of his computer.
The best printing technique puts the pen down and moves it around just a bit (helps prevent the ink flow problem we mentioned earlier) and produces images like one in the lower right. We love the 8-bit nature of the result and would use this all the time to make our own greeting cards.
Continue reading “Tearing Through Floppy Drives To Build A Small-format Dot Matrix Printer”


