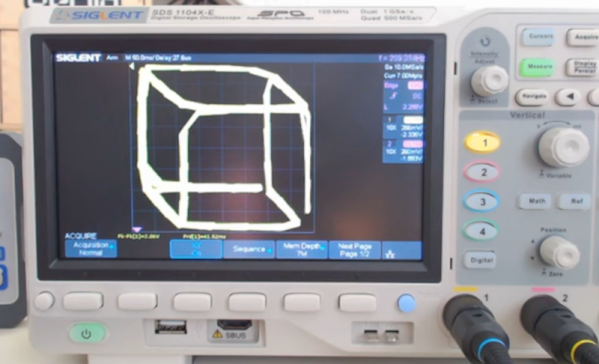
Drawing on an oscilloscope’s XY mode isn’t a new idea. However, if you’ve ever wanted to give it a go, you’d be hard-pressed to find more information than the nearly hour-and-a-half video about the topic from [Low Byte Productions]. You can check out the video below.
If you prefer to jump straight into the code, there’s a GitHub page. While the code is specific to the STM32, you can apply the ideas to anything.
In an era dominated by broadband and wireless cellular networks, it might come as a surprise to many that dial-up internet services still exist in the United States. This persistence is not a mere relic of nostalgia — but a testament to the diverse and uneven nature of internet infrastructure across the country.
Yes, dial-up internet, with those screechy, crackly tones, remains a useful tool in areas where modern, high-speed internet services are either unaffordable or unavailable. Subscriber numbers are tiny, but some plough on and access the Internet by the old ways, not the new.
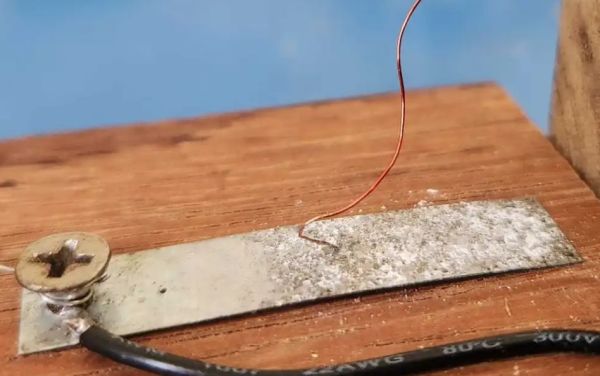
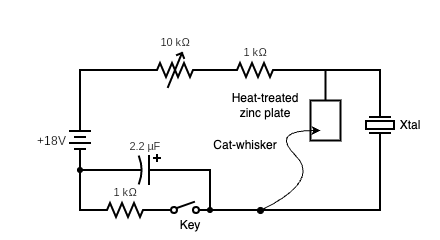
During the first half of the 20th century radio technology was booming, albeit restricted by the vacuum tube technology of the time which made radios cumbersome in size and power needs. The development of a solid state alternative to the vacuum tube was in full swing, but the first version pioneered by [Oleg Losev] in the form of crystal radios failed to compete. Even so these ‘crystal radios’ laid much of the groundwork for subsequent research. The ease of creating this type of radio also makes it a fun physics experiment today, as [Ashish Derhgawen] demonstrates in a blog post.
In the January 1925 issue of Radio News the theory of the circuit is explained by [Oleg Losev] himself (page 1167). At the core is a material capable of negative resistance, as a non-linear (non-Ohmic) material, which means that the current passing through them decreases as voltage increases over part of their I-V curve. This enables it to work as an amplifier or oscillator. After the cessation of research on crystal radio technology by [Losev] and others, the negative resistance diode was rediscovered in 1957 with the tunnel diode.
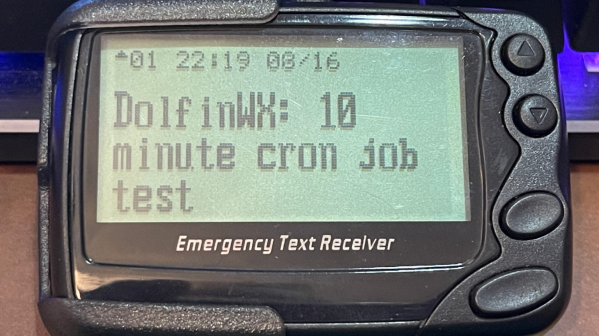
Pagers were a big deal for a while there, even if they never quite made it into the pantheon of excellent sitcom plot devices like answering machines did. Anyway, [Finnley Dolfin] had some pagers and gave them a refresh for the modern era, using them to receive message alerts from Mastodon.
The project is laced together with a bunch of Python code. It uses the Mastodon library for interacting with the social media website. When it detects an incoming direct message, it hooks into DAPNET – the Decentralized Amateur Paging Network. Via this network, a message is sent out over the airwaves to [Finnley’s] pager, serving as a notification that someone’s reached out to chat on Mastodon.
It’s neat that the amateur radio world is keeping pagers alive, using distributed base stations to share messages. Unfortunately, given the existence of smartphones, we don’t quite see pagers catching on again any time soon. And yet, [Finnley’s] setup has a certain level of old-school cool that no modern phone could match.
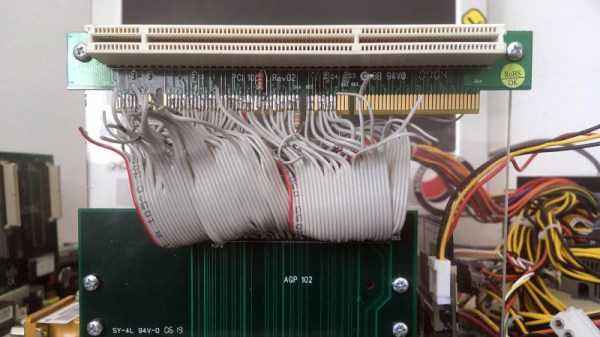
For a while around a quarter century ago PC motherboards came with a special slot, a little shorter than the PCI slots which ruled the roost back then, and offset from them further into the case. This was the Accelerated Graphics Port, or AGP, a standard created to more quickly serve the 3D graphics cards which were then taking the world by storm. It was everywhere for a few years, then in the mid-2000s it was replaced by PCI Express and faded into obscurity. [Peter] has a Socket 7-based NAS with an AGP slot, and was left wondering whether the unused port could be put to a worthwhile purpose.
AGP is a superset of PCI clocked at 66 MHz, and usually benefiting from having its own exclusive bridge to the processor bus. Thus he reasoned that he could make an AGP to PCI adapter and it might work, as the right connections are all there. A hacked-together version was made by butchering two riser cards, and when a network card worked quite happily he knew he was on to something and made a PCB. There’s a caveat that it only works with 66-MHz capable PCI cards so not everything will work, but if you’re one of the very few people who must be in the market for one, he can do you a PCB.
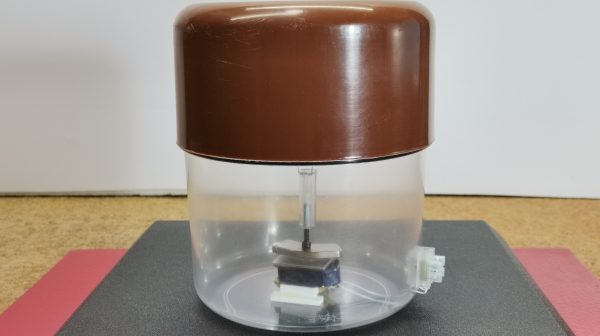
If you want to know what’s going on with the ground, geologically speaking, a geophone is a great tool to have. It lets you listen in on the rumbles and grumbles beneath your feet, and can give you great insight into matters of seismic importance. [mircemk] has designed a very capable geophone that’s simple enough for you to build at home.
The geophone relies on a mass suspended upon a spring inside a chamber, which as you might imagine, will move when shaken by seismic vibrations. The mass is in fact a plastic rod, fitted with an iron nut and a magnet on the end.
This is mounted above a coil, which is fixed to the base of the chamber. Thus, when the chamber is shaken by seismic activity, the mass moves relative to the coil, with the coil picking up the varying magnetic field as it dances around.
The YouTube video does a great job of explaining the concepts involved and how to practically build the device. [mircemk] has also had some other great projects featured on Hackaday before, too.
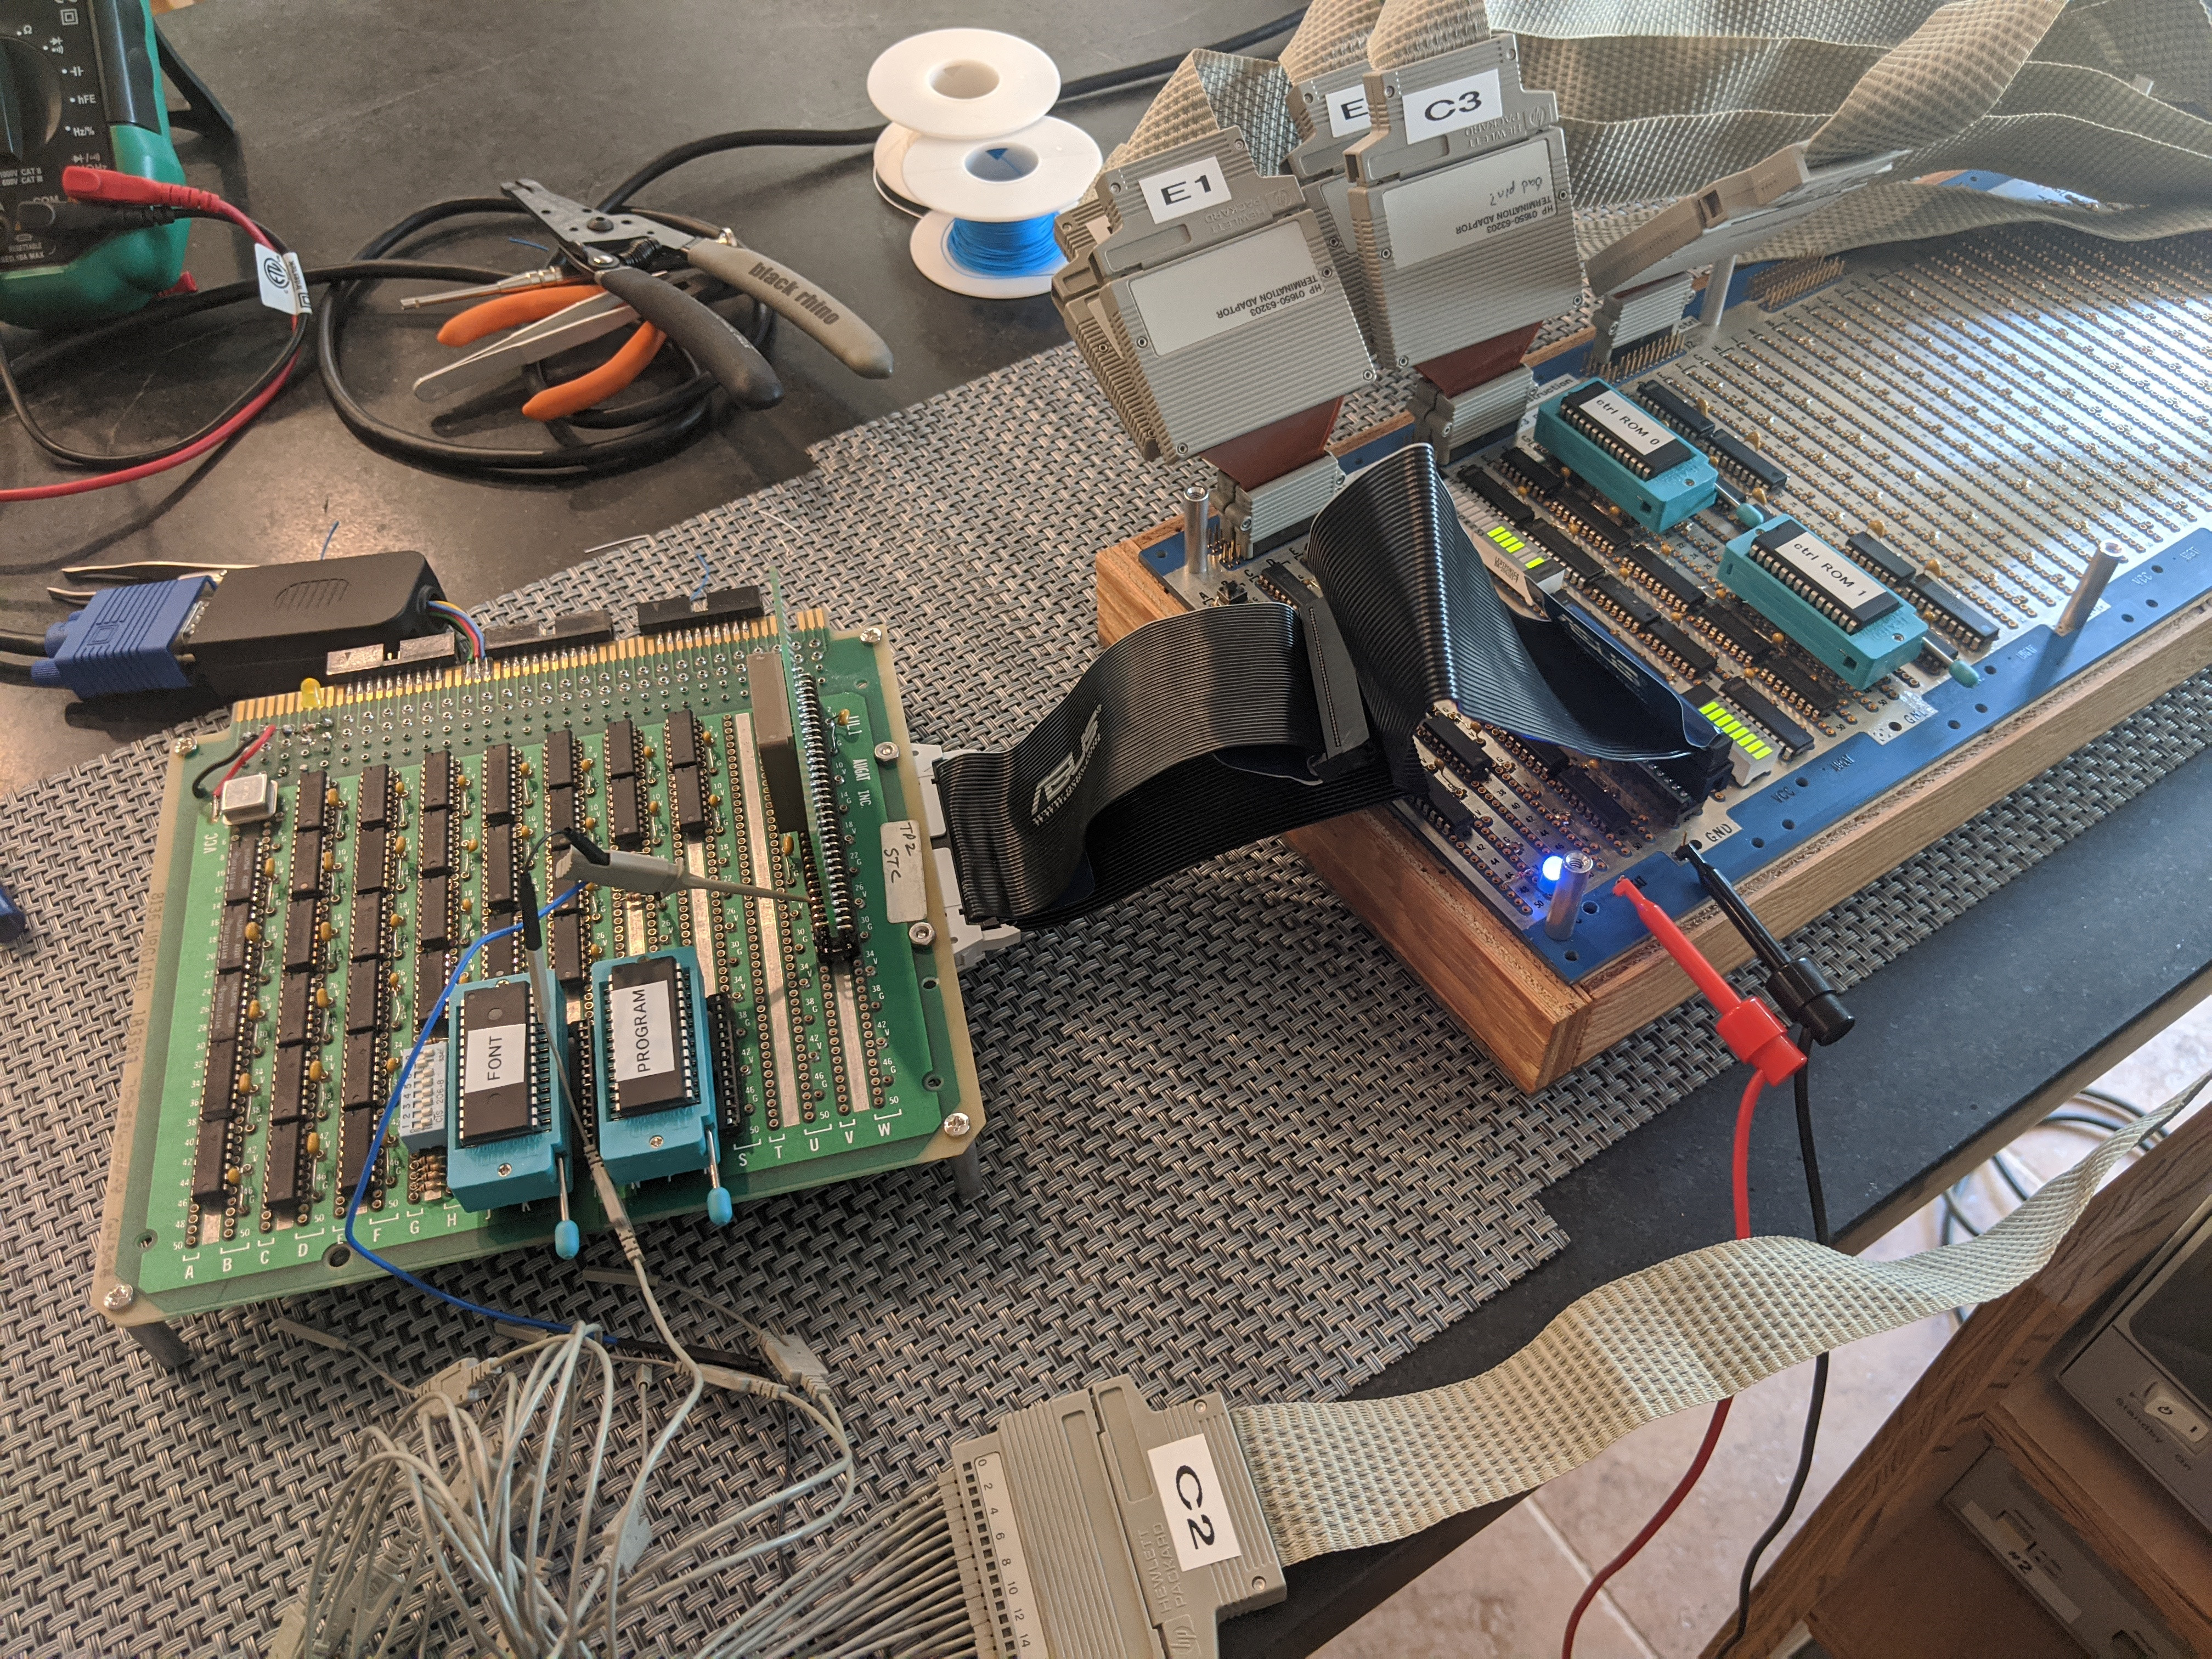
The Wire Wrap Odyssey’s first Hello World from the CPU module, here hooked up to a logic analyzer in July of 2020. (Credit: Paul Krizak)
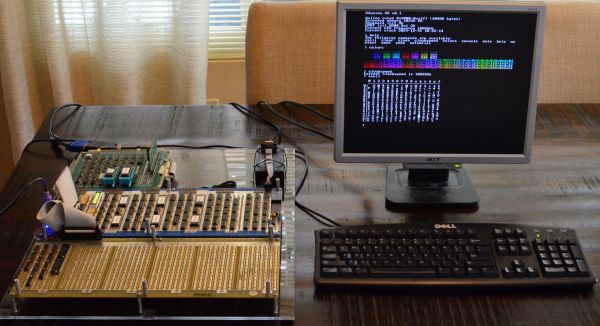
As part of his computer science curriculum at Texas A&M University in the early 2000s, [Paul Krizak] took a computer architecture course on the basics of their functioning. This and being exposed to dozens of homebuilt computer projects inspired him to begin building his own 8-bit computer in 2010, which eventually grew into the Wire Wrap Odyssey. This name covers both the primary construction method chosen around 2019 in the form of wire-wrapped connections, as well the harrowing journey to reach this point with a functioning computer system despite many choices and setbacks.
The Odyssey CPU is an 8-bit microcoded design with 16-bit address bus, using mostly 74HC-series logic. A VGA graphics card is also part of the design, which can output a 640×480 text display, with character glyphs read from the system ROM (32 kB AT28C256). As for the RAM, this is an extravagant 32 kB dual-port SRAM (Renesas 7007), which also allows both the CPU and video card to use the same SRAM. Currently the system has four peripherals: a PS/2 keyboard controller, an RTC and timer (DS1511Y+), 82C52 UART and 1 MB of extended RAM, but an ATA port and parallel port are in development.
Perhaps the most impressive part about this product is the level of documentation, from the early stages including paper doodles to the current state of the system, including the GitHub repository for the software. [Paul] was also an exhibitor at the Vintage Computing Festival (VCF) SoCal recently with his Wire Wrap Odyssey, where he was able to show off the progress so far. Next year he hopes to visit VCF SoCal again, with the remaining planned peripherals implemented.