A view of the inside of a car, with drivers wheel on the left and control panel in the middle, with red LED light displayed in the floor area under the drivers wheel and passenger side.

Bass Reactive LEDs For Your Car

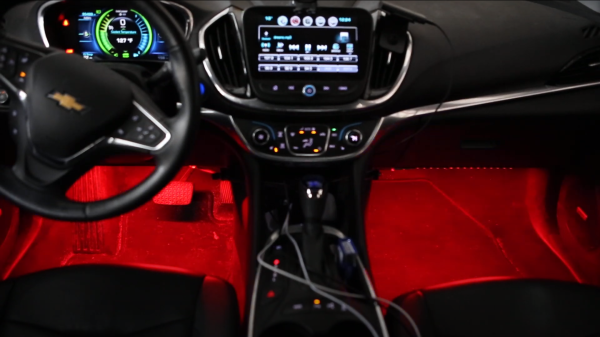
[Stephen Carey] wanted to spruce up his car with sound reactive LEDs but couldn’t quite find the right project online. Instead, he wound up assembling a custom bass reactive LED display using an ESP32.

A schematic of the Bass LED reactive circuit, with an ESP32 on a breadboard connected to a KY-040 encoder module, a GY-MAX4466 microphone module and LED strips below.

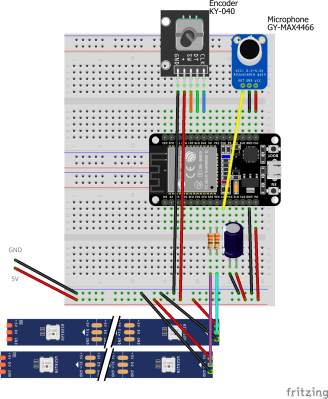
The entirety of the build is minimal, consisting of a GY-MAX4466 electret microphone module, a KY-040 encoder for some user control and an ESP32 attached to a Neopixel strip. The only additional electronic parts are some passive resistors to limit current on the data lines and a capacitor for power line noise suppression. [Stephen] uses various enclosures from Thingiverse for the microphone, rotary encoder and ESP32 box to make sure all the modules are protected and accessible.

The magic, of course, is in the software, with the CircuitPythyon ulab library used to do the heavy lifting of creating the spectrogram and frequency filtering. [Stephen] has made the code is available on GitHub for those wanting to take a closer look.

It wasn’t very long ago that sound reactive LEDs used to be a heavy lift, requiring optimized FFT libraries or specialized components to do the spectrogram. With faster and cheaper microcontroller boards, we’re seeing many great projects, like the sensory bridge or Raspberry Pi driven LED spectrogram, that can now take spectrograms and Fourier transform calculations as basic infrastructure to build on top of them. We’re happy to see [Stephen] leverage the ESP32’s speed and various circuit Python libraries to create a very cool LED car hack.

Video after the break!

Continue reading “Bass Reactive LEDs For Your Car”

Ambrosianus L 99 sup., p. 190, ll. 14–23, UV fluorescence image by Lumière Technology. Upside-down Latin overtext in dark brown and Greek undertext in light brown.

Reading Ptolemy’s Treatise On The Meteoroscope On Palimpsests After Centuries Of Recovery Attempts

During the Middle Ages much of Ancient Greek and Roman scientific, legal and similarly significant texts written on parchment were commonly erased, mostly because of the high cost of new parchment and the little regard given to these secular texts. Although recovery attempts of the remaining faint outlines of the old text has been attempted since at least the 19th century, these often involved aggressive chemical means. Now researchers have managed to recover the text written by Ptolemy on a parchment that suffered such a previous recovery attempt.

The term for a parchment and similar on which the existing text was washed or scraped off is a palimpsest, via Latin from  Ancient Greek παλίμψηστος (palímpsēstos, from παλίν + ψαω = ‘again’ + ‘scrape’). In the case of this particular treatise, it is part of L 99 sup which is kept at the Biblioteca Ambrosiana in Milan, Italy. This collection contains fifteen palimpsest parchment leaves previously used for three Greek scientific texts: a text of unknown authorship on mathematical mechanics and catoptrics, known as the Fragmentum Mathematicum Bobiense (three leaves), Ptolemy’s Analemma (six leaves), and a so far unidentified astronomical text on six leaves.

Outermost six rings of the meteoroscope, not to scale. Nh, Sh, Eh, and Wh are cardinal points of the horizon; Ne and Se are the north and south celestial poles; Nz and Sz are the north and south poles of the ecliptic; and Z is the zenith. (Gysembergh et al., 2023)

It is this last text that has now been identified, courtesy of work by Victor Gysembergh and colleagues. Whereas 19th century palimpsest recovery attempts by Angelo Mai involved reagents, during the 20th century ultraviolet illumination became the preferred method, followed by similar non-destructive analysis methods. For this study UV fluorescence and multispectral reflectance imaging was employed, which allowed for significant more of the original Greek text to be uncovered. Most notable, this revealed Ptolemy’s treatise on the Meteoroscope, which is an instrument for measuring the position, length, and direction of the apparent path of a shooting star.

This new recovery builds upon text previously recovered by other researchers since Mai’s attempts, and fills in more details, although it must be noted that not all of the text has been recovered. It’s hoped that in future imaging sessions more can be recovered of this irreplaceable text, that like so many of its kind nearly got destroyed during Europe’s darkest era.

(Top image: Ambrosianus L 99 sup., p. 190, ll. 14–23, UV fluorescence image by Lumière Technology. Upside-down Latin overtext in dark brown and Greek undertext in light brown.)

Insulin Pump Teardown Shows One Motor Does Many Jobs

Modern insulin pumps are self-contained devices that attach to a user’s skin via an adhesive patch, and are responsible for administering insulin as needed. Curious as to what was inside, [Ido Roseman] tore down an Omnipod Dash and took some pictures showing what was inside.

A single motor handles inserting the cannula into the skin, retracting the insertion needle, and administering insulin.

These devices do quite a few things. In addition to holding a reservoir of insulin, they automatically insert a small cannula (thin tube) through the skin after being attached, communicate wirelessly with a control system, and pump insulin through the cannula as needed. All in a sealed and waterproof device. They are also essentially disposable, so [Ido] was curious about what kind of engineering went into such a thing.

The teardown stops short of identifying exactly how all the mechanisms inside work, but [Ido] was able to learn a few interesting things. For example, all of the mechanical functions — inserting the cannula with the help of a needle (and retracting the needle afterwards) and pumping insulin — are all accomplished by one motor and some clever mechanical engineering.

The electronics consist of a PCB with an NXP EX2105F 32-bit Arm7 microcontroller, a second chip that is likely responsible for the wireless communications, three captive LR44 button cells, and hardly a passive component in sight.

The software and communications side of an insulin pump like this one has had its RF communications reverse-engineered with the help of an SDR, a task that took a lot more work than one might expect. Be sure to follow that link if you’re interested in what it can take to get to the bottom of mystery 433 MHz communications on a device that isn’t interested in sharing.

Very Slow Movie Player Avoids E-Ink Ghosting With Machine Learning

[mat kelcey] was so impressed and inspired by the concept of a very slow movie player (which is the playing of a movie at a slow rate on a kind of DIY photo frame) that he created his own with a high-resolution e-ink display. It shows high definition frames from Alien (1979) at a rate of about one frame every 200 seconds, but a surprising amount of work went into getting a color film intended to look good on a movie screen also look good when displayed on black & white e-ink.

The usual way to display images on a screen that is limited to black or white pixels is dithering, or manipulating relative densities of white and black to give the impression of a much richer image than one might otherwise expect. By itself, a dithering algorithm isn’t a cure-all and [mat] does an excellent job of explaining why, complete with loads of visual examples.

One consideration is the e-ink display itself. With these displays, changing the screen contents is where all the work happens, and it can be a visually imperfect process when it does. A very slow movie player aims to present each frame as cleanly as possible in an artful and stylish way, so rewriting the entire screen for every frame would mean uglier transitions, and that just wouldn’t do.

Delivering good dithering results despite sudden contrast shifts, and with fewest changed pixels.

So the overall challenge [mat] faced was twofold: how to dither a frame in a way that looked great, but also tried to minimize the number of pixels changed from the previous frame? All of a sudden, he had an interesting problem to solve and chose to solve it in an interesting way: training a GAN to generate the dithers, aiming to balance best image quality with minimal pixel change from the previous frame. The results do a great job of delivering quality visuals even when there are sharp changes in scene contrast to deal with. Curious about the code? Here’s the GitHub repository.

Here’s the original Very Slow Movie Player that so inspired [mat], and here’s a color version that helps make every frame a work of art. And as for dithering? It’s been around for ages, but that doesn’t mean there aren’t new problems to solve in that space. For example, making dithering look good in the game Return of the Obra Dinn required a custom algorithm.

Op Amp Contest: A Slice Of The ’70s

The 1970s was a great time to be an electronics hobbyist, as a whole new world of analogue integrated circuits was coming down in price while new devices would appear to tempt the would-be constructor. Magazines and project books were full of simple circuits to do all manner of fun things, including many synthesizers and sound generators.

We’re reminded of those days by [Burkhard Kainka]’s triggered sound generator, which couples an op-amp timer to another op-amp phase shift oscillator to produce a sound described as “the unwilling meowing of a cat, which does not want to be disturbed“. Yes, we did make things like this back in the day.

The timer is triggered by a few millivolts on its input, which can come from a bit of mains hum or a flash of light to an LED operating as a photodiode. This provides enough DC voltage to the input of the phase shift oscillator to start oscillation, and in turn the oscillator drives a piezo speaker. It’s a fun little project, it shows that a microcontroller isn’t always needed to make something work, and maybe those of you without the experience of a 1970s childhood can learn a little bit of analogue magic from it. Need to know op-amps better? Read our primer!

Retrotechtacular: Putting Pictures On The Wire In The 1930s

Remember fax machines? They used to be all the rage, and to be honest it was pretty cool to be able to send images back and forth over telephone lines. By the early 2000s, pretty much everyone had some kind of fax capability, whether thanks to a dedicated fax machine, a fax modem, or an all-in-one printer. But then along came the smartphone that allowed you to snap a picture of a document and send it by email or text, and along with the decrease in landline subscriptions, facsimile has pretty much become a technological dead end.

But long before fax machines became commonplace, there was a period during which sending images by wire was a very big deal indeed. So much so that General Motors produced “Spot News,” a short film to demonstrate how newspapers leveraged telephone technology to send photographs from the field. The film is very much of the “March of Progress” genre, and seems to be something that would have been included along with the newsreels and Looney Tunes between the double feature films. It shows a fictional newsroom in The Big City, where a cub reporter gets a hot tip about an airplane stunt about to be attempted out in the sticks. The editor doesn’t want to miss out on a scoop, so he sends a photographer and a reporter to the remote location to cover the stunt, along with a technology-packed photographic field car. Continue reading “Retrotechtacular: Putting Pictures On The Wire In The 1930s”

Low-Cost RF Power Sensor Gets All The Details Right

Dirty little secret time: although amateur radio operators talk a good game about relishing the technical challenge of building their own radio equipment, what’s really behind all the DIY gear is the fact that the really good stuff is just too expensive to buy.

A case in point is this super-low-cost RF power sensor that [Tech Minds (M0DQW)] recently built. It’s based on a design by [DL5NEG] that uses a single Schottky diode and a handful of passive components. The design is simple, but as with all things RF, details count. Chief among these details is the physical layout of the PCB, which features a stripline of precise dimensions to keep the input impedance at the expected 50 ohms. Also important are the number and locations of the vias that stitch the ground planes together on the double-sided PCB.

While [Tech Minds]’ first pass at the sensor hewed closely to the original design and used a homebrew PCB, the sensor seemed like a great candidate for translating to a commercial PCB. This version proved to be just as effective as the original, with the voltage output lining up nicely with the original calibration curves generated by [DL5NEG]. The addition of a nice extruded aluminum case and an N-type RF input made for a very professional-looking tool, not to mention a useful one.

[Tech Minds] is lucky enough to live within view of QO-100, ham radio’s first geosynchronous satellite, so this sensor will be teamed up with an ADC and a Raspberry Pi to create a wattmeter with a graphical display for his 2.4-GHz satellite operations.

Continue reading “Low-Cost RF Power Sensor Gets All The Details Right”