Mantis9 PCB Mill

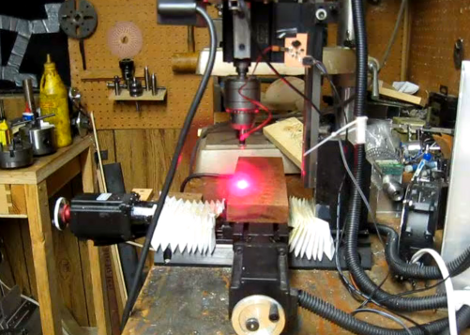
This is the Mantis9 PCB mill. It’s the first time we’ve featured the project, but it’s already well known by some as it keeps popping up in the comments for other CNC mill projects. Yes, it’s made out of wood — which some frown upon — but we’re happy with the build instructions and the especially the price tag (parts as low as $85).

We did feature an earlier revision of the hardware back in 2010. Subsequent versions changed the frame to use an open-front design, but it’s the build techniques that saw the biggest evolution. The problem was getting the holes for the parallel rods to align accurately. In the end it’s a simple operation that solves the problem; clamp both boards together and drill the holes at the same time. A drill press is used for all of the fabrication, ensuring that the holes are perpendicular to the surface of the boards. From there the rods are given some bronze bushings and pressed into place. Only then are the platforms secured to the bushings using epoxy. This is to ensure that the bushings don’t bind from poor alignment. We think it should end up having less play in it than other builds that use drawer slides.

Check out a PCB milling run in the clip after the break.

Continue reading “Mantis9 PCB Mill”

Open Rail, Or, Why Didn’t We Think Of This?

Hackaday readers familiar with the with the CNC and automated machinery scene will be familiar with MakerSlide, the open-source linear bearing system. This linear movement system composed of special aluminum extrusions and mounting plates riding on v-wheels has been used in a lot of awesome builds including the Quantum ORD Bot 3D printer and the Shapeoko CNC router. If there’s one downside to the MakerSlide, it’s the hard-to-source aluminum extrusion with the requisite v-wheel guides. [Mark] and [Trish] of Phlatboyz have an ingenious solution to this problem: just have bolt-on v-wheel guides. It’s an idea so simple we’re kicking ourselves for not thinking of it first.

Open Rail is completely compatible with the MakerSlide linear bearing system. Instead of requiring a special aluminum extrusion, the Open rail system uses regular, plain-jane aluminum extrusions available at any reputable hardware store. Just pop a few t-nut into the Open Rail and attach it to your extrusion. Couldn’t be easier.

Considering how easy it is to find surplus aluminum extrusion, we’ll expect a few gigantic MakerSlide and Open Rail derived CNC projects in the very near future.

Calculating With 3D Printed Gears

Here’s a 3D printed electromechanical computer built by [Chris Fenton] over at NYCResistor. It uses plastic registers printed on a Makerbot, a bunch of pogo pins, and business-card sized punch cards capable of storing 32 bits of instructions and data.

In case you’re wondering, this isn’t the first time we’ve seen [Chris]’  FIBIAC. Since the last update, [Chris] managed to get a program that walks through the first three digits of the Fibonacci sequence. There’s really no limit to what the FIBIAC can theoretically do, but with only three registers he’s limited to calculating the first three digits of pi.

With more registers, [Chris]’ computer could be expanded, but each register takes about 8 hours to print. We’re sure [Chris] would gladly accept any donations of additional 3D-printed registers, so if you’d like to make a few of these gear registers you can get the files on Thingiverse.

As a proof of concept, [Chris]’ FIBIAC is amazing, but it doesn’t live up to its intended design. The punch card format [Chris] created is capable of storing 8 registers, and the registers themselves can be expanded far beyond their current 3-digit width. Still, it’s an incredible build and has the bonus of being easily expandable thanks to a very clever design.

Continue reading “Calculating With 3D Printed Gears”

Android CNC Controller

[Matt] is the proud owner of a JGRO-based CNC router and he’s been working on a way to control it without a computer. What he came up with is a way to drive the CNC machine using this Android tablet.

A big part of the hack is the CNC controller that he’s using. The TinyG is a board that can take commands via USB and convert them to instructions for up to six axes. In the video after the break [Matt] shows off a direct USB connection as the control method. This is the most interesting part to us, but the system can also be run through the network with the assistance of a computer feeding commands to the TinyG. This second method means the Android controller would be wireless.

A trio of repositories host the code [Matt] is using. From the demo it looks like the Android app has no shortage of features.

Continue reading “Android CNC Controller”

Laser Cutting In 3D

Everyone in the world suffers from some degree of functional fixedness, a proclivity to use tools only how they were meant to be use. A laser cutter, for example, is usually used to make flat, two-dimensional parts. [Seeker] broke out of this cognitive lock when he decided to create an illuminated 3D object with a laser cutter and a dozen acrylic sheets.

[Seeker]’s project is inspired by acrylic edge-lit LED signs. In these signs, a pattern is engraved on an acrylic sheet and a LED illuminates the panel from the side. When the light from the LED hits the engraving, it’s refracted and produces a wonderful colorful pattern.

To make a 3D version of an edge lit display, [Seeker] subtracted a 3D model of a virus from a cube in Sketchup. This resulted in a hollow cavity that would refract light. After slicing up the model of the 3D cube, [Seeker] sent the files over to the laser cutter to produce a few dozen custom panels. [Seeker] glued them together, put the entire assemblage in front of a LED light, and admired the beauty of his new laser cut 3D virus.

Blu-ray CNC Looks Great For Branding And Engraving

[Nav] got the bug for a tiny little laser cutter. He pulled off the build, and has just finished the second rendition which makes some nice improvements. He’s was hoping for a laser cutter, but we think this really shines when it comes to branding objects like the scrap wood seen above.

This joins a long line of optical drive parts builds. For instance, we saw this plotter that used the lens sleds from some CD-ROM drives. You may think that [Nav] doesn’t need to worry about the Z axis since this is a laser but you’d be wrong. The focal point of the light needs to hit at the right place to cut efficiently, and this is often the trouble with laser cutters. As material is burned away the laser becomes less efficient if you don’t adjust the lens for vertical position. That’s why we think it’s best as an engraver, but the original build writeup for his cutter does show some success cutting letters in dark paper.

Check out a clip of this design being burnt into the wood after the break.

Continue reading “Blu-ray CNC Looks Great For Branding And Engraving”

Tearing Apart A Hot Glue Gun For A 3D Printer

If you’re building a 3D printer, the most complicated part is the extruder. This part uses a series of gears to pull plastic filament off of a spool, heats it up, and squirts it out in a manner precise enough to build objects one layer at a time. [Chris] made his own extruder out of a hot glue gun and made it so simple we’re surprised we haven’t seen this build before.

The basic operations of a plastic extruder – pushing a rod of plastic through a heated nozzle – already exists in a hot glue gun available for $3 at WalMart. To build his printer, [Chris] tor apart the hot glue gun and mounted the nozzle on a piece of plywood. The hot glue sticks are fed into the nozzle with the help of a 3D printed gear and a stepper motor driver.

After the break, you can see [Chris]’s hot glue gun RepRap printing a 10cm cube. It’s not fast, but the quality is exceptional, especially considering he made it out of a hot glue gun.

Continue reading “Tearing Apart A Hot Glue Gun For A 3D Printer”