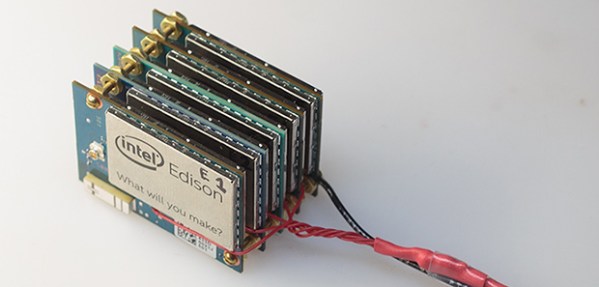
Try Out Your Assembly And BASIC Skills With A ZX Spectrum Project

It can be really hard to warm up to coding in Assembly. But this tutorial looks to make it understandable and (almost) easy. It focuses on programming a game for the ZX Spectrum. But you won’t need the hardware on hand as you can just use the ZX Spin emulator as you work your way through the code.

Ostensibly this is a 30-minute tutorial but that’s a gross underestimate. We finished a cursory read of the tutorial and the building blocks are certainly clear and easy to understand. But we like to make sure we understand every line of code and plan to spread that out over the coming weekend.

The first chapter eases us into machine code by combining it with a bit of BASIC. You’ll see how to manipulate the ZX Spectrum memory and then pluck that value back out into the BASIC program. But once chapter 2 hits it’s pretty much all assembly from there on out. The nice thing is that as you go along you learn how the hardware works and there are quite a few references to pages in the manual so you can do some extra learning along the way.

[Thanks Mathilda]

Tri-mounted Monitors Using Strut Channeling (no Welding)

[Optec] want his own triple monitor setup built to his specifications. It turns out to have been a pretty easy project thanks to his mastery of stock materials. The image above is just a bit dim, but if you look closely you can see the strut channel which makes up the monitor frame.

When it comes to this type of metal strut material there’s a lot to choose from. [Optec] went with the half-slot format which provides a little bit of left and right wiggle room. This is important to get the edges of those monitors to butt up to one another. After making a pair of relief cuts he bent the channel in two places, using 45 degree brackets as reinforcement. The monitor mounts are made of MDF with countersunk holes to hide the bolt heads which connect it to the channel.

He figures the total cost of the mount was around $40. Seeing how easy it was makes us think we may never buy a commercial TV mounting bracket again. Of course if you’re more into woodworking there’s a tri-monitor project for you too.

[via reddit]

Retrotectacular: Time Sharing

It’s easy to forget the layer upon layer of technological advances that led to the computers we use today. But this look at the state of the art half a century ago does a good job of reminding us. Here [Fernando J. Corbató] explains the concept of Time-Sharing. He is one of the pioneers of the topic which is now used in every computer system in the world.

Since processors (read: a single core) can only work on one operation at a time, it inherently creates a bottle-neck. This is a huge issue when you consider the cost of the computers used at the time. In the video he mentions $300-$600 an hour. That was in the 1960’s and would roughly equate to about $2300-$4600 in 2012. In other words, there’s big money in using the machine as efficiently as possible.

Early on in the discussion he mentions how programs were loaded and solutions were returned by computers of the day. It started with punch cards, then moved to magnetic tape. At the time this was filmed they had just started using teletype and were hoping to add a graphical interface in the near future. We’ve come a long way but the core principles he’s explaining are still quite important. See both parts of the film after the break.

Continue reading “Retrotectacular: Time Sharing”

Building A Turing Machine From Magic The Gathering

If you really know your Magic the Gather and you’re a programming wiz you’ll appreciate this paper on building a functioning Turing Machine from Magic the Gathering cards. We’re sure you’re familiar with Turing Machines, which uses a rewritable strip to store and recall data. Most of the time we see these machines built as… machines. For instance, this dry-erase marker Turing Machine has long been on the top of our favorites list. But as The Diamond Age by Neal Stephenson illustrates, there’s more than one way to skin this cat.

A complete list of the cards used in this machine can be found here. A little bit of preparation (casting to tweak abilities) goes into making sure the cards will work as called for in the Turing design. The tape is made of Ally tokens to the right of the head, and Zombie tokens to the left. The computational abilities of the head depend on the colors of the cards. It’s a bit too complex to paraphrase, but the design is based on this 2-state, 3-symbol setup whose rules are listed in the image above.

It’s going to take us a while to fully wrap our heads around this thing, but it’ll be fun getting to that point!

[via Slashdot]

Breadboarding A 4-bit ALU

[TGTTGIT] recently took the plunge and decided to build his own computer using logic chips. He just completed a 4-bit ALU which can compute 18 functions. It took a long time to get the wiring right, but in true geek fashion his build was accompanied by an alternating Chapelle’s Show and Star Trek: TNG marathon playing in the background.

This project is the stepping stone for a larger 16-bit version. The experience of wiring up just this much of it has convinced him that an FPGA is the only way to go for the future of the build. But since he had already ordered the chips it was decided that the only thing to do was to see this much through. He used the truth table from The Elements of Computing Systems for the design and posted several times about the project before arriving at this stopping point so you may be interested in clicking through the other post on his blog. There’s also a lot of other TTL computer projects around here worth checking into.

Continue reading “Breadboarding A 4-bit ALU”

IMac Reborn With Present-day Parts

[Paul] spent his summer bringing an iMac G3 into this decade. There’s plenty of room to work with since he removed the CRT which originally occupied most of the computer’s space. The final project is much more powerful and since he preserved most of the metal mounting parts inside it remains quite strong.

He started by swapping flat screen monitors with his Grandma (who incidentally runs Linux… nice!). She had a 15″ model which would fit nicely in the case so he upgraded her to 17″ and took the old one. With bezel removed it fits perfectly where to old tube had been. Next comes the power supply. It’s mounted on the bracket which held the back of the tube, with a bit of metal removed to clear the air intake. To mount the motherboard he fabricated a bracket at one end where the iMac’s stage drops away. In retrospect he wishes he had rotated the board to make the I/O panel more accessible. The hard drive mounts on the original carriage, and he did some creative gluing to make his replacement DVD drive align with the original optical drive opening. The finished product looks great from the front and sides, with the cables running out the back as the only indication that it’s had some major work done on it.

An STM32 Processor Powers This PC

This 32-bit computer is a project [Bogdan Marinescu] built as a contest entry. Sadly he didn’t win, but he did do an excellent job of documenting the build. Having seen several other home built PC projects we’re familiar with the challenges that go into such a thing, and he found some great solutions to each of them.

He started with an STM32F103ZET6 chip. This is an ARM Cortex-M3 processor which brings a lot of power to the playing field. That being said, generating a VGA signal would pretty much zap the usefulness of the chip for other processes so he offloaded that work on a separate Propeller chip. A microSD card serves as storage for the machine, which runs eLua (embedded Lua programming language). There is 1 MB of external RAM and a PS/2 port for keyboard interface. The system is networked thanks to an ENC28J60 Ethernet controller. Don’t miss the video after the break where you can see several demos running on the system.

Continue reading “An STM32 Processor Powers This PC”