Bluetooth Headset Garage Door Opener Update

bluetooth-headset-garagedoor-opener-update

[Lou Prado] sent in a link to his new video on using a Bluetooth headset as a garage door opener for your Android device. This isn’t a new hack, and we’ve actually seen him pull it off once before back in 2011. But we’re running this as an update for a couple of reasons. First off, we had forgotten about the hack and it’s worth revisiting. Secondly, the headset which he used with the initial hack has gone out of production. He chose a new model, and the assembly video (embedded after the break) which he made is a treasure trove of best practices to use when hacking consumer electronics.

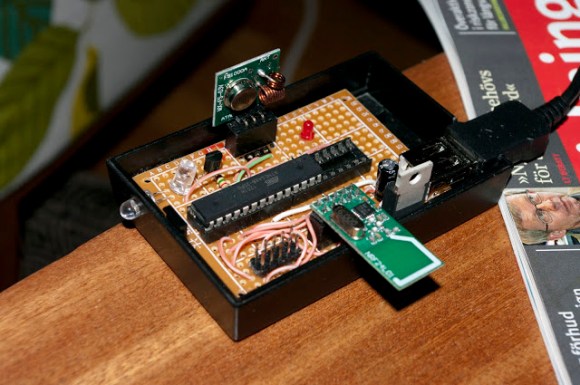
Here’s how the hardware part of the hack goes. He removes the speaker from the headset and solders the base of a transistor in-line with a resistor to the red wire. The emitter connects to the grounded frame of the USB charging cable which is plugged into an outlet next to your garage door opener. The collector of the transistor is then connected to the garage door opener, along with a common ground connection, allowing audio from the headset to trigger the transistor to open the door.

The systems is secure based on Bluetooth pairing, which was done with his phone before starting the hardware hack.

Continue reading “Bluetooth Headset Garage Door Opener Update”

Remote Control Command Center Includes RF And IR Functions

all-in-one-remote-relay-includes-RF

We’re still not quite sure what to call these projects, but as we’ve said before, it’s a pleasure to see what people are doing to use one remote control to rule them all. The project being developed by [Kalle Löfgren] seeks to simplify the remote controlled items in his home by combining all control into one smart phone app. The linchpin of the system is this command center which lets a smart phone send IR and RF commands to various devices (translated).

We’ve seen this done with pretty beefy microcontrollers, like this project that uses a PIC32. But the communications going on between the smartphone and the base station are very simple, as are the remote control commands which are being relayed. So we’re not surprised to find that this setup just uses an ATmega88, IR LED, Bluetooth Module, and RF module. There is no connection to a computer (the USB simply provides power via a cellphone charger). If you’re interested in how [Kalle] sniffed the protocol for each remote he wrote two other articles which you can find in the write-up linked above.

NANDputer Is Mostly Wiring

We would wager that by weight this project is mostly wiring. We might go as far as betting that the wire outweighs the rest of the components 2 to 1. We’ll keep our fingers crossed that there’s never a loose connection, but for now it seems that [Kevin Horton’s] NAND-based computer project is up and running. Very nearly ever part of the build is based on NAND gates, which is why the point-to-point wiring is so crazy. There is one peripheral board which uses some non-NAND components, but he eventually plans on replacing that to make the system…. pure?

Now get ready for the crazy part. This is just one half of the program counter! There’s another board that looks just like it. The two join at least a half-dozen other boards of similar size and complexity to make a functioning computer. Crazy! The post shares a ton of details, but you can also just skip down after the break to see a video of it running a program.

If you’re wondering how a NAND-based computer works you should make your way through this online course.

Continue reading “NANDputer Is Mostly Wiring”

WSPR Transmitter Shows True Value Of Raspberry Pi For Hacking

wspr

Don’t get us wrong, we love our Raspberry Pi. But if you’re merely running a Linux image without adding a hardware hack into the mix you’re missing out on part of the power for which the platform was developed. This project is a great example of how to embrace the Raspberry Pi’s ability to deliver both low-level hardware access, and solid embedded Linux performance. [Dan Ankers] and [Threeme3] have developed a program which turns the RPi in to a WSPR transmitter. The GitHub readme shares many of the details on how it was done. But you’ll also want to dig through the .c file to see how they’re making use of the GPIO header pins.

[William Meara] sent in the tip for this. He’s been featured on Hackaday previously for his work with WSPR (Weak Signal Propagation Report). It’s an amateur radio protocol which lets you communicate over very long distances using relatively weak transmitters. The trick is to use computing power to find the signal hidden in all the noise. Be warned that you do need a HAM license to try this out, but otherwise all you need to connect to the board is a low-pass filter and an antennae.

[via SolderSmoke]

[Photo credit: WSPR hompage]

Words Of Wisdom From A Maker Entrepreneur

words-of-wisdom-from-a-maker-entrepreneur

Have an awesome invention that you want to create and sell to the world? Think you have everything all planned out and you’re ready to just let the money flow in? Maybe not. Take a few moments and read [Jonathan]’s first hand experience of a maker start up business that didn’t go anything like he had planned.

[Jonathan] thought he was ready. He had created a unique product and, by taking pre-orders, didn’t have to front any of his own capital. He had shown that there was demand for such a device. The big problem…supply. Selling things was the easy part. Actually making them was another story. Every step of the way had complications. Printing errors, parts suppliers backed out, an international money transfer didn’t go through, postage rates increased, suppliers sent the wrong parts, and he and his wife had a baby. His stress levels were through the roof knowing that his customers had prepaid and were waiting through all the delays.

In the end, [Jonathan] learned a lot and survived the journey. He is currently working on his next invention. If you’d like to learn more about his experiences, you can message him personally.  There’s also a Pianocade features video after the break.

[via Adafruit]

Continue reading “Words Of Wisdom From A Maker Entrepreneur”

Assigning New Packages To Eagle PCB Components

adafruit-eagle-component-creation-tut

If you’ve spent any time at all laying out your own circuit boards we’re sure you’ve run into the issue of not having the right component or package available in the standard libraries. If it’s a common part, chances are the symbol definition will be there.  But perhaps the footprint you want to use is missing? Here’s an easy to follow tutorial which demonstrates how to assign new packages to existing Eagle PCB components. It even shows the basics of how to tweak the footprint to fit your needs (like making SMD footprints easier to hand solder).

This will not teach you how to make your own custom symbols, or how to build packages from scratch. But it will let you locate the package you want to use from a different component, then copy it to your own library for use with different parts. And the techniques shown make this a quick and relatively painless process.

We certainly don’t want to start another comment quagmire like the recent PIC v. AVR discussion. But we’ve used both Kicad and Eagle rather extensively and feel that neither one has really mastered part/footprint creation in a user-friendly way. We like Kicad’s total separation of footprints from components, and it’s myriad of parameters which can be used to tweak the layout. But if you use the same components frequently, Eagle’s standard of linking parts and footprints does end up saving a lot of time. What do you think?

Printed Vacuum Pump Muffler Quiets The Lab

printed-vacuum-pump-muffler

[Joel] made a brilliant improvement to his shop. If you think about it, most folks would hear a loud vacuum pump and either tolerate it or put in some ear plugs. But [Joel] heard a loud vacuum pump and thought: hey, I can fix that! His solution was to design and print his own muffler.

He did a bit of research on the topic and found that design complexity runs the gamut based on the application. For instance, you don’t want to affect the airflow of a vehicle’s exhaust too much or you will take a horsepower (and efficiency) hit for it. In this case the vacuum pump making all the noise has a relatively low airflow so that is not a concern. What he ended up doing is designing a baffle that will help cushion the vibrations in the airy by piping it through a maze of channels. The end result drops from about 92 dB to 82 dB. That might not seem like much, but decibel measurements aren’t linear so it ends up having a great effect. Hear for yourself in the video after the break.

Continue reading “Printed Vacuum Pump Muffler Quiets The Lab”