IPhone Charger Teardown Shows Astounding Miniaturization.

There’s no question that Apple has their industrial design down pat; comparing a cell phone charger made by Blackberry or Motorola to the tiny 1-inch-cube Apple charger just underscores this fact. [Ken Shirriff] posted a great teardown of the Apple iPhone charger that goes through the hardware that makes this charger so impressive.

Like most cell phone chargers and power supplies these days, Apple’s charger is a switching power supply giving it a much better efficiency than a simple ‘transformer, rectifier, regulator’ linear power supply. Inside the charger, mains power is converted to DC, chopped up by a control IC, fed into a flyback transformer and converted into AC, and finally changed back into DC, and finally filtered and sent out through a USB port.

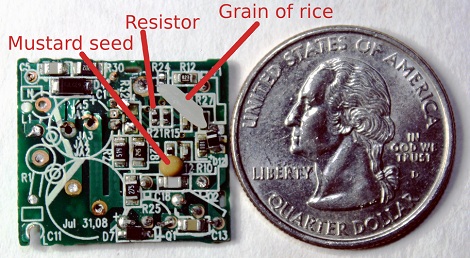
The quality of the charger is apparent; there’s really no way this small 1-inch cube could be made any smaller. In fact, if it weren’t for the microscopic 0402 SMD components, it’s doubtful this charger could be made at all.

Comparing the $30 iPhone charger of a cheap (and fake) iPhone charger, the budget charger still uses a flyback transformer but there are serious compromises of the safety and quality. The fake charger doesn’t use a power supply controller IC and replaces the four bridge diodes for a single diode to rectify the AC; a very efficient cost-cutting measure, but it does lead to a noisier power supply.

There’s also the issue of safety; on the Apple charger, there is a (relatively) huge physical separation of  ~340 VDC and your phone. With the off-brand charger, these circuits are separated by less than a millimeter – not very safe, and certainly wouldn’t be UL approved.

It’s worth pointing out that [Ken] compares a similar $7 Samsung charger favorably to the $30 Apple charger. Both are functionally identical, but Apple also has their  marketing down pat, to say the least.

Tip ‘o the hat to [George] for sending this in.

EDIT: In case a 1-inch cube wasn’t impressive enough, check out the euro version of the iPhone/iPad charger. It supplies 1A @ 5V, and isn’t much thicker than the USB port itself. Thanks [Andreas] for bringing this to our attention. If anyone wants to do a teardown of the euro version, send it in on the tip line.

Printing Circuitry On A RepRap

Over on the RepRap blog, [Rhys] has been experimenting with molten metal to build circuits with the RepRap.

Last June, [Rhys] found a neat alloy made of Tin, Bismuth, and a little bit of Indium that melts at around 130° C, and has just the right properties to be extruded with a standard RepRap setup. The results were encouraging, but the molten metal quickly dissolved the brass and aluminum nozzles [Rhys] was pushing liquid metal through.

The solution to this problem was solved by anodizing the heck out of a RepRap nozzle to make a hard, protective oxide layer. Already [Rhys] has logged hundreds of hours squirting molten metal out of his RepRap with no signs of any damage to the nozzle.

Since [Rhys] figured out how to print in metal, he whipped up an extremely minimal Sanguino board. You can see this RepRapped PCB running a LED blink program after the break. Now to work on the RepRap pick and place…

Continue reading “Printing Circuitry On A RepRap”

Electric Imp Connects Projects To The Internet

If you’re planning a build that communicates wirelessly to that ‘Internet of things’ we’ve been hearing about, you might want to check out the Electric Imp. This tiny little card connects your project to the Internet without all the hassle of configuring an embedded wireless device.

Inside the Electric Imp is a good bit of hardware: an ARM CortexM3, and an 802.11b/g/n wi-fi module that will connect to your wireless network automatically. There are also a few pins left over for serial, I2C, SPI and PWM applications.

Instead of manually configuring the DNS and WPA encryption, the Electric Imp does all of this automatically. We have no idea how the Electric Imp configures itself, but we’d bet it’s something along the lines of plugging the SD card-sized Imp into a computer and piggybacking off the computer’s credentials. The Imp also uses a cloud service, but we’ll bet once Imps are out in the wild, you’ll be able to use them with your own network.

The Electric Imp card itself will sell for about $25, but there are also dev kits to turn the Imp into an Arduino-compatible board. If everything goes as planned, the Imp will be released sometime this summer; we’ll probably see a few Electric Imp projects finished before August.

EDIT: [Kevin] over at Electronic Imp wrote in and told us about the configuration process:

We have an iOS and Android app where the user enters their wireless network’s SSID and the password, then they hold the screen up to the Imp. There’s a photosensor in the Imp that picks up the phone’s flashing and configures the device optically, without the need of plugging it in to a computer, setting up a temporary network for config, or any other cumbersome mechanisms.

We’re basically looking at a much cooler version of the Timex Datalink here. Awesome.

3D Gesture Tracking With LIDAR

[Reza] has been working on detecting hand gestures with LIDAR for about 10 years now, and we’ve got to say the end result is worth the wait.

The build uses three small LIDAR sensors to measure the distance to an object. These sensors work by sending out an infrared pulse and recording the time of flight for a beam of light to be emmitted and reflected back to a light sensor. Basically, it’s radar but with infrared light. Three of these LIDAR sensors are mounted on a stand and plugged into an Arduino Uno. By measuring how far away an object is to each sensor, [Reza] can determine the object’s position in 3D space relative to the sensor.

Unlike the Kinect-based gesture applications we’ve seen, [Reza]’s LIDAR can work outside in the sun. Because each LIDAR sensor is measuring the distance a million times a second, it’s also much more responsive than a Kinect as well. Not bad for 10 years worth of work.

You can check out [Reza]’s gesture control demo, as well as a few demos of his LIDAR hardware after the break.

Continue reading “3D Gesture Tracking With LIDAR”

Building A Sound Reactive EL Panel And Learning Something In The Process

We’ve seen a lot of builds using electroluminescent wire, usually in the realm of costumes and props. Unfortunately, most electrical engineers don’t deal with blinking and dimming EL wire and panels and any tinkerer trying to control electroluminescence doesn’t have a lot of resources on how to control EL stuff. [ch00f] wanted to fill this knowledge gap, so he build a sound reactive EL panel driver and learned a lot in the process.

Nobody really knows how electroluminescent wire and panels work on a molecular level, but [ch00f] did know that changing the direction of an electric field will cause the EL material to glow. Changing the frequency of this electric field will change the EL material’s brightness, so all [ch00f] had to do was make a variable-frequency EL driver – something that’s a lot harder than it sounds.

We won’t bore you with the details because we  couldn’t do [ch00f]’s write up any justice. We will skip to the end and tell you [ch00f] was able to make a sound reactive EL panel after a month of work that included making his own transformers and doing a whole bunch of math. You can check out the video of [ch00f]’s [Tony Stark]-esque EL panel after the break.

Continue reading “Building A Sound Reactive EL Panel And Learning Something In The Process”

Hacking The Kingston Wi-Drive

[Andrew] got his hands on a Kingston Wi-Drive, and being the responsible Hackaday reader he is, spent the better part of a weekend figuring out how to get root on this shiny new toy

The Kingston Wi-Drive is a small battery-powered Flash drive with a wi-fi adapter in a small, compact case. Even though Kingston is going after a fairly niche market by advertising the Wi-Drive to expand the storage of iOS and Android devices, a network attached storage solution that can fit in a pocket is somewhat interesting. Unfortunately, Kingston decided to lock down the Wi-Drive; [Andrew] can’t even get a terminal running on this little box.

After a weekend, [Andrew] is no closer to his goal of getting root on the Wi-Drive. He suspects the problem may be there simply isn’t a terminal for Telnet to bind to. [Andrew] realized he was a bit out of his league on this hack and decided to open up his research to people much more experienced in embedded Linux environments. If you’ve been playing around with a Wi-Drive, or you want a tiny battery-powered NAS, send us something on the tip line and we’ll follow up on this post.

Putting A Software Defined Radio On A Mac

A few months ago [Antti Palosaari] discovered cheap USB TV tuners could be used as a software-defined radio. Since then, we’ve seen these TV tuners receive signals from GPS satellites and even the signals between air traffic control and passenger aircraft. Like everything cool, Mac support for these drivers is slightly terrible so [hpux735] wrote his own Cocoa app to support these amazing dongles.

[hpux735]’s driver is a port of the osmocom driver, repackaged as a native Cocoa app so the terribly fickle libusb and other dependencies aren’t needed. All the code is up on GitHub, ready for you to start playing around with SDR.

As far as tutorials for those wading into the deep waters of software-defined radio, a number of how-to guides have popped up over the last month to get SDR noobs up and running quickly. Here’s a few of the best ones we’ve seen:

[braingram] put up an Instructable for Ubuntu users.

For people who have a Windows box lying around [balint] put up a getting started guide.

There’s a slightly more thorough Windows guide here.

Most of the development in the TV tuner SDR community is happening on the RTLSDR subreddit, and there’s more than enough info there to do just about anything with these TV tuner dongles. If you come up with a novel use for one of these dongles, send it in on the tip line.