It warms our hearts when the community gets together. [esar] needed to get a decrypted HDMI stream for his home theater system. A tip-off in the comments and a ton of good old-fashioned hacking resulted in a HDMI splitter converted into a full-featured HDMI decrypter. Here’s the story.
His amazing custom Ambilight clone got profiled here, and someone asked him in the comments if it worked when High-bandwidth Digital Content Protection (HDCP) is on. [esar] lamented that it didn’t. Hackaday readers to the rescue. [Alan Hightower] and [RoyTheReaper] pointed [esar] to the fact that HDMI splitters need to decrypt and re-encrypt the signal to pass it on, and pointed him to a trick to knock out the on-board microcontroller. [esar] took off from there.
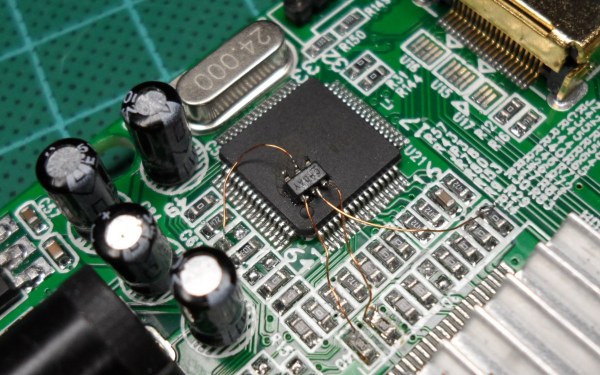
Unfortunately, taking the micro out of the picture messed with a lot of other HDMI functionality. So [esar] started digging in the datasheets for the HDMI splitter chip, looking for registers relevant to the re-encryption. If he could get in between the microcontroller and the splitter chip on the I2C bus and disable the re-encryption, he’d be set.
If you’re at all interested in I2C hacking or abusing HDMI splitters, you need to read his post because he details all of the tribulations and triumphs. He first tries just brute-forcing the I2C by overwriting a 1 bit with a 0. This (correctly) signals the micro that there’s been a conflict on the bus, so it re-sends the command again. Dead end.
He then found another signal that the receiver could use say that it wasn’t decrypting. He tried sending this continuously to the splitter so that it would stop encrypting. That worked, but only for one channel, some of the time. It turns out that his code was taking too long in his bit-banged I2C code. He fixes this up and all is well? Well, 90% of the way there.
To hammer down the last 10% of the functionality, [esar] buys a couple more splitters, experiments around with another splitter chipset that works with 3D, and solders some more wires to enable the Audio Return Channel. And after a ton of well-documented hard work, he wins in the end.