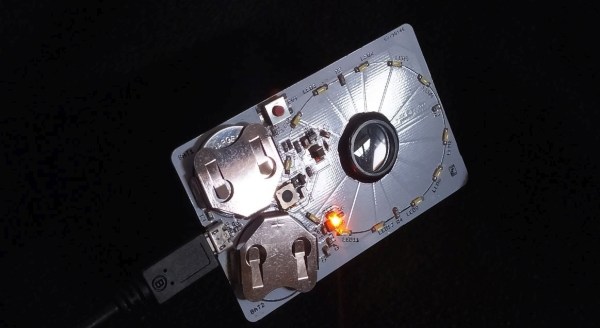
Tree Of Life Branches Out With A Twist

In the middle of 2020, [charlie] challenged himself to conceive of and finish one project every month for the next twelve. Here we are a year later with [charlie]’s last project of the challenge: a tree of life with a bit of a twist to it.

The idea was to build a tree with lights that would represent the leaves and change as the tree went through the seasons. After a lot of searching, he found a really elaborate model meant for CNC carving, but the model maker converted it to an STL. [charlie]’s original plan was to poke the LEDs through the print. After consulting a wise woman, he decided to take the two-color approach and make the background translucent so that the 16 RGB LEDs can shine through.

So, what’s the twist? Well, over time, the tree will develop dementia. One by one, the leaves will lose awareness and go through the seasons backward, or slow down their cycle, or speed up. Eventually, the entire tree recedes into a rainbow of confusion. Sadly beautiful, isn’t it?

No printer? No problem. Trees of life come in all forms, including free-form.

Virtual Racers Battle It Out On Portable WS2812 Track

Sure modern video games are impressive, but you certainly don’t need a 4K display or high speed Internet connection to have a good time. For a perfect example, take a look at this unique one-dimensional racing game put together by [mircemk]. This variation of [Gerardo Barbarov Rostan]’s Open LED Race project has been scaled down so it can be transported easily, though at least for now, you’ll still need to plug it into an external power supply.

The game is pretty straightforward. By rapidly pressing their respective buttons, players race their virtual vehicles on a linear “track” made of 60 WS2812 RGB LEDs. In the most basic of terms, the faster they press their button, the faster the red or green illuminated LED that represents their car moves.

But in practice, things are made a bit more interesting with the addition of simulated gravity for the “hills” the racers will encounter. The cars also have a bit of inertia, and will coast along even when you aren’t mashing the button. There are even optional engine sounds, though as with the visual representation of the cars, a certain degree of imagination is required for the desired effect.

The hardware requirements for this game are minimal, and can easily be adapted to what you have in the parts bin. Beyond the strip of WS2812 LEDs, all you really need is a microcontroller and two buttons. Here [mircemk] is using an Arduino Nano, but you could press pretty much any MCU into service. To make this version as portable as possible, the buttons are built right into the PVC sheet enclosure, but putting them in some wired remotes would make for a bit more comfortable gameplay.

We’ve covered several projects that have aimed to turn the humble string of RGB LEDs into an interactive electronic game over the years. As long as you’ve got an open mind, you can find a whole world hidden inside some blinking lights.

Continue reading “Virtual Racers Battle It Out On Portable WS2812 Track”

How To Make Resin Prints Crystal Clear

[Matou] has always been entranced by the beauty of natural crystal formations [and has long wished for a glowing crystal pendant]. Once he got a resin-based 3D printer, he was majorly disappointed to find out that although transparent resin prints look like delicious candy when they’re still wet, they turn cloudy and dull after being washed in an isopropyl bath and cured with UV light. There must be a way to either polish pieces back to clear, or keep them clear in the first place, [Matou] thought, and set about experimenting with some test crystals (video, embedded below).

As [Matou] found out, the dullness is caused by surface imperfections. Resin prints have layer lines, too, and although they may be super fine and invisible to the naked eye, they will still scatter light. The choices seem obvious — either polish the proud parts down with many grits of sandpaper, or fill the valleys with something to smooth everything out. As you’ll see in the video after the break, [Matou] tried it all, including a coat of the same resin that made the print. It’s an interesting look at the different ways to smooth out resin prints, though you may not be surprised to find that the one with the most work put into it looks the best.

We were hoping to see [Matou] try a green LED in the pendant, but it didn’t happen. If you’re dying to know what that looks like, you can get one of these pendants for yourself by supporting [Matou] on Patreon.

We think crystals are pretty cool, too — especially crystal radios. Here’s the hack-iest one of those we’ve ever seen, free of charge.

Continue reading “How To Make Resin Prints Crystal Clear”

Dedicated LED Animation Framework For ESP32

[Eric Arcana] has been creating animated holiday decorations for several years, which involved a lot of custom code to make things light up the way he wanted, pulling the microcontroller to make changes. Using ESP32s with remote software updates is easier, but [Eric] also wanted to make the code simpler. To achieve this he created Fade, a custom programming language/framework for controlling LED animations from the ESP32.

Fade is written for addressable RGB LEDs like the Neopixel/WS2812. It keeps track of the current color of every LED in the system and allows the user to define what color it should be at a specified time in the future. Time is specified using 10 ms clock cycles. The LEDs will smoothly change from one color to the other in the specified number of clock cycles, without needing to specify what the intermediate colors should be.

Code is written in simple IDE, running on a web server on the ESP32 itself, or on a remote Windows PC. The language is very simple, but still powerful enough to create complex LED animations. A key part of it is the ability to specify multiple concurrent state changes in just a few lines of code. [Eric] also included optioning to take touch button inputs and use them to update the animations. Another nice feature is a simulation window on the desktop IDE. It allows you to create custom LED layouts on PC, and test your code without needing to send it to the ESP32.

Addressable LEDs have made creating large LED installations a lot simpler, like this 6 foot LED ball or a LED Video Wall.

Continue reading “Dedicated LED Animation Framework For ESP32”

Cool WS2811 Trick Makes LED Art Installation Smooth

Normally, when a project calls for addressable LEDs, we just throw a strip of WS2812s and an Arduino together, cobble together some code from the examples in the FastLED library, and call it a day. We don’t put much thought into what’s going on under the hood, unless and until we run into an LED project that’s a little more challenging.

Inventor [Leo Fernekes] found himself in such a situation recently, when he pitched in on an LED art installation. The project called for rings of LED bars around the trunks of trees on a private estate. The physical size of the project and the aesthetic requirements created significant challenges, though. One of these was finding a way to control the LED bars, each of which draws about 100 mA and needs to be very smoothly dimmed. [Leo] looked at the WS2811 LED driver, but found that the low drive current and the 8-bit PWM output failed to tick either of those boxes.

[Leo] solved both problems by using two of the three PWM channels on the chip in concert — one to control the current and one to PWM the LED. The circuit he came up with is deceptively simple — just four transistors, a Schottky diode, and a bunch of passives. The other clever bit is the data interface between LED bars, which can be configured as either single-ended or differential. This allows the same interface to be used for the short distance between bars on a tree, and the longer runs between trees.

As usual, [Leo] does a great job of explaining his design and how it works, which we find very instructional. He did something similar when he managed to dim a non-dimmable LED fixture.

Continue reading “Cool WS2811 Trick Makes LED Art Installation Smooth”

salah_360display-photos

A New Spin On 360 Degree Displays

Back in 2018, [Salah] created a prototype display that seems to defy logic using little more than a Pringles can and a fast motor. While not volumetric, this hack does show the same 2D image from any vantage point in 360 degrees around it.

How can cardboard create this effect? Somewhat like a zoetrope uses slits to create a shutter effect, this display uses a thin slit to limit the view of the image within to one narrow vertical slice at a time. When moving fast enough, Persistence of Vision kicks in to assemble these slices into a complete image. What we think is so cool about this hack is that the effect is the same from any angle and by multiple viewers simultaneously.

The project page and video demonstration after the break are light on details, though the idea is so simple as to not require additional explanation. We assume the bright LED seen in the video below was added to overcome the relatively dim appearance of the image when viewed through the narrow slit and isn’t strictly required.

Continue reading “A New Spin On 360 Degree Displays”

Big 3D-Printed Lamp Tries Some New Features

In lamp design, bulbs are usually given generous clearances because they get hot during use. LED bulbs however give off comparatively little heat, which opens a few new doors. [Mark Rehorst] created this huge 3D printed lamp, made with his custom 3D printer and a hefty 1 mm diameter nozzle, and the resulting device not only looks great, but shows off a few neat design features.

The LED filament bulb doesn’t give off much heat, so a PETG partial shade mounted directly to the bulb works fine.

[Mark] printed a partial shade in PETG that is made to sit directly on the bulb itself. The back of the shade is open, allowing light to spill out from behind while the front of the bulb is shielded, making it easier on the eyes. The result is pretty nifty, as you can see here. It sits in the center of the 600 mm tall lamp, which takes up most of the build volume of his self-made CoreXY-based printer, the UMMD.

The LED filament strands in this style of bulb are pretty neat in their own way, and some of you may remember that when they first became available as separate components, no time was lost in finding out what made them tick.