A Real GPU On The Raspberry Pi — Barely.

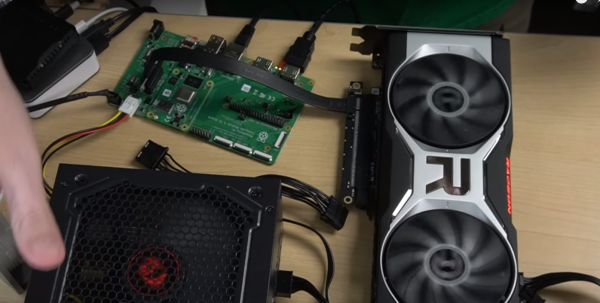
[Jeff Geerling] saw the Raspberry Pi Compute Module 4 and its exposed PCI-Express 1x connection, and just naturally wondered whether he could plug a GPU into that slot and get it to work. It didn’t. There were a few reasons why, such as the limited Base Address Register space, and drivers that just weren’t written for ARM hardware. A bit of help from the Raspberry Pi software engineers and other Linux kernel hackers and those issues were fixed, albeit with a big hurdle in the CPU. The Broadcom chip in the Pi 4, the BCM2711, has a broken PCIe implementation.

There has finally been a breakthrough — Thanks to the dedicated community that has sprung up around this topic, a set of kernel patches manage to work around the hardware issues. It’s now possible to run a Radeon HD 5000/6000/7000 card on the Raspberry Pi 4 Compute Module. There are still glitches, and the Kernel patches to make this work will likely never land upstream. That said, It’s possible to run a desktop environment on the Radeon GPU on a Pi, and even a few simple benchmarks. The results… aren’t particularly inspiring, but that wasn’t really ever the point. You may be asking what real-world use is for a full-size GPU on the Pi. Sure, maybe crypto-mining or emulation, or being able to run more monitors for digital signage. More than that, it might help ensure the next Pi has a working PCIe implementation. But like many things we cover here, the real reason is that it’s a challenge that a group of enthusiasts couldn’t leave alone.

Continue reading “A Real GPU On The Raspberry Pi — Barely.”

Recycling Plastic Into Filament

Plastic is a remarkable material in many ways. Cheap, durable, and versatile, it is responsible for a large percentage of the modern world we live in. As we all know, though, it’s not without its downsides. Its persistence in the environment is quite troubling, so any opportunity we can take to reduce its use is welcome. This 3D printed machine, although made out of plastic, is made out of repurposed water bottles that have been turned into the filament for the 3D printer.

While there’s not too much information available on the site, what we gather is that the machine cuts a specific type of plastic water bottle made out of PET plastic into strips, and then feeds the strips into a heated forming tool. The tool transforms the strips into the filament shape and spools them so they are ready to feed back into a 3D printer. As a proof of concept, it seems as though this machine was made from repurposed plastic, but it could also be made using whatever filament you happen to have on hand.

As far as recycling goes, this is a great effort to keep at least some of it out of landfills and oceans. Unfortunately, plastic can’t be recycled endlessly like metal, as it will eventually break down. But something like this could additionally save on some filament costs for those with access to these types of bottles. Other options for creating your own filament also include old VHS tapes, but you will likely need a separate machine for that.

Multiband Crystal Radio Set Pulls Out All The Stops

Most crystal radio receivers have a decidedly “field expedient” look to them. Fashioned as they often are from a few turns of wire around an oatmeal container and a safety pin scratching the surface of a razor blade, the whole assembly often does a great impersonation of a pile of trash whose appearance gives little hope of actually working. And yet work they do, usually, pulling radio signals out of thin air as if by magic.

Not all crystal sets take this slapdash approach, of course, and some, like this homebrew multiband crystal receiver, aim for a feature set and fit and finish that goes way beyond the norm. The “Husky” crystal set, as it’s called by its creator [alvenh], looks like it fell through a time warp right from the 1920s. The electronics are based on the Australian “Mystery Set” circuit, with modifications to make the receiver tunable over multiple bands. Rather than the traditional galena crystal and cat’s whisker detector, a pair of1N34A germanium diodes are used as rectifiers — one for demodulating the audio signal, and the other to drive a microammeter to indicate signal strength. A cat’s whisker is included for looks, though, mounted to the black acrylic front panel along with nice chunky knobs and homebrew rotary switches for band selection and antenna.

As nice as the details on the electronics are, it’s the case that really sells this build. Using quarter-sawn oak salvaged from old floorboards. The joinery is beautiful and the hardware is period correct; we especially appreciate the work that went into transforming a common flat washer into a nickel-plated escutcheon for the lock — because every radio needs a lock.

Congratulations to [Alvenh] for pulling off such a wonderful build, and really celebrating the craftsmanship of the early days of radio. Need some crystal radio theory before tackling your build? Check out [Greg Charvat]’s crystal radio deep dive.

Plinko-Like Build Takes Advantage Of Wireless LEDs

Imagine if you had some magic glowing beads, that would emit beautiful colors without any wires tangling them up. They exist, in the form of wireless induction-powered LEDs, and [Debra] of Geek Mom Projects has been experimenting with them in a new way.

The build takes the wireless LEDs and wraps each one up in a 1/4″-thick clear ring of acrylic. This toughens up the LEDs and helps diffuse their light. They’re then installed in a hexagonal plastic container, featuring a grid of screws not unlike the metal pins of the game Plinko. Thanks to the induction coil mounted behind, the LEDs glow as they ricochet around the metal pins in various ways.

We’d love to see the container full of LEDs mounted on a slowly-turning motor, such that they would tumble around endlessly, glowing all the while. It would be quite mesmerizing, in much the same way as the kaleidoscope project [Debra] built using these parts previously. Video after the break.

Continue reading “Plinko-Like Build Takes Advantage Of Wireless LEDs”

Tiny RISC Virtual Machine Is Built For Speed

Most of us are familiar with virtual machines (VMs) as a way to test out various operating systems, reliably deploy servers and other software, or protect against potentially malicious software. But virtual machines aren’t limited to running full server or desktop operating systems. This tiny VM is capable of deploying software on less powerful systems like the Raspberry Pi or AVR microcontrollers, and it is exceptionally fast as well.

The virtual machine is built from scratch, including the RISC processor with only 61 opcodes, a 64 bit core, and runs code written in his own programming language called “Brackets” or in assembly. It’s designed to be modular, so only those things needed for a given application are loaded into the VM. With these design criteria it turns out to be up to seven times as fast as comparably small VMs like NanoVM. The project’s creator, [koder77], has even used its direct mouse readout and joystick functionality to control a Raspberry Pi 3D camera robot.

For anyone looking to add an efficient VM to a small computing environment, [koder77] has made the project open-source on his GitHub page. This also includes all of the modules he has created so far which greatly expand the project’s capabilities. For some further reading on exceedingly tiny virtual machines, we featured this project way back in 2012 which allows users to run Java on similar hardware.

2022 Sci-Fi Contest: The Winners Are In

The Sci-Fi Contest closed out on Monday, and we put our heads together and picked our favorites. And it was no easy task, because in addition to many of the projects simply looking stellar, many went all-out on the documentation as well, making these stellar examples that we can all learn from, whether you’re into sci-fi or not. But who are we kidding? From the responses we got, you are.

The Winners

[RubenFixit]’s Star Trek Shuttle Console is a Trek themed escape room in a box. The project’s extraordinary attention to detail and exhaustive project logs absolutely won our judges heart. From the LCARS graphics to the 3D printed isolinear chip bays and mimetic crystals, it’s all there. [Ruben] estimates about 300 hours of work went into this one, and it shows.

We had no shortage of robotic projects in the contest, but [RudyAramayo]’s R.O.B. won our judges over. This one is not a joke, weighing in at over 140 lbs of custom metalwork and righteous treads. It’s also made out of some expensive hardware all around, so maybe this isn’t your weekend-build robot. We love the comment on the Arduino test code suite: “For gods sake man, you must test your code when it becomes an autonomous vehicle.”

Finally, [zapwizard]’s Functional Razor Crest Control Lever is a prop and a video game controller in one. We can totally see Grogu playing with this, and we were wowed by the attention to detail in the physical build — with custom gears and a speed limiter — as well as the attention to prop-making detail. Some parts are custom-cut stainless steel plates. 3D printed parts are covered in aluminum tape and chemically aged. Awesome. Oh yeah, it’s also a working USB joystick.

These three winners will be receiving a $150 shopping spree at Digi-Key.

Continue reading “2022 Sci-Fi Contest: The Winners Are In”

Automatic Turntable Makes Photogrammetry A Cinch

Photogrammetry is a great way to produce accurate 3D models of real objects. A turntable is often a common tool used in this work as it helps image an object from all angles. [Peter Lin] wanted a way to run the photogrammetry process with minimal human intervention, and set about building an automated turntable setup.

The build relies on a smartphone to take images of the physical object. The phone is triggered to take photos by an ESP8266, which fires the shutter via the phone’s audio socket. The microcontroller then turns the turntable on for a short period of time after each shot, rotating it by a set angle.

The build still requires objects to be repositioned in various orientations on the turntable now and then, in order to capture the top and bottom areas that would otherwise be obscured. However, the grunt work of taking the photos and rotating the objects is now entirely automated.

It’s a useful build for anyone that finds themselves regularly imaging objects to create 3D models. The results of [Peter]’s rig look great, and as a bonus come with life-like textures ready to go. We’ve seen some other great photogrammetry builds before, too. Video after the break.

Continue reading “Automatic Turntable Makes Photogrammetry A Cinch”