[Zak Kemble] likes to build things, and for several years has been pining over various Raspberry Pi products with an eye on putting them into service as a router. Sadly, none of them so far provided what he was looking for with regard to the raw throughput of the Gigabit Ethernet ports. His hopes were renewed when the Compute Module 4 came on scene, and [Zak] set out to turn the CM4 module into a full Gigabit Ethernet router. The project is documented on his excellent website, and sources are provided via a link to GitHub.
A view underneath shows off the RTC, power supply, and more.
Of course the Compute Module 4 is just a module- it’s designed to be built into another product, and this is one of the many things differentiating it from a traditional Raspberry Pi. [Zak] designed a simple two layer PCB that breaks out the CM4’s main features. But a router with just one Ethernet port, even if it’s GbE, isn’t really a router. [Zak] added a Realtek RTL8111HS GbE controller to the PCIe bus, ensuring that he’d be able to get the full bandwidth of the device.
The list of fancy addons is fairly long, but it includes such neat hacks as the ability to power other network devices by passing through the 12 V power supply, having a poweroff button and a hard reset button, and even including an environmental sensor (although he doesn’t go into why… but why not, right?).
Testing the RouterPi uncovered some performance bottlenecks that were solved with some clever tweaks to the software that assigned different ports an tasks to different CPU cores. Overall, it’s a great looking device and has been successfully server [Zak] as a router, a DNS resolver, and more- what more can you ask for from an experimental project?
This CM4 based project is a wonderful contrast to Cisco’s first network product, which in itself was innovative at the the time, but definitely didn’t have Gigabit Ethernet. Thanks to [Adrian] for the tip!
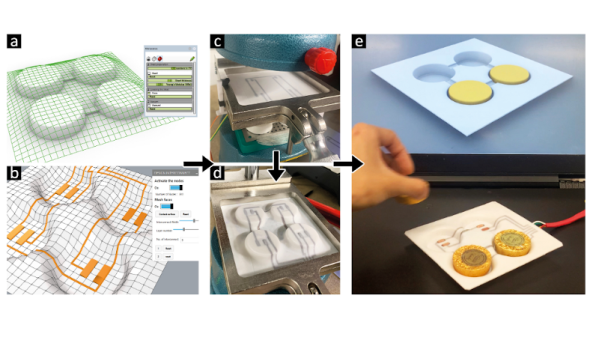
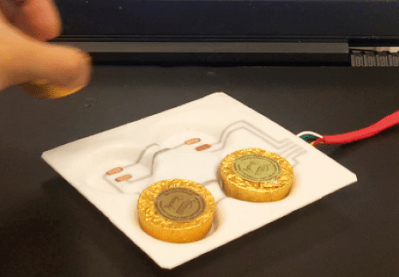
Surface conductors on vacuum formed parts appear in many hacks, from cosplay armor to 3D touch pads and smart objects. But making them has always been painful. Either they had to be hand painted after forming, which looked sloppy and was labor intensive, or they had to be printed with some difficult to use stretchable ink tech. [Freddie Hong] and his group have another solution, using tech most hackers already have – a 3D printer and a vacuum former.
Smart tray created by this method.
They 3D print the traces with conductive PLA filament directly onto a base plastic sheet, and then vacuum form the whole thing. The filament is happy to deform when heated – it’s printer filament.
We like this process. We’ve found conductive filament isn’t reliably resistive across vertical layers, but is reliable in the XY plane. Their method only requires one layer. Also, they suggest 3D printing a layer of non conductive PLA atop most of the conductor, like a PCB solder mask.
Conductive filament has a fair bulk resistance. They suggest electroplating it before applying the top mask layer. They also are exploring 3D printing logos, stripes, and such with colored filament, or even making surface detail like rivets on model parts or adding thickness where the plastic thins during vacuum forming.
Designing the 3D print requires guessing what bit of plastic sheet ends up where in the vacuum formed final part. His group used a commercial program, t-sim, to do the prediction and Grasshopper to import the result into Rhino3D. This seems a lot for a home hacker. Drawing lines on a test sheet and vacuum forming seems simpler.
Computer memory is a problem that has been solved for many years. But early on, it was more than just a small problem. We’ve many of the different kinds at Hackaday over the years, and we’ll link to some of them later on. But one of the original types of memory was called Delay Line memory, which worked by waiting for a signal to propagate slow enough through a device that it was essentially stored in the device. This was highly inefficient, but still a neat concept- one that [Tom7] has taken to entirely new levels of amazing and impractical as seen in the video below the break.
Such factors as “harm to society” are artfully considered
Starting with a demonstration of orbiting chainsaws, he then moves on to explaining how radio propagation waves could be used to temporarily store data while it’s in transit. He missed the opportunity to call it cloud storage, but we’ll forgive him. Extrapolating that further, he decided to use the Entire Internet to store data without its permission, utilizing large ICMP packets and even making it available as block storage in Linux.
Not content to use the entire Internet to store a few kb of data, he moved on to several thousand virtualized NES game systems which are all playing “an inventory management survival horror game” commonly known as Tetris. [Tom7] deconstructs Tetris, analyzing its Random Number Generator, gaming the system to store data in virtual NES consoles by the thousands. What data did he store? The source code to Tetris for the NES. And what did he do with it? Well, he mounted it and ran the program, of course!
The last Harder Drive we’ll leave for those who want to watch the video, because it’s a bit on the “ewww gross!” side of things but is also a bit less successful due to some magic smoke being released.
If none of these things we’ve mentioned were enough, then watch the video for an excellent breakdown of the cost, efficiency, and even the harm to society. For fun, he also tosses blockchain into the mix to see how it fares against the Harder Drives. There’s also at least one easter egg in the video, and the whimsical discussion of engineering is both entertaining and inspiring. How would you implement a Harder Drive?
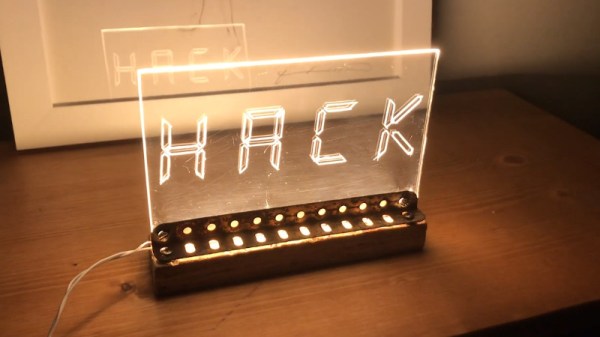
Whether in a shop window or mounted to the top of consoles in NASA’s Mission Control Center, edge lit acrylic is a popular choice for making high visibility signs. Partly because of their striking hologram-like appearance, but also because they’re exceptionally cheap and easy to produce. Just how cheap and easy? Take a look at this recent video from [Hack Modular] for a perfect example.
Now you might think you’d need something like a CNC router to produce a sign like this, and for more complex images, that’s arguably the case. But if you’re only concerned with text, and have a fairly steady hand, you can pull off the etching step with nothing more exotic than a printed template and a razor blade. Of course, the LCD style font that [Hack Modular] picked for this sign is particularly well suited to hand cutting — if you’re interested in edge lit calligraphy, this method probably isn’t what you’re looking for.
This linear LED provides a more consistent light.
With the text carved into the acrylic, the only missing ingredient is light. For that, [Hack Modular] is using a 12 volt linear LED strip light. That is, instead of being dotted with individual LEDs like traditional strips, it provides a continuous band of light that’s perfect for this application. That gets stuck down to a scrap piece of wood, and a rusty angle bracket from an old Meccano set is used to hold the acrylic right on the center-line. If you think the final product looks like something that was created from trash, don’t feel bad, that was the intent.
The end result looks great. In fact, if we’re being honest, it’s a lot better than we would have thought was possible using hand tools. Granted the choice of font has a lot to do with that, but then again, we wouldn’t mind if all our edge lit acrylic signs ended up looking like big seven-segment displays either.
Every fan of the original Star Wars trilogy knows the plight of Han Solo, who was so cruelly frozen in carbonite by Imperial forces. [erv.plecter] came into possession of a replica Solo, this time frozen in polyurethane, and set about using it as the door for a home theater setup.
Just like in the movie, there are a series of controls and lights on the side of the door, clearly intended to represent the state of the carbonite block and the smuggler trapped within. This was achieved with the use of a SAMD51 microcontroller, which controls five meters of WS2812B LED strip along with a small OLED display.
There’s also an amazing little smoke effect, built using a vape inhaler. These devices have proved popular for all kinds of theme builds and costumes, as it turns out. They’re a great way to produce a visible fog or smoke in a tiny, compact package.
[erv.plecter] was kind enough to share plenty of details on the build, including how the polyurethane cast was assembled into the door. The final result looks remarkably authentic, and would surely prove a hit at any Star Wars movie night. Just don’t spoil things by forcing everyone to sit through Revenge of the Sith. Video after the break. Continue reading “2022 Sci-Fi Contest: A Very Star Wars Door”→
It’s no surprise that the hacking and making community has traditionally had something of a love affair with movie props, especially those of the science fiction variety. Over the years we’ve seen folks put untold hours into incredible recreations of their favorite pieces of fictional gear — and by the time this post goes out, our 2022 Sci-Fi Contest will be entering into the final stretch. So it’s a safe bet that if you make your living by creating the electronics behind all that Hollywood movie magic, you’ll find ours to be an especially welcoming community.
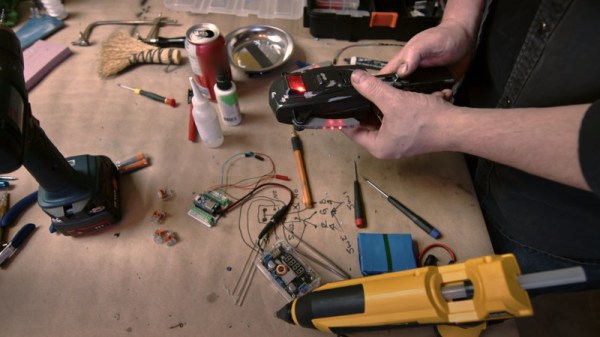
We were fortunate enough to see this in action this week when Ben Eadie stopped by to host the Hack Chat. It’s no exaggeration to say that he’s been living out what most of us would consider a dream, having worked on films from iconic franchises such as Star Trek and Predator. But perhaps his most enviable credit is that of propmaster for 2021’s Ghostbusters: Afterlife, where he got the chance to work on the proton packs and ghost traps; arguably some of the most well-known props in the history of cinema.
Not bad for a guy who only recently got in the game. Ben spent 20 years working as an aerounatical engineer until a friend from his local maker space mentioned they were working on a film and could use a hand. Suddenly he found himself behind the scenes of Star Trek: Beyond in 2015, helping to design and fabricate one of the largest rotating sets ever made. He figures he must have done something right, because Hollywood has been calling ever since.
This anecdote about his first time working on a feature film helped answer what many wanted to know early on in the Chat, which was how one manages to get into the prop and special effects industry. Ben once again confirmed a truth well known to this community: that what you’re capable of is far more important than where you went to school and what you studied. There’s not a lot of formal education out there that can train you to make the impossible possible, and Ben says the majority of his day-to-day knowledge came from a lifetime of fiddling around with electronics. In fact, he attributes much of his professional success with hanging out in maker spaces, reading Hackaday, and watching YouTube. If that’s the recipe, then we should all be in pretty good shape.
Over the last few years, Ben has been trying to pay that forward by documenting some of the tricks of the trade on his own YouTube channel. In a particularly interesting piece of marketing on Sony’s part, some of Ben’s videos have even been featured on the official Ghostbusters YouTube channel as part of a “Maker Monday” series. In fact, we first got in contact with Ben when he left a comment on our coverage of his “PKE Meter” prop build. This is the kind of advertisement we can get behind, and wish more companies would embrace the hacker and maker culture with this kind of interactive content. Ben says the best way to make initiatives like this more popular is to consume it — if Sony sees people watching and sharing this kind of content, hopefully more will follow.
Of course, it wouldn’t be a Hack Chat unless some arcane compartmentalized technical knowledge was dished out. In this case, several of the questions were about the unique challenges posed by operating custom electronics on a movie set. For example, Ben says he always uses addressable LEDs controlled by the APA102 chip as it offers an external clock pin that he can feed with a different frequency to avoid on-screen flickering. The radio spectrum also tends to be pretty noisy on set, so if at all possible, you want to make sure your gear has a wired connection. Otherwise, you’ll need to get intimately acquainted with what other RF signals are being used on set so as not to interfere with the production.
Ben’s creations include the Remote Trap Vehicle (RTV) from Ghostbusters: Afterlife.
But while some of the challenges he has to deal with might seem pretty foreign to us, the technology itself is in some cases more familiar than you might think. It turns out there’s plenty of Sparkfun and Adafruit gear behind the scenes, with Ben specifically mentioning the Feather nRF52 as one of his go-to microcontrollers. Sometimes the graybeards on set grumble about his “consumer grade” tech, but when his gear is up and running in half the time, it’s usually he who gets the last laugh.
Towards the end of the Chat, Ben says the most important thing he’s learned over the years is to always have backups. His motto is “One is None”, and if he can help it, he usually builds four of everything: that gives him two to learn from, and a pair to actually use for whatever the project is. Even if our own projects don’t quite rise to the level of a key prop from a summer blockbuster, there’s no certainly no harm in being prepared.
We want to thank Ben Eadie for taking the time to talk with the community and sharing some of his fascinating stories and tips with us. At the risk of sounding a bit sappy, stories like his are what motivates us here at Hackaday. If we can provide even a small part of the what it takes to help people like Ben achieve their goals, that’s reason enough for us to keep the lights on.
The Hack Chat is a weekly online chat session hosted by leading experts from all corners of the hardware hacking universe. It’s a great way for hackers connect in a fun and informal way, but if you can’t make it live, these overview posts as well as the transcripts posted to Hackaday.io make sure you don’t miss out.
Join Hackaday Editor-in-Chief Elliot Williams and Assignments Editor Kristina Panos as we gab about the most interesting hacks and stories of the previous week. This time, we start off by marveling over everything happening this weekend. Most urgently, it’s your last chance to enter the 2022 Sci-Fi contest, which closes Monday, April 25th at 8:30 AM Pacific Time sharp. Already got your hat in the ring? If you’re anywhere in the neighborhood of New Jersey, don’t miss the VCF’s Vintage Computer Festival East. Don’t want to leave the house? Then check out all the talks that start approximately right now, assuming you get your Hackaday Podcasts hot off the server.
In this episode, we’ll fawn over a KiCAD plug-in that gives your PCBs that old-timey look, discuss ancient telephone exchanges and the finest in 70s-era custom telephones, and dream about building a wall of sound out of Raspberry Pis. Then we’ll talk about awesome old printers and the elegance of RSS feeds, developing your own digital film, and a really cool line follower robot that works without a brain. Stay with us to find out where Kristina likes her taskbar, and we’ll tell you the cool-kid name for the the Commodore key.