Sex And Blinky LEDs At Burning Man

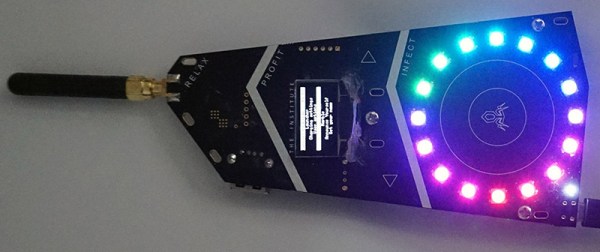
[Bunnie] was at Burning Man this year, and to illuminate his camp members in the dark and dusty nights of the playa, he created a blinky badge. This isn’t just any badge stuffed with RGB LEDs; each of the badges were unique by the end of Burning Man. These badges were made unique not by twiddling dials or pressing buttons; all the color patterns were bred with badge sex.

This social experiment to replicate nature’s most popular means of creating more nature is built around a peer to peer radio. Each badge is equipped with a radio, a circle of RGB LEDs, and a bit of code that expresses the pattern of lights on the badge as a sequence of genes. When one badge gives consent to another badge, they ‘breed’, creating a new pattern of lights. If you’re wondering about the specifics of the act, each badge is a hermaphrodite, and each badge transmits a ‘sperm’ to fertilize the other plant’s ‘egg’. There’s even a rare trait included in the genome of the badge; each badge has a 3% chance of having a white pixel that moves around the circle of LEDs. [Bunnie] found this trait was more common after a few days, suggesting that people were selectively breeding their badges.

Of course, finding potential mates is a paramount concern for any sexual organism, and the sex badge has this covered, too. The 900MHz radio listens for other badges in close proximity, and when any are found their owners are displayed on an OLED display. This came in handy for [Bunnie] more than a few times – there’s no phones out there, and simply knowing your friends are within a hundred meters or so is a big help.

The entire badge platform is documented online, along with the code and spec for badge genes. Badges with some sort of wireless communication have been around for a while, but this is the first time that communication has been used for something more than sharing contact information or implementing a chat room. It’s a great idea, and something we hope to see more of in future con badges.

The Netflix And Chill Button

While the people at Netflix were busy killing weekends around the world with marathon viewings of 90s sitcoms, they also found time to release the Netflix Switch. It’s a small device with a single button that will control your TV, turn off the lights, and order a pizza. Remember, time you enjoy wasting is not wasted time.

netflix
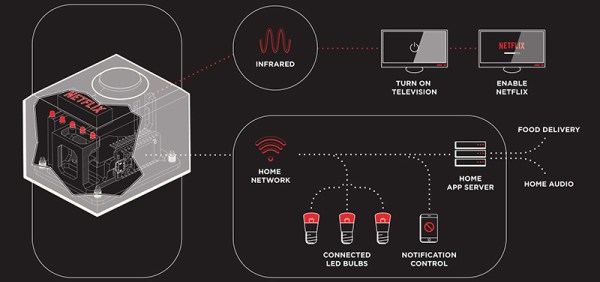
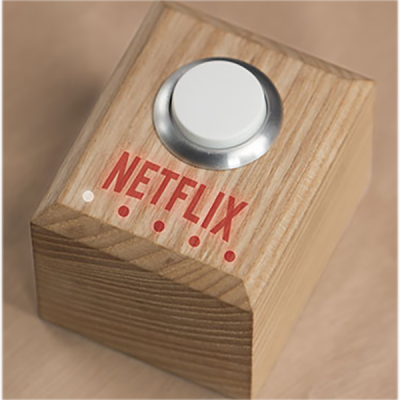
The Netflix Switch is a relatively simple device powered by a Particle Core, an Arduino-compatible development board with on-board WiFi. Also in this box is a LiPo battery, a few LEDs, and an IR transmitter that will send the same IR signal as the Netflix button on your TV remote, should your remote have a Netflix button.

In an unprecedented break from reality, this astute corporate branding of electronics tinkering also has design files, schematics, and real instructions that come along with it. Netflix released all of the mechanical files for their switch in Solidworks format; for the low, low price of only $4000 per Solidworks license, you too can Netflix and Chill.

Although Netflix’ implementation of tapping into a DIY electronics movement that has been around for 100 years is lacking, the spirit of the build is laudable. A single button connected to the Internet is a universal tool, and whether you want to order a pizza or make a ‘do not disturb’ button for your phone, the only limitation for the Netflix and Chill button is your imagination.

Demonstrating Baudot Code

Visualizing how electronic signals work can be difficult. A physical model can be darn useful in overcoming that difficulty. At a recent workshop entitled “Unboxing Black Boxes” [Julian Hespenheide’s] group created a device to show Baudot Code in operation. This amalgam of wood and Arduino they dubbed émile in honor of Émile Baudot (1845-1903).

Baudot developed his code to transmit telegraph signals from one machine to another, in contrast to Morse code which was principally for human communication. Both codes were used throughout the 20th century. For example, those big clattering, mechanical teletype machines use a minor variation of Baudot code.

Baudot is a fixed length code of 5 bits, as opposed to Morse’s variable length code. Morse has a separate code for each characters while Baudot uses “shift’ codes to change between alphabet and figure characters. For instance, a binary 11 would represent either an ‘A’ or a ‘-‘ depending on the shift state. If the shift code was missed the receiver would get gibberish.

In émile the Baudot code is sent by marbles. That’s right, marbles. There are five marbles, one for each bit in the Baudot code. Each marble rolls in a track toward the Arduino. How does the machine know which marbles to send? “Punch cards”! These are a marvelous aspect of the design.

Each card represents a code. Each position in the card has a gap to allow a marble to pass ( a set bit), or no gap to block the marble (an unset bit). The operator loads 5 marbles and a punch card and launches the marbles via a spring mechanism.

[Julian’s] really created a great visualization of Baudot code with this project! Take a look at émile in action after the break. Continue reading “Demonstrating Baudot Code”

Hackaday’s Omaha Mini Maker Faire Roundup

The 2nd annual Omaha Mini Maker Faire wasn’t our first rodeo, but it was nonetheless a bit surprising . Before we even made it inside to pay our admission to the Omaha Children’s Museum, I took the opportunity to pet a Transylvanian Naked Neck chicken at one of the outdoor booths. The amiable fowl lives at City Sprouts, an Omaha community farming collective in its 20th year of operation. There seemed to be a theme of bootstrappy sustainability among the makers this year, and that’s great to see.

Just a few feet away sat a mustard-colored 1975 Chevy pickup with a food garden growing in its bed. This is Omaha’s truck farm, an initiative that seeks to educate the city’s kids in the ways of eating locally and growing food at home.  On a carnivorous note, [Chad] from Cure Cooking showed my companion and me the correct way to dry-cure meats using time-honored methods.

Continue reading “Hackaday’s Omaha Mini Maker Faire Roundup”

Foam And Antistatic Bag Bring Vintage Compaq Keyboard Back To Life

After winning an online auction for an 1980s vintage Compaq Portable PC, [leadacid44] discovered why it only cost him $5USD – the keyboard was shot. Not willing to accept having forked out $45USD to ship a brick, he tore into the ancient machine and came up with a found-material solution to the wonky keyboard.

[leadacid44]’s very detailed writeup of the fix for his Compaq includes a thorough examination of the guts of the machine. He got it to boot to MS-DOS 5.0 off of a 20MB ISA hard drive card and began probing the keyboard problem. It turns out the Compaq keyboard has much in common with a modern touchscreen, in that it’s a capacitive keyboard. Unfortunately the foam disks used as springs under each key cap had degraded over the last 30 years, so [leadacid44] began a quest to replace them. After much experimentation and a few false starts, he created a sandwich of transparency film, closed-cell polyethylene foam, and a Mylar antistatic bag. Many discs were punched out with a leather punch and tediously placed in the body of each key switch, and the quick brown fox was soon jumping flawlessly over the lazy dog.

We’ve seen some fixes to these lovable luggables before, like this dumpster queen that became a Hackaday Retro submission. At least [leadacid44]s machine didn’t release the Magic Blue Smoke like that one did.

Air Rocket Launch Pad UI Entertains Eager Kids

Last spring [Mike] built a foam rocket launchpad which was a hit with the kids in his neighborhood. But the launch system was merely a couple of buttons so the early enthusiasm quickly wore off. He went back to the drawing board to make improvements and really hit the jackpot!

The original launch system had one button for building up air pressure with a second big red button of doom for launching the rocket. The problem was a complete lack of user feedback; all the kids could do is guess how long they needed to hold the button to achieve the highest launch. This revision adds flashing LEDs to hold the attention of the wee ones but to also function as a gauge for the new pressure control system. The visually fascinating control board also includes a removable key to prevent accidental launches.

The particulars of this are as you’d expect: it’s a bunch of plumbing to manage the air pressure, an Arduino to control it all, and additional electronics in between to make them work together.

We’re especially impressed by the leap in features and quality from the first version to this one. It’s a testament to the power of quick proofs-of-concept before committing to a more involved build. Great work [Mike]!

We’ve seen rocket launchers for adults and some neat mission control panels but [Mike’s] kid friendly launch controller really is out of this world (sorry, couldn’t resist). You’ll find a video demo of this launcher after the break.

Continue reading “Air Rocket Launch Pad UI Entertains Eager Kids”

Learn Flip Flops With (More) Simulation

In the previous installment, we talked about why flip flops are such an important part of digital design. We also looked at some latch circuits. This time, I want to look at some actual flip flops–that is circuit elements that hold their state based on some clock signal.

Just like last time, I want to look at sequential building blocks in three different ways: at the abstraction level, at the gate level, and then using Verilog and two online tools that you can also use to simulate the circuits. Remember the SR latch? It takes two inputs, one to set the Q output and the other to reset it. This unassuming building block is at the heart of many other logic circuits.

circ5A common enhancement to the SR latch is to include an enable signal. This precludes the output from changing when the enable signal is not asserted. The implementation is simple. You only need to put an additional gate on each input so that the output of the gate can’t assert unless the other input (the enable) is asserted. The schematic appears on the right.

In the case of this simulation (or the Verilog equivalent), the SR inputs become active high because of the inversion in the input NAND gates. If the enable input is low, nothing will change. If it is high, then asserted inputs on the S or R inputs will cause the latch to set or reset. Don’t set both high at the same time when the enable is high (or, go ahead–it is a simulation, so you can’t burn anything up).(Note: If you can’t see the entire circuit or you see nothing in the circuit simulator, try selecting Edit | Centre Circuit from the main menu.)

Continue reading “Learn Flip Flops With (More) Simulation”