MIT Media Lab’s Month In Shenzhen

When you’ve got a month worth of blog postings it’s pretty difficult to choose one photograph that sums it all up. This one shows the tour group from MIT Media Lab in ESD garb ready for their tour of Okano SMT and Speaker Factory. It was part of a tour of Shenzhen aimed at bringing graduate students up to speed on what it means to manufacture products in the city. Luckily, Freaklabs member [Akiba] was one of the staff members of the program and blogged extensively about the experience. At first glance his page full of post abstracts looks really boring, but click through because both his recount and the commented images associated with each day are fun and fascinating ways to tag along with the group.

If you’re really good with faces you can pick [Bunnie Huang] out of the lineup above (he’s the third from the right). He had the original idea for the program and brought aboard a few others to help make the thing a success. The group toured a wide range of factories and parts markets in the city. This included your traditional electronics manufacturing venues but there was even a side trip to a diaper and feminine napkin plant to see the non-electronic factories in operation. In addition to tours there were lectures by industry members like HAXLR8R, a group that specializes in helping start-ups navigate the manufacturing jungle.

Hand Bind Your Own Books

hand-bind-your-own-books

This guide will show you how to bind books by hand. The process from start to finish isn’t very difficult as long as you follow each step along the way. The final product looks great, and we can’t think of a better gift… as long as you have something meaningful on the pages.

We never really thought about the direction of the fibers in a sheet of paper, but that’s the first thing you’ll have to take into consideration here. You want the fibers running up and down when the book is in a bookcase. Next the sheets are organized into stacks of four, then folded in half forming eight pages. After stacking these packets together a series of lines are marked on the folded side. Holes are then punched from the inside at each mark using a sturdy needle. This is where the stitching for the binding will happen. Bands are added using coarse linen thread. After stitching these in place and knotting, glue is added and finally a piece of cloth is adhered to the binding and a portion of each inside cover. From there it’s onto fabricating the cover before pressing the finished project as seen above. What a piece of work!

[via Reddit]

Iron Man Faux Stained Glass Saves $4k

ironman-faux-stained-glass

Check out how the light hits this piece of artwork. It’s a very convincing piece of stained glass… except it’s fake. [Sdtacoma] figured out a way to mimic stained glass using a single pane. The inspiration for the project came after seeing a real stained glass panel featuring Iron Man which was available on Etsy for $4500.

Due to popular demand [Sdtacoma] posted an album of the technique he used. Starting with some art found online he made it black and white, blew it up to size (this thing’s about five feet tall) and used posterizer to print it out using multiple sheets of paper.

The frame and pane were found at a recycled building goods store. After cleaning it up he used the paper template to lay out the dividing lines between different colored sections using Liquid Lead. The product had dimension to it (kind of like puffy paint for fabrics) which looks like the lead tracks between panes of stained glass. Once dry the color was added using an eye dropper to apply glass paint.

Brake Drum And Plumbing Parts Get You Started With Blacksmithing

brake-drum-forge

If you’ve ever wanted to do some serious metal working you’re going to need a method of heating the stock. Here’s a build that combines a brake drum and some plumbing fittings into an entry-level forge. It’s a pretty cheap start to see if Blacksmithing is for you.

[Asuka] says that the parts cost him around $40. The brake drum was sourced from a local salvage yard for ten bucks. To that he added a shower floor drain plate to keep the fuel from falling into the air inlet. We have doubts about how long that thin metal screen will last once the coal really gets going, but heat rises to who knows? On the bottom of the drum he mounted a pipe flange with some nuts and bolts. Galvanized pipe fittings connect to this to inject air into the forge. Right now he’s using a compressor and some garden hose to fan the flames, but plans to get a fan from the auto salvage for a more permanent setup.

A note for beginners. Blacksmith work can be dangerous. We’d like to point you to this discussion thread about injuries.

Build And Install Your Own High-end Cycling Power Meter

Cycling power meters can set you back quite a pretty penny. [Keith] quotes prices starting at $1500 and going up to $4000. We know several serious cyclists who would think twice about spending that on a bike, and wouldn’t even consider putting that kind of investment into an accessory for it. But if you’ve got the time [Keith] will show you how to build and install your own cycling power meter.

The link above is a roundup of all the posts and videos [Keith] made along the way. We’ve embedded his introduction video after the break where he discusses the goals of the project. The system allows for independently measuring the power of each leg. This is accomplished using strain gauges on the cranks to monitor torque. This data is combined with cadence measurements (how fast the rider is turning the cranks) which is all that is necessary to calculate the power output of the rider.

The parts list comes in at about $350. This doesn’t include the equipment he used to test and calibrate his calculations.

Continue reading “Build And Install Your Own High-end Cycling Power Meter”

How 6502 Overflow Works

6502 Overflow Circuit

The 6502 was a ubiquitous microprocessor back in the 80s, powering devices such as the Apple II and the Nintendo Entertainment System. [Ken] took an in depth look at a small part of the processor: the overflow circuit.

In order to do signed calculations, a microprocessor’s arithmetic logic unit (ALU) needs to be able to calculate when an overflow occurs. This happens when two numbers are added that cannot fit in a single byte. The result of a calculation will be incorrect, so the processor must inform the program that an overflow has occurred. This is done by setting an overflow flag.

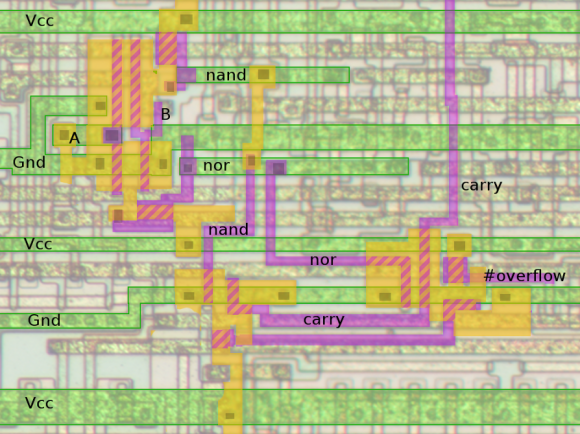
[Ken] uses this example to first explain how the overflow circuit works in logic. He then looks at the gates and a transistor implementation of the logic. Finally, he walks us through the circuit on the actual 6502 die, showing how the circuit is constructed in silicon.

This is a great example to learn a bit more about how ALUs work and how integrated circuits get built.

Make Your Own Machinable Wax

wax

No matter how easy it is to throw a piece of metal or plastic onto a tool and start making chips, the price of materials does add up. [rawkstar320] has been using machinable wax – a very hard wax that is up to the task of being cut with tools spinning at thousands of RPM – to reduce his material cost, simply remelting every part with a mistake. This wax can be made at home, it turns out, and [rawkstar] is glad to walk us through the process.

The creation of machinable wax begins by melting a few pounds of paraffin wax in a home deep fryer. Machining pure paraffin would gum up the works of just about any machine, so [rawkstar] throws a few plastic polyethylene bags into the already melted wax.

After casting and cooling, these blocks of wax are ready to be surfaced with a tool and milled into any part [rawkstar]’s workshop is capable of. As a bonus, all of the chips produced from this wax can be recycled and melted down again making for a somewhat renewable material that is perfect for prototyping or casting.