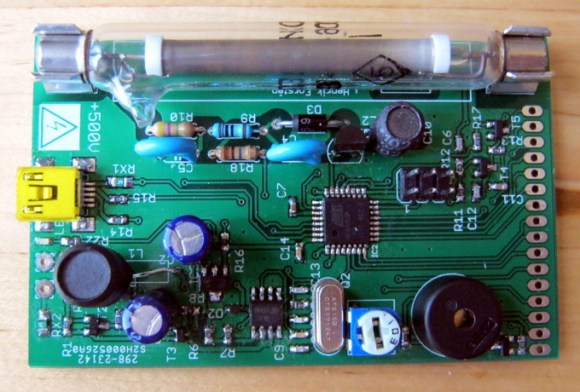
Assigning New Packages To Eagle PCB Components

adafruit-eagle-component-creation-tut

If you’ve spent any time at all laying out your own circuit boards we’re sure you’ve run into the issue of not having the right component or package available in the standard libraries. If it’s a common part, chances are the symbol definition will be there.  But perhaps the footprint you want to use is missing? Here’s an easy to follow tutorial which demonstrates how to assign new packages to existing Eagle PCB components. It even shows the basics of how to tweak the footprint to fit your needs (like making SMD footprints easier to hand solder).

This will not teach you how to make your own custom symbols, or how to build packages from scratch. But it will let you locate the package you want to use from a different component, then copy it to your own library for use with different parts. And the techniques shown make this a quick and relatively painless process.

We certainly don’t want to start another comment quagmire like the recent PIC v. AVR discussion. But we’ve used both Kicad and Eagle rather extensively and feel that neither one has really mastered part/footprint creation in a user-friendly way. We like Kicad’s total separation of footprints from components, and it’s myriad of parameters which can be used to tweak the layout. But if you use the same components frequently, Eagle’s standard of linking parts and footprints does end up saving a lot of time. What do you think?

DIY Space Experiments Within A Ping Pong Ball ‘satellite’

Pongsat space satellite

Ahhh space. The final frontier. While many people dream of one day becoming an astronaut (and possibly battling aliens or cylons), it’s a select few who actually make it their reality. Fortunately for us, there’s a middle ground that allows the masses to still have some fun in the sky. Enter the “Pongsat” program – space experiments within a ping pong ball.

Created by JP Aerospace, this free program allows anyone to create their own mini experiment and send it off to the edge of space. The imagination is the limit. Curious if a marshmallow will expand? Interested what the temperature would be? Wonder if you can charge a solar battery? Stuff it inside a ping pong ball and find out!

Check out the PDF Users Guide to get started, then their Blog and Facebook page for more up to date information.  Now go out there and get your experiment to Mars! (Or at least 100,00 feet)

Watch a video of in flight footage after the break.

[via adafruit]
Continue reading “DIY Space Experiments Within A Ping Pong Ball ‘satellite’”

Beautiful Replica Team Fortress 2 Weapons

gun

We’ve seen our share of replica props, but [Nathan]’s replica of the spy’s sidearm from Team Fortress 2 is the bee’s knees.

The build began as an off-the-shelf Airsoft gun. After removing the barrel and cylinder, [Nathan] used Apoxie Sculpt and a whole lot of sanding to turn a stock piece of metal and plastic into something that came straight from the Mann Co. store. The in-game version of the Ambassador also includes an engraving of the object of the spy’s affection, replicated by [Nathan] with some very careful Dremel work. Once the prop was done, [Nathan] built a mold box out of plywood and filled it with silicone rubber. This allowed him to make several castings of his prop weapon

This isn’t [Nathan]’s only TF2 replica prop; he also made a replica of the stock sniper gun and scout’s scattergun and a megaphone from Borderlands. In an effort to out do himself, [Nathan] is gearing to build a gun that fires two hundred-dollar, custom-tooled cartridges at ten thousand rounds per minute. He has yet to craft any hats.

24V Relay Driver Circuit

driving-24v-relays

[Glitch] got his hands on a slew of relays which are meant for use in industrial equipment. They are designed to operate at 24V. He wanted to use these with common microcontrollers and instead of buying a driver he designed and built his own.

There’s a few things to consider with a project like this. You need a power source, a way to level convert the driver pins, and some protection in case something goes wrong with the circuit. Looking at the board above should give you some idea of what’s going on. There’s a big transformer taking up half of the footprint. This steps down mains voltage to something a 7824 regulator can handle. That’s a 24V linear regulator which is fed by a bridge rectifier along with some smoothing capacitors. With the source taken care of [Glitch] uses an optoisolator for both protection and level conversion. After working the bugs out of the design he was able to control the relay using 3.3V, 5V, or 12V.

Framing Up Your Electronics Projects

framing-up-your-projects

[Victor] may be onto something when it comes to project enclosures. He’s using a picture frame to house his electronics projects. This is made especially easy by the variety of sizes you can find at Ikea. Possibly the most important dimension is to have enough frame thickness to sandwich your components between the glass and the back plate of the frame.

The project seen here is a temperature data logger. The frosted diffuser covering everything but the LCD screen and gives you a glimpse of what’s mounted to the back panel. He connected the four different protoboard components, along with a battery pack, to each other use right angle pin headers. They were then strapped to the back plate of the frame by drilling some holes through which a bit of wire was threaded. He even cut a hole to get at the socket for the temperature sensor and to attach the power input. So that he doesn’t need to open the frame to get at the data, the SD card slot is also accessible. His depth adjustment was made by adding standoffs at each corner of the frame, and replacing the metal wedges that hold the back in place.

You don’t need to limit yourself with just one. This UV exposure rig uses three Ikea frames.

Gifsockets: WebSockets Using Animated GIF Files

gifsockets

Using animated GIF images as a crude WebSocket is an idea we’ve never come across before, but it actually makes a lot of sense. Not in terms of it’s overall usefulness, but just for the fact that the animated files work in a similar way. The nature of these animated containers is what makes it work. A GIF doesn’t tell the browser how many frames to expect, so the connection is kept open until the “hey this is the last frame” command is received. This can be used to stream data to anything that can play the animations.

The demonstration after the break shows this in action. Hello World and a couple of other test messages are pushed to the browser without refreshing the page. In our mind that’s what’s useful — real time updates without a refresh or any underlying client-side code structure. But we haven’t looked into the particulars like does this eat bandwidth even when nothing new is being sent?

When [Hans] wrote into us about this gif hack he referenced this discussion panel on WebSockets. We didn’t watch the whole thing yet, but apparently someone calls the gif trick the WebSocket of the ’90s.

Continue reading “Gifsockets: WebSockets Using Animated GIF Files”

Quick Fixes For SMD Population Problems

Here’s a collection of tricks to get over some surface mount prototyping issues the next time you find yourself in a bind. But first we have to address the soldering atrocity seen on most of the components above. [Rxdtxd] admits he’s using a firestick for soldering his SMD parts. The non-brand 40W iron is just about the worst thing he could be using (well, we guess a candle would be worse). Try to overlook those joints and enjoy his solutions to a couple of other problems.

First up is what to do when you lift a fine-pitch trace like would be found on a TQFP footprint. The fix for this is to grab a junked transformer and use a bit of the enameled wire from the wrappings as a jumper. The wire is quite fine, and the insulation will burn off when soldered which means you don’t need to strip it first.

The second and third tricks both deal with resistors. As you can see above he placed two 1K resistors on a single resistor footprint to make his 2k resistor. The 0603 packages were both soldered standing on end, then connected with a lead from a through-hole component. The other resistor hack piles five components on top of each other to build resistance in parallel. This is not a great idea as it will fail over the long-term, but it will get you though the prototyping stage as long it doesn’t require precise tolerance.