Tearing Apart An Organ And Making A MIDI Keyboard

pedul

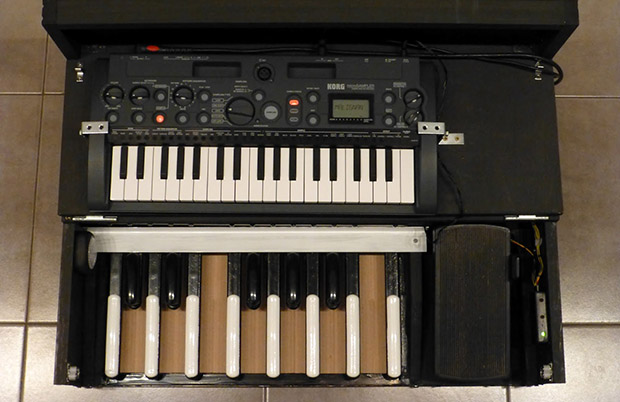
What do you do if you’re in a band and have an old, dead organ lying around? Build a MIDI foot controller, of course.

After dispensing of the old organ guts, [Mark] mounted the pedals in a handsome road case and started working on the electronics. His first inclination was to mount an Arduino Pro Mini on a piece of stripboard, but after that failed decided to learn Eagle and fabricate a PCB. each key of the organ pedals are connected to a switch read by the Arduino which sends data to a Korg Microsampler over MIDI.

The swell pedal from the organ was also reused, but because the old incandescent light in the pedal was toast, this was replaced with an LED. It still works, allowing [Mark] to do volume swells on his new, fancy, MIDI foot controller.

You can check out a video of the controller below.

Continue reading “Tearing Apart An Organ And Making A MIDI Keyboard”

Building A Synth On A Breadboard

synth

Building an analog synth is a challenge, but with the [Tymkrs] protosynth, it’s easier than ever. It’s a 25-key keyboard attached to a stack of solderless breadboards to make analog synth prototyping a snap.

Earlier, [Tymkrs] acquired a whole bunch of solderless breadboards and decided to put them to use by making a component-level modular synth. The earlier incarnation tied each key on the keyboard to a few wires behind the breadboard and tied them in to a shift register so they could be read with a Propeller dev board loaded up with a Commodore SID emulator. The new version keeps the very clean through-the-back keyboard connector, but this time the [Tymkrs] are adding a few more components that add a sequencer setup and a rotary encoder.

The eventual goal for this really cool breadboard synth is to explore the world of Moogs, Arps, and other analog synths easily on a breadbaord. The [Tymkrs] have already put together a breadboard-compatible low pass and high pass filter. While there’s still a lot of work to be done to make an analog synth a reality, the [Tymkrs] are off to a great start.

Continue reading “Building A Synth On A Breadboard”

We Should Build Mandolins And Violas

Lutherie is the art of turning strips of maple and spruce into beautiful stringed instruments like the violin, cello, viola, as well as guitars, mandolins, and banjos. Just about anyone can make an electric guitar on a bandsaw, but the skill and precision of building acoustic instruments is something to stand in awe of.

[Helen Michetschläger] builds violins, violas, and cellos in her hometown of Manchester, each one a work of art. Hardly any of her tools would seem out of place in the workshop of [Stradivarius]; everything is made by hand. The scroll on the neck is carved by hand, the inlaid purfling on the edges of the top and back are cut with a knife, not a router, and even the finish – one of [Helen]’s specialties – is applied with a light touch.

Violins are fine, but for the dulcet tones we enjoy, you’ll need the most beautiful instrument ever created, the mandolin. [Tom Ellis] has been making mandolins for over 40 years. After working in the shop of another accomplished luthier, he struck out on his own to build mandolins.

[Tom] does the tuning and setup on all his mandolins, but there is a bit more machinery involved in the creation of his pieces; quite a bit of the routine stuff (bridges, for example) are milled on a CNC, but each instrument still has a hand-built touch.

There’s much more to the luthier’s art than can be presented in a pair of 6-minute videos, so if you have something else that showcases some of the larger, more difficult instruments such as an archtop guitar or a double bass, send them in. We’ll put them up.

Guitarduino Show And Tell

guitarduino-show-and-tell

[Igor Stolarsky] plays in a band called 3’s & Sevens. We’d say he is the Guitarist but since he’s playing this hacked axe we probably should call him the band’s Guitarduinist. Scroll down and listen to the quick demo clip of what he can do with the hardware add-ons, then check out his video explanation of the hardware.

There are several added inputs attached to the guitar itself. The most obvious is the set of colored buttons which are a shield riding on the Arduino board itself. This attaches to his computer via a USB cable where it is controlling his MaxMSP patches. They’re out of the way and act as something of a sample looper which he can then play along with. But look at the guitar body under his strumming hand and you’ll also see a few grey patches. These, along with one long strip on the back of the neck, are pressure sensors which he actuates while playing. The result is a level of seamless integration we don’t remember seeing before. Now he just needs to move the prototype to a wireless system and he’ll be set.

If you don’t have the skills to shred like [Igor] perhaps an automatic chording device will give you a leg up.

Continue reading “Guitarduino Show And Tell”

MSP430 Touchscreen Piano

msp430-touchscreen-piano

[Rohit Gupta] wrote in to share this touchscreen piano project he built around the TI Launchpad. It provided a way for him to explore using a resistive digitizer found on a lot of mobile devices. These are simply stuck to the top of LCD screens and replacements are inexpensive, but salvaging one from old hardware is an option as well.

The first thing he did was to test the four outputs of the digitizer with his multimeter. Logging the changing resistance will help make sure you’re reading the correct wires and are able to zero in the settings before you start coding. [Rohit] uses the ADC on the MSP430 chip to read from the screen. He went with the algorithm from one of TI’s app notes to convert the readings in to X and Y coordinates.

He separated the screen into seven columns, each generating a different tone. Touching higher or lower on that column will alter the pitch of the note produced. You can hear an example of this in the demo after the jump.

Continue reading “MSP430 Touchscreen Piano”

MIDI Out For A Korg CX-3 Organ

midi-out-for-a-vintage-korg-cx-3-organ

[Michael] loves this old organ of his, but recently he wondered if it would be possible to add MIDI out without altering its original functionality. With a bit of research and more than a bit of hard work he accomplished his goal.

The nice thing about working on a quality piece of hardware like this is the resources you can find regarding how they work (which we bet is tailored for how to repair them when they break). [Michael] found a website with plenty of info on the circuit boards and how they work. From this he was able to locate a few chips which stream serial data regarding which keys have been pressed. Bingo!

Once he located the three signals he was after he built a board to translate them to the MIDI protocol. His circuit is based around an ATtiny2313. It is supported by a liner voltage regulator circuit as well as a buffer chip which converts the incoming signals to the 5V levels needed. His home etched board is clean and well mounted, and the success of the project can be heard in the clip after the jump.

Continue reading “MIDI Out For A Korg CX-3 Organ”