Color Sensor From An RGB LED And A Photocell

When you need to quantify the color of an object, you’ve got quite a few options. You can throw a Raspberry Pi camera and OpenCV at the problem and approach it through software, or you can buy an off-the-shelf RGB sensor and wire it up to an Arduino. Or you can go back to basics and build this reflective RGB sensor from an LED and a photocell.

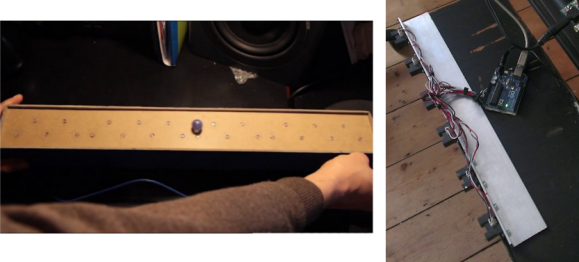
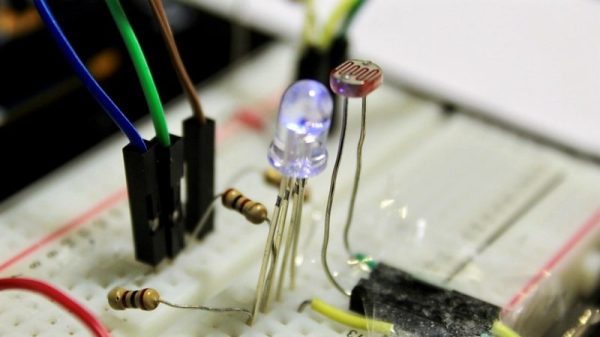
The principle behind [TechMartian]’s approach is simplicity itself: shine different colored lights on an object and measure how much light it reflects. If you know the red, green, and blue components of the light that correspond to maximum reflectance, then you know the color of the object. Their sensor uses a four-lead RGB LED, but we suppose a Neopixel could be used as well. The photosensor is a simple cadmium sulfide cell, which measures the intensity of light bouncing back from an object as an Arduino drives the LED through all possible colors with PWM signals. The sensor needs to be white balanced before use but seems to give sensible results in the video below. One imagines that a microcontroller-free design would be possible too, with 555s sweeping the PWN signals and op-amps taking care of detection.

And what’s the natural endpoint for a good RGB sensor? A candy sorter, or course, of which we have many examples, from the sleek and polished to the slightly more hackish.

Continue reading “Color Sensor From An RGB LED And A Photocell”

Cyborg Photosynthetic Bacteria!

This is weird science. Researchers at Lawrence Berkeley National Laboratory have taken some normal bacteria and made them photosynthetic by adding cadmium sulfide nanoparticles. Cadmium sulfide is what makes the garden-variety photoresistor work. That’s strange enough. But the bacteria did the heavy lifting — they coated themselves in the inorganic cadmium — which means that they can continue to grow and reproduce without much further intervention.

Bacteria are used as workhorses in a lot of chemical reactions these days, and everybody’s trying to teach them new tricks. But fooling them into taking on inorganic light absorbing materials and becoming photosynthetic is pretty cool. As far as we understand, the researchers found a chemical pathway into which the electrons produced by the CdS would fit, and the bacteria took care of the rest. They still make acetic acid, which is their normal behavior, but now they produce much more when exposed to light.

If you want to dig a little deeper, the paper just came out in Science magazine, but it’s behind a paywall. But with a little searching, one can often come up with the full version for free. (PDF).

Or if you’d rather make electricity, instead of acetic acid, from your bacteria be our guest. In place of CdS, however, you’ll need a fish. Biology is weird.

Headline images credit: Peidong Yang

Pair Of Musical Hacks Use Sensor Arrays As Keyboards

sensor-driven-musical-keyboards

This pair of musical keyboard hacks both use light to detect inputs. The pair of tips came in on the same day, which sparks talk of consipiracy theory here at Hackaday. Something in the weather must influence what types of projects people take on because we frequently see trends like this one. Video of both projects is embedded after the jump.

On the left is a light-sensitive keyboard which [Kaziem] is showing off. In this image he’s rolling a marble around on the surface. As it passes over the Cadmium Sulfide sensors (which are arranged in the pattern of white and black keys from a piano keyboard) the instrument plays pitches based on the changing light levels. [Thanks Michael via Make]

To the right is [Lex’s] proximity sensor keyboard. It uses a half-dozen Infrared proximity sensor which pick up reflected light. He calls it a ‘quantised theremin’ and after seeing it in action we understand why. The overclocked Raspberry Pi playing the tones reacts differently based on distance from the keyboard itself, and hand alignment with the different sensors.

Continue reading “Pair Of Musical Hacks Use Sensor Arrays As Keyboards”

Laser Trip Wire – The Bare Essentials

[Gordon] sent us a tip about this simple laser trip wire system after reading yesterday’s post on a more complicated laser security unit. That build did a lot to provide functionality, such as a system to disarm the trip wire, and a robust light detection circuit. This time around there’s more happening with smoke and mirrors than with electronics.

[The Timmy] built this simpler version based on a laser trip system from Afrotechmods (video of that one is embedded after the break). He had a bag full of small square mirrors which he attached to a wall with some poster putty. A laser module shines a beam of light onto a cadmium sulfide sensor after it bounces around the optical network for a while. That CdS sensor controls an N-channel MOSFET, switching it off when light is detected and on when the intensity of the laser is absent. This example just turns an LED on and off, but since it uses logic-level voltages you can choose to add a microcontroller to the mix if you have other plans in mind.

Continue reading “Laser Trip Wire – The Bare Essentials”

Laser Harp

[Jared] had a bunch of lasers left over from a previous project that he put to use by producing this laser harp. The look of it reminds us of a very small Koto or perhaps an Autoharp (although the chords can’t be changed on this model).

We’re so glad that [Jared] spent the time to produce such a fine looking body for the instrument. The strings that would traditionally produce the sound on a harp have been replaced with laser diodes shining at Cadmium Sulfide photo resistors. When a beam of light is broken, an Arduino detects the change via the CdS cell and plays a sound through an Altec Lansing speaker inside of the case.

Unfortunately there’s no video available but we’re pretty sure it makes a “pew-pew” sound. There is a link to download the source code but it points to the overview page instead of downloadable code. From the fritzing diagram the CdS cells are part of a voltage divider which provides digital logic to the Arduino. That should be pretty easy to replicate even without seeing [Jared’s] code and we’re sure you can source other Arduino instrument projects for tips on wave shield or midi functionality.

[Thanks The Cheap Vegetable Gardener]