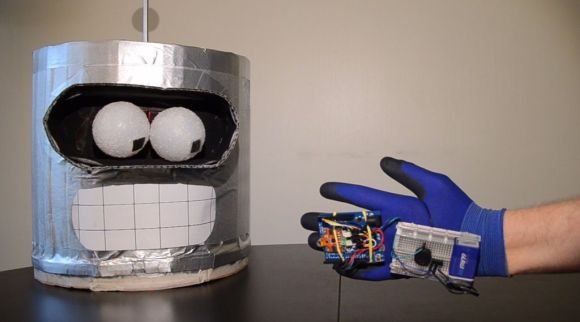
Nine Not-so-easy Steps To Build A Singing Tesla Coil

We love a good Tesla coil music performance, but have never really considered building our own. After reading [TheHomebrewGuru’s] guide to musical Tesla coils we’re still not considering it. Whether or not you’re going to undertake the project, his massive writeup is worth a look.

The tutorial begins at the beginning, with a bit of background on these devices, including what they are, where they came from, and the electrical theory behind them. From there it’s on to the build. This isn’t a go-out-and-buy it type of project. You’re going to need some ingenuity to hunt down parts that will work, and will work with each other.

The image above shows a partially built device, using sheet metal ductwork covered in foil tape as the torroid at the top. The column is wrapped in wire, forming the secondary coil, and the wooden base is ready for the installation of the primary coil. Electronics will be housed between the two wood discs of the base, with a TI Launchpad board driving the music part of the hack.

There isn’t a good demo video of this playing music. But you can get the idea if you look back at the head-mounted tesla coil which did a great job of pumping out the tunes.

Tiny Audio Switcher Eliminates Repetitive Plug Swapping

usb-audio-switcher

[Phil] uses both his computer’s speakers and a set of headphones while working at his desk, but he was growing tired of constantly having to remove the headset from his sound card in order to insert the speaker plug. He’s been meaning to rig something up to make it easier to switch outputs, but never seemed to get around to it until he recently saw this LAN-enabled audio switcher we featured.

His USB-controlled switch features a single audio input and two audio outputs, which he mounted on a nicely done homemade double-sided PCB. The switch can be toggled using any terminal program, sending commands to the on-board ATtiny13A via an FT232R USB to serial UART chip.

The switch’s operation is really quite simple, merely requiring [Phil] to type in the desired audio channel into the terminal. The ATiny and a small relay do the rest, directing the audio to the proper output.

Follow Up: Star Wars Tree Gets An Upgrade

star-wars-tree-sound

We asked, and [Zach] listened.

Earlier this week, we featured a circuit he built which allowed his tiny Star Wars Christmas tree to visually replicate the series’ theme song. Several of you, along with myself, thought it would be far cooler if the tree also played the music to accompany the light show, so [Zach] set off to add that functionality.

Worried that the music would get annoying if it played along with the lights constantly, he tweaked his circuit design to incorporate a piezo buzzer that could be easily switched on and off. After wiring it to the MSP430 driving the light show, he tweaked the program to output signals to both the light string and buzzer simultaneously.

While the light show accurately represented the song, he initially ignored flat and sharp notes as they would be indistinguishable to the eye. In audio form however, the missing notes would be glaringly obvious, so he re-transcribed the sheet music resulting in the video you see below.

If you happened to follow [Zach’s] lead and put one of these together in your own house, be sure to swing by his site and grab the latest code, complete with audio track.

Continue reading “Follow Up: Star Wars Tree Gets An Upgrade”

Hand Made Carbon Fiber Violin Is A Stunning Work Of Craftsmanship

carbon-fiber-violin

Building a violin by hand is no easy task, but constructing one out of carbon fiber is an amazing feat! Carpenter [Ken] had never made a violin before, nor built anything substantial out of carbon fiber, and he figured the best way to learn was by doing.

He spent a good bit of time measuring and drawing out his design before making fiberglass molds of the violin’s front and back plates from carved plaster plugs. The process was extremely time consuming, requiring him to make 10 different infusion-molded carbon fiber body plates before he was satisfied with the sound they produced.

With the larger parts of the violin’s body built, he started on the rib molds, which took him 5 hours apiece to set up before injecting the resin. With the body complete, [Ken] was ready to cut the f holes into the violin – a process that required a lot of time hunched over a tank of water with Dremel in hand.

As you can see in the picture above, the final result is stunning – we just wish we could give it a listen to see if it sounds as good as it looks.

Sound Treating A Studio

Looks like [Dino] is getting the band back together. After a junkyard tube amp and a DIY tremolo stompbox, he’s back again, this time doing a bit of sound treatment in his studio.

Most rooms naturally have a bit of flutter echo. You’ll notice this when you move into an apartment or new house – rooms sound a lot more cavernous without rugs, drapes and furniture. Unfortunately, having a bunch of couches doesn’t bode well for the workflow in a studio despite what MTV Cribs may have told us. The usual solution is to put up some sound-absorbing material on the walls, and a metric ton of cardboard egg cartons don’t work.

[Dino] found a bunch of acoustic panels his neighbor threw out during a renovation (yes, we know, he’s very lucky). After doing some pre-installation tests, the panels were hung. Afterwards, the amount of echo was drastically reduced.

The good news is we finally get a look inside [Dino]’s studio. We saw the junkyard tube amp we covered earlier, but not the neat tremolo pedal he made.

Check out [Dino]’s video of sound treating a room after the break.

Continue reading “Sound Treating A Studio”

Playing Classic 60s Tunes With An All Electronic Band

house-of-the-rising-sun

If you are considering repurposing some old computer equipment to create music, be aware that the bar has been raised just a tad. YouTube user [BD594] spent some time sifting through his bin of used electronics and put together a 5-piece band that plays a pretty awesome rendition of The Animals’ “House of the Rising Sun”.

Last week, we saw a pretty impressive hack with a floppy drive that could bang out music using a calculator, but this takes things to a whole new level. [BD594] used an old HP ScanJet to simulate the song’s vocals, while an Atari 800XL combined with an oscilloscope is used as an organ. A Ti-99/4a is used in conjunction with another scope to play guitar notes, while a PIC-controlled hard drive does double duty, playing both the bass drum and cymbals.

We dare you to watch the video below and NOT be thoroughly impressed with his work.

[BD594] says that once he has a bit of free time, he’ll be putting out another video – something we’ll be anxiously waiting to see.

Continue reading “Playing Classic 60s Tunes With An All Electronic Band”

Musical [Blinky] Candy Tin

Since it’s the holidays and pine trees are being cut down and installed in living rooms all around the world, [Jarv] though it would be a good idea to make a musical Christmas ornament. He needed to keep some of his geek cred, so [Jarv] decided to build a musical [Blinky] ghost from Pacman.

A few weeks ago, [Jarv] sent in his musical greeting card that uses a minimal amount of parts to play a short 8-bit tune. His project was based around an ATtiny85 and sounded pretty good. For his [Blinky] ornament, [Jarv] used a similar circuit along with some old-school Pacman songs that sound great.

[Jarv] found a [Blinky] candy tin and after dispensing with all that pressed sugar began work on his build. In keeping with his greeting card, everything is very minimal. Just a speaker, ATtiny85, and button make up the build. Pressing the button cycles through three songs from Ms. Pacman. The result sounds uncannily like a vintage arcade game, so be sure to check out the video after the break.

Continue reading “Musical [Blinky] Candy Tin”