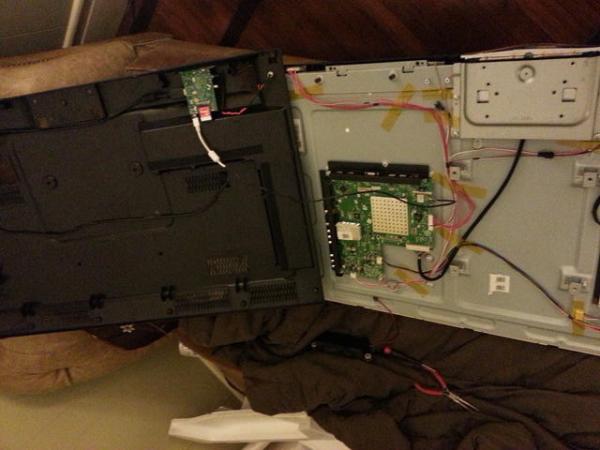
Replacement Controllers For Slot Car Racing

replacement-controllers-for-slot-car-racing

That blur on the right is a car racing into the frame. But look around the rest of the image and you’ll see the area is littered with extra hardware. [Matthew], [Doug], and [Barry] have been hard at work adding extra functionality and replacing the original controllers on this Scalextric slot car setup. So far it looks like their build log has not caught up with all the work they’ve done. We’re hoping to learn more details as they have time to write about them (this is coursework at University so we’re sure there’s a lot on their plates). But for now there are several videos and a gallery of images to drool over.

The cars are controlled by the voltage level in the track. The team replaced the stock controllers with a Raspberry Pi. It manages that voltage using Pulse-Width Modulation via MOSFETs. This allows the races to be automated but also makes it simple for a human operator to use just about any input device imaginable to control the cars. For good measure they also added a lap counter that uses an IR LED and detector to sense when a car passes the finish line.

After viewing several of their videos we think the goal of the project is to log the fasts times without sending the cars flying off the tracks during the turns.

Raspberry Pi Plays MIDI Without An Operating System

[youtube=http://www.youtube.com/watch?v=k6TCysv6AzE&w=580]

For all the interesting DSP functions locked away in the Raspberry Pi, it’s still hard to imagine using the Raspberry Pi as an eminently capable software synthesizer, tracker, or sequencer. Running any of the usual Linux digital audio programs means – surprise – running Linux, and the performance penalty associated with that.

It would be much better if all these audio programs could run directly on the Raspberry Pi without an operating system, and [Joe]’s project is right up that alley. He’s playing MIDI files without an operating system, in effect making the Raspberry Pi a very powerful embedded platform.

[Joe]’s build is the first bare metal audio code for the Raspberry Pi. It’s actually an LV2 plugin host that will load audio plugins, read MIDI files, and shoot the resulting audio out over the 1/8″ jack on the Pi.  This work wouldn’t have been possible without a few Raspberry Pi bare metal tutorials put together by [David Welch].

Hopefully this won’t be the last we’ll see of [Joe] and his code; the Raspberry Pi has more than enough horsepower to be an amazing sampler, synth, beat machine, or the next generation of Akai MPC. All we need are a few brave coders to take up coding bare metal on the Raspberry Pi.

Raspberry Pi Power Controller Adds Shutdown And Startup Functionality

This breadboarded circuit uses a PIC chip to control the Raspberry Pi’s power supply. We first noticed this gap in the RPi features when we built an XBMC setup around the RPi board. It’s not the end of the world, but since installing the Raspberry Pi we have been unplugging it after each use. [Kevin Sangeelee’s] circuit could be the path to automating this process.

This is not really aimed at media applications. The PIC circuit does switch power to the RPi, but the goal was to add a push-button to do so. Other goals of the project include scheduled shutdown and data logging of brownout events on the power rail. As you can see, there’s a coin cell in the mix which keeps time when the system is in power down. The RPi communicates with the PIC via i2c. This facilitates full power-down using the Linux command ‘shudown -h’, as well as the ability to schedule a restart time.

Adding an IR receiver and tweaking the PIC code are all it would take to trigger the power controller from the couch.

[Thanks Donn]

Raspi Astrophotography Board Also Does Everything Else

FPGA

A few years ago the folks at Astro Designs put together a board that took off-the-shelf CCD sensors from point and shoot cameras and turned them into respectable astrophotography sensors. Since then, the world has seen an explosion of Raspberry Pis, Arduinos, and other microcontroller platforms, making this the perfect time for a hardware revision.

Their PiXi-200, like their previous AstroCam board, is able to take image sensors out of cameras and turn them into telescope mounted cameras. That’s only one of its tricks, though: The PiXi-200 also has accelerometers, gyroscopes, enough UARTs to do just about anything, a four channel ADC and four channel DAC, two dozen GPIO pins, enough LEDs and buttons for any project, and a 200,000 gate FPGA. All this in a board that plugs directly into the GPIO pins on the Raspberry Pi just like an Arduino shield. Needless to say, there’s a lot you can do with this board.

Right now, the design is still in the prototype stage, but once everything is finalized the basic model of the board will sell for £30 GBP ($50 USD). The high-end “Model C” board, with all the bells and whistles, will sell for £45 GPB ($70 USD).

Putting The BBC In Seattle

radio

Among great British traditions, there’s tea, knowing how to lose an empire, tea, Parliament, big ben, tea, incalculable wit, Parliament, big ben, tea, and BBC radio. While Britons in foreign lands may not be able receive BBC radio over the airwaves, there is the remarkable BBC iPlayer that allows online streaming of all those awesome BBC radio stations. Unfortunately, moving away from the Prime Meridian means the BBC radio schedule deviates from the schedule ordained by divine right. In Seattle, for example, a Friday evening comedy would be broadcast in the middle of the afternoon. Basically, it’s like listening to  Prairie Home Companion on Saturday morning. It just feels wrong.

[Adam] came up with a clever solution to this problem. Yes, it’s really just a Raspberry Pi-powered web radio, but there’s a twist to this build: everything from BBC radio is buffered and time shifted. A program that airs at noon in London will now play on [Adam]’s radio at noon in Seattle.

The hardware portion of the build is an exceedingly British radio which [Adam] deftly modified to include an auxiliary input. The software portion of the build uses ffmpeg, mplayer, and a PHP script to stream the iPlayer audio to a file, wait 8 hours (or whatever the offset from GMT is), and start playing the audio.

In the end, the time shifted BBC radio works perfectly, and even caught the attention of a few people at BBC Radio 4. [Adam] was interviewed about his project, and was even able to listen to his interview several hours later.

One-button Scan To Email Using Raspberry Pi

one-button-scan-to-email-raspberry-pi

We’ve come across extremely expensive photocopiers that also fax, scan to email, and generally have too many features to list. [Eduardo Luis] figured out how to implement some of this type office magic using very inexpensive components. Specifically, he can press one button to scan a document and send it to an email address.

The user controls patch into the RPi GPIO header. There’s the button we already mentioned, a red LED for “System Busy”, and a green one for “System Status”. A set of scripts montor the button and drive the LEDs. When it’s time to scan, the RPi uses the scanimage package to capture a .PNM file, then converts it to .JPG before sending it via email using the mutt package.

We’d love to see a character LCD and a few more buttons added to the setup. This way you could select between different recipients (or even send via fax). And there’s always the possibility of connecting a printer to the other USB port on the RPi to make it work as a photocopier too.

You can catch a demo video after the jump.

Continue reading “One-button Scan To Email Using Raspberry Pi”

Adding AirPlay To A Shelf System

adding-airplay-to-a-shelf-system

AirPlay is a great system. It allows you to send whatever media is playing from one device to another. Sure, we wish it were a bit more open (Apple is certainly not known for that) but there are several option for creating your own AirPlay receivers. After coming across a project that does just that, [Matt Shirley] decided to turn his shelf system into an AirPlay receiver.

The path to his goal depends on the Raspberry Pi’s ability to receive AirPlay audio using the Shairport package (we just looked in on another player that does this last week). He uses an Edirol UA-5 USB audio interface as an amplifier for his record player. He wasn’t using the USB port for it and knew that it would be simple to connect the RPi USB as a host for the device.

Wanting to keep the look of the system as clean as possible he popped the lid off of the amp. There is just enough room to fit the small RPi board inside. He hacked (literally, look at the pictures) an opening for the USB ports into the side of the metal enclosure. A short patch cable connects from one port to the USB jack on the back of the amplifier. The white cable leaving the side of the case provides power to the Rasperry Pi. The surgery was a success and now he can listen to his tunes with a tap of his finger.