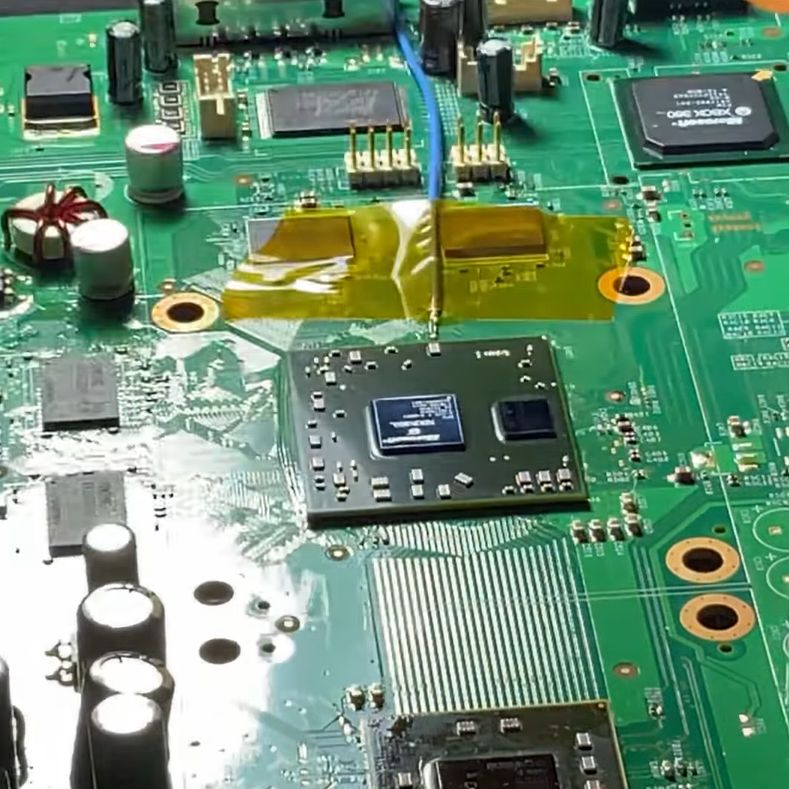
Repairing A Component On A Flex Connector

It used to be you could crack open a TV or radio and really work on the components inside. The smallest thing in there was maybe a disc capacitor a little smaller than your pinky’s nail. Nowadays, consumer electronic boards are full of tiny SMD components. Luckily [StezStix Fix?] has a microscope and the other tools you need. Someone sent him an Amazon Echo Show with a bad touchscreen. Can it be fixed?

The video below shows that it can, but there’s a twist. The bad capacitor was mounted on one of those flexible PCB cables that are so hard to work with. It is hard enough not to damage these when you aren’t trying to remove and replace a component from the surface of the cable.

Continue reading “Repairing A Component On A Flex Connector”

Braun TS2 Radio Turns 68, Gets Makeover

The Braun TS2 radio was a state-of-the art tube set in 1956. Today it still looks great, but unsurprisingly, the one that [Manuel Caldeier] has needed a little tender loving care. The table radio had a distinct style for its day and push-buttons. However, the dial glass and the speaker grill needed replacement. Even more interesting, the radio has a troublesome selenium rectifier, giving him the perfect chance to try out his new selenium rectifier solid-state replacement.

The radio is as good-looking inside as it is outside. You can tell that this isn’t his first restoration, as he has several tricks to test things at different stages of the project.

While the radio looked good, it smelled of smoke, which required a big effort to clean. The dial glass was intact enough for him to duplicate it in a graphic program and print it on a transparent adhesive sticker. With a deep breath, he removed the original markings from the glass so he could add the sticker to it. That didn’t work because the label needed cutouts. So now he is waiting for a piece of acrylic that will have the art UV printed on it.

We want to see the next part as we imagine the radio sounds as good as it looks when it is working. If you want to know more about the rectifier replacement, we covered that earlier. Even years later, Braun would have a clean aesthetic.

Continue reading “Braun TS2 Radio Turns 68, Gets Makeover”

Laptop GPU Upgrade With Just A Little Reballing

Modern gaming laptops are in an uncomfortable spot – often too underpowered for newest titles, but too bulky to be genuinely portable. It doesn’t help they’re not often upgradeable, so you’re stuck with what you’ve bought – unless, say, you’re a hacker equipped some tools for PCB reflow? If that’s the case, welcome to [TechModLab]’s video showing you the process of upgrading a laptop’s soldered-on NVIDIA GPU, replacing the 3070 chip with a 3080.

You don’t need much – the most exotic tool is a BGA rework station, holding the mainboard steady&stiff and heating a specific large chip on the board with an infrared lamp from above. This one is definitely a specialty tool, but we’ve seen hackers build their own. From there, some general soldering tools like flux and solder wick, a stencil for your chip, BGA balls, and a $20 USB-C hotplate are instrumental for reballing chips – tools you ought to have.

Reballing was perhaps the hardest step of the journey – instrumental for preparing the GPU before the transplant. Afterwards, only a few steps were needed – poking a BGA ball that didn’t connect, changing board straps to adjust for the new VRAM our enterprising hacker added alongside the upgrade, and playing with the driver process install a little. Use this method to upgrade from a lower-end binned GPU you’re stuck with, or perhaps to repair your laptop if artifacts start appearing – it’s a worthwhile reminder about methods that laptop repair shops use on the daily.

Itching to learn more about BGAs? You absolutely should read this article series by our own [Robin Kearey]. We’ve mostly seen reballing used for upgrading RAM on laptop and Raspberry Pi boards, but seeing it being used for an entire laptop is nice – it’s the same technique, just scaled up, and you always can start by practicing at a smaller scale. Now, it might feel like we’ve left the era of upgradable GPUs on laptops, and today’s project might not necessarily help your worries – but the Framework 16 definitely bucks the trend.

Continue reading “Laptop GPU Upgrade With Just A Little Reballing”

Screen caps of upgraded BBC Micro, and OS 9 code

BBC Micro: A Retro Revamp With The 68008 Upgrade

The BBC Microcomputer, launched in the early 1980s, holds a special place in computing history. Designed for educational purposes, it introduced a generation to programming and technology. With its robust architecture and community-driven modifications, the BBC Micro remains a beloved project for retro computing enthusiasts. [Neil] from Retro4U has been delving into this classic machine, showcasing the fascinating process of repairing and upgrading his BBC Micro with a 68008 CPU upgrade.

Last week, [Neil] shared his progress, unveiling advancements in his repairs and upgrades. After tackling a troublesome beep issue, he successfully managed to get the BBC running with 32 KB of functional memory, allowing him to boot into BASIC. But he wasn’t stopping there. With ambitions set on installing the 68008 CPU, [Neil]’s journey continued.

The 68008 board offers significant enhancements, including multitasking capabilities with OS-9 and its own hard drive and floppy disk controller. However, [Neil] quickly encountered challenges; the board’s condition revealed the usual broken capacitors and a few other faulty components. After addressing these issues, [Neil] turned his attention to programming the necessary ROM for OS-9.

Looking to get your hands dirty? [Neil] has shared a PDF of the upgrade circuit diagram. You can also join the discussion with fellow enthusiasts on his Discord channel, linked in the video description.

Continue reading “BBC Micro: A Retro Revamp With The 68008 Upgrade”

Xiaomi M365 Battery Fault? Just Remove A Capacitor

Electric scooters have long been a hacker’s friend, Xiaomi ones in particular – starting with M365, the Xiaomi scooter family has expanded a fair bit. They do have a weak spot, like many other devices – the battery, something you expect to wear out.

Let’s say, one day the scooter’s diagnostics app shows one section of the battery going way below 3 volts. Was it a sudden failure of one of the cells that brought the whole stage down? Or perhaps, water damage after a hastily assembled scooter? Now, what if you measure the stages with a multimeter and it turns out they are perfectly fine?

Turns out, it might just be a single capacitor’s fault. In a YouTube video, [darieee] tells us all about debugging a Xiaomi M365 battery with such a fault – a BQ76930 controller being responsible for measuring battery voltages. The BMS (Battery Management System) board has capacitors in parallel with the cells, and it appears that some of these capacitors can go faulty.

Are you experiencing this particular fault? It’s easy to check – measure the battery stages and see if the information checks out with the readings in your scooter monitoring app of choice. Could this be a mechanical failure mode for this poor MLCC? Or maybe, a bad batch of capacitors? One thing is clear, this case is worth learning from, adding this kind of failure to your collection of fun LiIon pack tidbits. This pack seems pretty hacker-friendly – other packs lock up when anything is amiss, like the Ryobi batteries do, overdue for someone to really spill their secrets!

Continue reading “Xiaomi M365 Battery Fault? Just Remove A Capacitor”

HP WebOS TouchPad Gets With The USB-C Times

Despite HP shuttering their WebOS project some time ago, the operating system has kept a dedicated following. One device in particular, the HP TouchPad, was released just a month before webOS went under and is still a favorite among hackers — giving the device the kind of love that HP never could. [Alan Morford] from the pivotCE blog shares the kind of hack that helps this device exist in a modern-day world: a USB-C upgrade for charging and data transfer.

The inline micro USB port used is a perfect fit for a USB-C upgrade, with only small amounts of PCB and case cutting required. Just make sure to get a breakout that has the appropriate 5.1 K resistors onboard, and follow [Alan]’s tutorial closely. He shows all the points you need to tap to let your TouchPad charge and transfer data to your computer, whether for firmware flashing or for daily use.

This hack doesn’t preserve the USB-OTG feature, but that’s fixable with a single WUSB3801. Apart from that, this mod is perfect for keeping your webOS tablet alive and kicking in today’s increasingly USB-C dominated world. Once you’ve done it, you might want to take care of your PlayStation 4 controllers and Arduino Uno boards, too.

Some SPI Flash Chip Nuances Worth Learning

Some hackers have the skills to help us find noteworthy lessons in even the most basic of repairs. For instance, is your computer failing to boot? Guess what, it could just be a flash chip that’s to blame — and, there’s more you should know about such a failure mode. [Manawyrm] and [tSYS] over at the Kittenlabs blog show us a server motherboard fix involving a SPI flash chip replacement, and tell us every single detail we should know if we ever encounter such a case.

They got some Gigabyte MJ11-EC1 boards for cheap, and indeed, one of the BIOS chips simply failed — they show you how to figure that one out. Lesson one: after flashing a SPI chip, remember to read back the image and compare it to the one you just flashed into it! Now, you might be tempted to take any flash chip as a replacement, after all, many are command-compatible. Indeed, the duo crew harvested a SPI chip from an ESP32 board, the size matched, and surely, that’d suffice.

That’s another factor you should watch out for. Lesson two is to compare the SPI flash commands being used on the two chips you’re working with. In this case, the motherboard would read the BIOS alright and boot just fine, but wasn’t able to save the BIOS settings. Nothing you couldn’t fix by buying the exact chip needed and waiting for it to arrive, of course! SPI flash command sets are fun and worth learning about — after all, they could be the key to hacking your “smart” kettle. Need a 1.8 V level shifter while flashing? Remember, some resistors and a NPN transistor is more than enough.