Back in the 1980s, your options for writing your own code and games were rather more limited than today. This also mostly depended on what home computer you could get your hands on, which was a market that — at least in Japan — Nintendo was very happy to slide into with their ‘Nintendo Family Computer’, or ‘Famicom’ for short. With the available peripherals, including a tape deck and keyboard, you could actually create a fairly decent home computer, as demonstrated by [Throaty Mumbo] in a recent video.
Are you in the mood for a retrocomputing deep dive into the Scriptovision Super Micro Script? It was a Canadian-made vintage video titler from the 80s, and [Cameron Kaiser] has written up a journey of repair and reverse-engineering for it. But his work is far more than just a refurbish job; [Cameron] transforms the device into something not unlike 8-bit homebrew computers of the era, able to upload and run custom programs with a limited blister keypad for input, and displaying output on a composite video monitor.
The lovely thing about the x86 architecture is its decades of backwards compatibility, which makes it possible to run 1990s operating systems on modern-day hardware, with relatively few obstacles in the way. Recently [Yeo Kheng Meng] did just that with Windows 98 SE on a 2020 ThinkPad P12s Gen 1, booting it alongside Windows 11 and Linux from the same NVMe drive.
Naturally, after previously getting MS-DOS 6.22 from 1994 running on a 2020 ThinkPad X13, the step to doing the same with Windows 98 SE wasn’t that large. The main obstacles that you face come in the form of UEFI and hardware driver support.
Both ThinkPad laptops have in common that they support UEFI-CSM mode, also known as ‘classical BIOS’, as UEFI boot wasn’t even a glimmer yet in some drunk engineer’s eye when Win98 was released. After this everything is about getting as many hardware drivers scrounged together as possible.
[Yeo] ended up having to bodge on a USB 2.0 expansion card via a Thunderbolt dock as Win98 doesn’t have xHCI (USB 3.0) support. With that issue successfully bodged around using a veritable tower of adapters, installing Windows 98 was as easy as nuking Secure Boot in the BIOS, enabling UEFI-CSM along with Thunderbolt BIOS assist mode and disable Kernel DMA protection.
Because UEFI-CSM implementations tend to be buggy, the CREGFIX DOS driver was used to smooth things over. Another issue is the same that we chuckled about back in the day, as Windows 98 cannot address more than 512 MB of RAM by default. Fortunately patches by [Rudolph Loew] helped to fix this and some other smaller issues.
Unfortunately neither Intel nor NVIDIA have released Win98 drivers for quite some time, so there’s no graphics acceleration beyond basic VESA support and the SoftGPU driver. Disk access goes via the BIOS too rather than using an NVMe driver, so it’s not as zippy as it could be, but for Win9x it’s quite usable.
Finally ACPI wasn’t recognized by Win98, but it’s only fair to blame that on the complete flaming train wreck that is ACPI rather than anything to do with Windows. This particular issue was worked around by configuring the BIOS to support S3 power state and with that making Win98 happy again.
It’s honestly quite a shame that UEFI-CSM is largely ignored by new systems, as it makes installing even Windows 7 basically impossible, and thus creating probably the largest split within the x86 ecosystem since the arrival of AMD64/x86_64.
It’s a bit ironic that an Atari 2600 game based on Raiders of the Lost Ark — a movie about archaeology — is now the subject of its own archaeological expedition as [Dennis Debro] and [Halkun] spent time reverse-engineering the game. Luckily, they shared their findings, so you can enjoy it the same way you can visit a king’s tomb without having to discover it and dig for it. If you don’t remember the game, you might enjoy the demo from [Speedy Walkthroughs] in the video below.
If you are only used to modern software, you might think this is little more than someone dumping the program code and commenting it. However, on these old, limited systems, you have to really understand the actual architecture because there are so many things you have to manage that are specific to the hardware.
For example, the game has two 4K ROM banks that use a strange switching mechanism. The entire game is built around the NTSC television signal. Everything is oriented toward generating the 60 Hz frame rate. Game logic runs during the vertical blanking and over-scan sections to prevent strange visible artifacts due to software running.
This is a fascinating look inside game coding as it existed around 1982. Of course, you can also run everything using emulation. Usually, our reverse engineering is more hardware-related. But we do love these old games, too.
Today, we take office software suites for granted. But in the 1970s, you were lucky to have a typewriter and access to a photocopier. But in the early 1980s, IBM rolled out PROFS — the Professional Office System — to try to revolutionize the office. It was an offshoot of an earlier internal system. The system would hardly qualify as an office suite today, but for the time it was very advanced.
The key component was an editor you could use to input notes and e-mail messages. PROFS also kept your calendar and could provide databases like phonebooks. There were several key features of PROFS that would make it hard to recognize as productivity software today. For one thing, IBM terminals were screen-oriented. The central computer would load a form into your terminal, which you could fill out. Then you’d press send to transmit it back to the mainframe. That makes text editing, for example, a very different proposition since you work on a screen of data at any one time. In addition, while you could coordinate calendars and send e-mail, you could only do that with certain people.
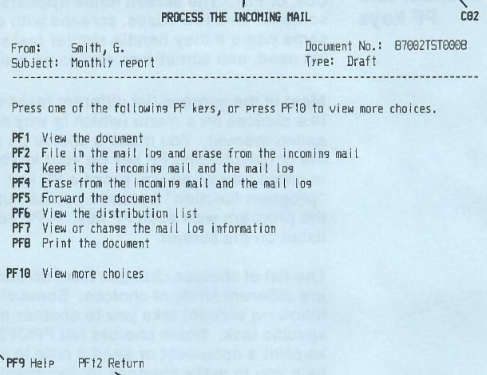
A PROFS message from your inbox
In general, PROFS connected everyone using your mainframe or, perhaps, a group of mainframes. In some cases, there might be gateways to other systems, but it wasn’t universal. However, it did have most of the major functions you’d expect from an e-mail system that was text-only, as you can see in the screenshot from a 1986 manual. PF keys, by the way, are what we would now call function keys.
The calendar was good, too. You could grant different users different access to your calendar. It was possible to just let people see when you were busy or mark events as confidential or personal.
You could actually operate PROFS using a command-line interface, and the PF keys were simply shorthand. That was a good thing, too. If you wanted to erase a file named Hackaday, for example, you had to type: ERASE Hackaday AUT$PROF.
Styles
PROFS messages were short and were essentially ephemeral chat messages. Of course, because of the block-mode terminals, you could only get messages after you sent something to the mainframe, or you were idle in a menu. A note was different. Notes were what we could call e-mail. They went into your inbox, and you could file them in “logs”, which were similar to folders.
Even in a field you think you know intimately, the Internet still has the power to surprise. Sound cards of the 1990s might not be everyone’s specialist subject, but since the CD-ROM business provided formative employment where this is being written, it’s safe to say that a lot of tech from that era is familiar. It’s a surprise then when along comes [DOS Storm] with a new one. The IBM Mwave was the computer giant’s offering back in the days when they were still pushing forward in the PC space, and sadly for them it turned out to be a commercial disaster.
The king of the sound cards in the ’90s was the SoundBlaster 16, which other manufacturers cloned directly. Not IBM of course, who brought their own Mwave DSP chip to the card, using it as both the sound card and the engine behind an on-board dial-up modem. This appears to have been its undoing, because aside from its notoriously flaky drivers, using both sound and modem at the same time just wasn’t a pleasant experience. To compound the problem, Big Blue resorted to trying to bury the problem with NDAs rather than releasing better drivers, so unsurprisingly it faded from view. Perhaps the reason it was unfamiliar here had something to do with it not being sold in Europe, but given that the chipset found its way into ’90s ThinkPads, we’d have expected to have seen something of it.
In the video below the break he introduces the card, and with quite some trouble gets it working. There are several demos of period games which sound a little scratchy, but we can’t judge from this whether they’d have sounded better on the Creative card. If you’d like to immerse yourself in the folly of ’90s multimedia, have a little bit of Hackaday scribe reminiscing.
The Commodore Amiga was famous for its characteristic Say voice, with its robotic enunciation being somewhat emblematic of the 16-bit era. The Commodore VIC-20 had no such capability out of the box, but [Mike] was able to get one talking with a little bit of work.
The project centers around the Adventureland cartridge, created by Scott Adams (but not the one you’re thinking of). It was a simple game that was able to deliver speech with the aid of the Votrax Type and Talk speech synthesizer box. Those aren’t exactly easy to come by, so [Mike] set about creating a modern equivalent. The concept was simple enough. An Arduino would be used to act as a go between the VIC-20’s slow serial port operating at 300 bps and the Speakjet and TTS256 chips which both preferred to talk at 9600 bps. The audio output of the Speakjet is then passed to an LM386 op-amp, set up as an amplifier to drive a small speaker. The lashed-together TTS system basically just reads out the text from the Adventureland game in an incredibly robotic voice. It’s relatively hard to understand and has poor cadence, but it does work – in much the same way as the original Type and Talk setup would have back in the day!