minibloq

Drag And Drop Programming Gets Kids Started Early

While programming an Arduino is a piece of cake for EEs who have been around the block a few times, there are some groups who would still find it difficult to get started with the IDE. It is touted for its ease of use, but there is a steep learning curve if say, you are 5 or 6 years old. [Julián da Silva] has been hard at work for a while now, to make the Arduino more accessible than ever.

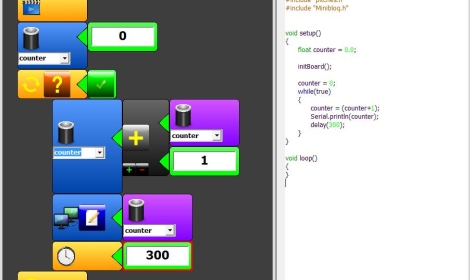
Earlier today, we posted a story about moldable putty which can be used by children to build rudimentary circuits, enabling them to enter the fun world of hobby electronics at a young age. [Julián’s] project “Minibloq” aims to do the same thing with the Arduino. A work in progress, Minibloq uses a graphical interface to “build” Arduino code a block at a time. The code components are dragged and dropped into place on one side of the screen, while the source code is generated on the other half. This helps gently introduce those people new to the Arduino how to write actual code, a little bit at a time.

[Julián] is working hard to ensure that his application works well on OLPC and other classroom-oriented computers to ensure it can reach as wide an audience as possible. We think this would be a great introduction to the world of micro controllers for children as well as those who have never tinkered with electronics at any point in their lives.

Keep reading to see a quick demo of the software in action.

Continue reading “Drag And Drop Programming Gets Kids Started Early”

build_status_board

LED Build Monitor Helps Keep An Eye On Your Servers

In his line of work, Hackaday reader [Pedantite] often has to monitor the build status of several continuous integration servers throughout the day. One afternoon, he got the idea to install a set of stop lights in the office in order to monitor the status of the servers, but filed it away as a “wouldn’t it be cool if…” project.

After some time had passed, he was bitten by the idea bug again and decided he would build a physical device to display the status of his build processes. This time around, he brainstormed on a smaller scale and the result is the “Indictron” you see above.

He built a simple LED board made up of four rows of four LEDs to display the build processes. Different LEDs are lit depending on the project’s current build status as well as the results of the previous build. The board uses an ATmega88, and interfaces with a compiler watchdog application using a virtual USB package made specifically for AVR micro controllers.

The end result is a simple, yet useful status board that “just works”. He does not seem to have code or schematics posted on his site at the moment, but we’re pretty sure he would share them upon request.

If you’re interested in a bit more of [Pedantite’s] work, check out his “Good Times” parental timer we featured last week.

TI’s Grace – A New MCU IDE GUI (DNFTT)

TI has recently been fighting to gain traction in the market of low-cost microcontroller development platforms with products such as the MSP430 Value Line Launchpad.  In order to meet the needs of a rapidly growing customer base and appeal to a broader market they have recently released Grace beta Graphical Peripheral Configuration Tool. Grace is a plugin for TI’s own Code-Composer Studio (CCS) IDE that allows users to graphically control many aspecst of MSP430 development and is compatible with all MSP430F2xx/G2xx MCUs.

Utilizing a simple “wizard-like” interface, Grace allows users to quickly and efficiently control peripherals such clocks, timers, OpAmps,  ADCs, GPIOs, comparators, and even more advanced features such as serial communications or the configuration of low-level register settings. Once everything is configured as desired, Grace outputs standard C code that can be debugged and handled as if it were hand-written.

Although Code-Composer Studio is not free, there is a 30-day full-featured trial available as well as other (restricted) free licensing options as well. Since CCS is based on the Eclipse open-source  software development framework, perhaps we will see other similar development tools in the near future. Although not an apples-to-apples comparison, we could imagine that such a tool might provide many novice users with a simple and cost-effective alternative to the Arduino IDE.

The questions then becomes: If a later incarnation were to raise the MSP430 line to “Arduino-killer” status, would it be rejoiced as such or would it simply then become a new target for those die-hard microcontroller purists who love to shout “overkill” on the forums at the slightest provocation? Of course we would love to hear your take in the comments below!

Learn To Code At Lifehacker

[Adam] over at lifehacker is putting together a series on the principles of programming called “Learn to code”. They are using Javascript as a basis to teach the fundamentals that would allow you to get stuff done in any similar language, like actionscript. After you’ve got these basics down, even moving to an object oriented language shouldn’t be too difficult. We absolutely love educational resources and hope they continue this series pretty far. They’ve already released part one and part two. We have supplied the video from each after the break, but there’s more info at the links.

Continue reading “Learn To Code At Lifehacker”

C Sharp Development 101 – Part 2: Toolbox Controls

In this tutorial we are going to start finding out more about the toolbox we utilized in the previous tutorial.  The Controls available in the toolbox are quite extensive and allow users to simplify a variety of everyday tasks such as manually creating and instantiating a textbox on a windows form.  At the end of this tutorial you should be comfortable finding Controls in the Visual Studio Toolbox, alter or produce code to link tools together using event handlers and ultimately get a better sense of Visual Studio, it’s layout and how to easily navigate it.

C Sharp Development 101 – Part 1: Hello World

In this tutorial we are going to get up close with the Visual Studio 2010 environment. We will learn how to make a console application as well as a form to display our hello world applications.  This will give us an opportunity to view 2 types of solutions of the many available in Visual Studio.  We will start making the console application first then progress to the forms application.

First we must  understand the development environment we are going to use.  On the far left side is the toolbox panel.  This panel gives us access to a lot of controls  that can be used by the Windows Forms.  Next is the Solution Explorer that will allow us to navigate the projects and files we are going to create in this Solution.  The Properties panel is directly under my Solution Explorer and will allow us to change properties of controls and of the form we will create later on.  If any of these are not being displayed they can be retrieved from the View menu at the top under Other Windows.  For more information on the Visual Studio IDE visit MSDN and search for the specific questions you are having.

Continue reading “C Sharp Development 101 – Part 1: Hello World”

C Sharp Development 101 – A Tutorial Series

In this tutorial series we are going to look at C# Development using the Visual Studio 2010 Express editions.  This will take you from the basics of installing Visual Studio 2010 Express, to the Object Oriented Programming style associated with C# and other languages, dabble in some database access (Access & SQL Server Express) and finally, design a project that will pull all of our knowledge together into a final solution.