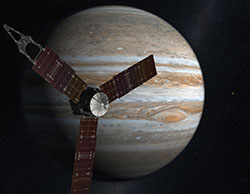
Scrobby’s On Your Roof, Cleaning Your Solar Panels

Solar panels are a great, sustainable addition to your home’s energy scheme. They’re bound to get dirty, but they can’t withstand harsh chemicals and still be effective. While there are companies that will come out and clean your installation a few times a year, the service is a recurring cost that adds up quickly. With Scrobby, his entry into The Hackaday Prize, [Stefan] sought to build a highly affordable and sustainable solution that, after installation, requires no dangerous trips back up to the roof.

Scrobby is solar-powered and cleans using rainwater. The user can set and alter the cleaning schedule over Bluetooth from their phone. [Stefan]’s prototype was built around a Teensy 3.0, but he will ultimately use custom boards based on the Freescale KL26. In addition to the Bluetooth module, there are six ultrasonic sensors, rain and temperature sensors, and motor-driven spools for tethered movement.

Make the jump to see Scrobby get his prototype bristles installed and show off his abilities in [Stefan]’s demo video. To register for updates, check out Scrobby’s website. If you hurry, you can donate to Scrobby’s Kickstarter campaign. The question is, who will clean Scrobby’s solar panels?


SpaceWrencherThis project is an official entry to The Hackaday Prize that sadly didn’t make the quarterfinal selection. It’s still a great project, and worthy of a Hackaday post on its own.

Continue reading “Scrobby’s On Your Roof, Cleaning Your Solar Panels”

Hackaday 10th Anniversary: Demoscenes And Blink(1)

There were two LA hackerspaces represented at our 10th anniversary party, and members from both of them were able to give a talk on the projects coming out of their labs. [Arko] from null space labs showed up with a few of his creations including CUBEX, his high altitude balloon payload and a demoscene board he’s been working on. [Tod] from Crashspace showed up with the rest of the Crash crew and helped out with the morning build-offs and labs.

A Demoscene Board

Demoscenes, for one reason or another, aren’t extremely popular in the US. In Europe, you can find teams working on programatically generated music videos year-round, coded for Commodore 64s, Amigas, even stranger computers, and x86 assembly. There’s an art to the whole thing, but for those of us on this side of the pond, there aren’t many venues to demonstrate impeccable graphics programming skill.

[Arko] wants to change this. He’s designed a demoscene board around a PIC micro with hardware graphics acceleration, USB OTG, VGA out at 640×480, and an audio out port. It’s meant to be a platform to create demos on, and already [Arko] has ported the famous Craft demo from [lft] to his platform. Edit: the Craft demo was playing on the older ATmega88 version of the board. The PIC board is a little more capable.

Being that there are so few Demo parties in the US, only building a board to play demos would be just a bit shortsighted. [Arko]’s main reason for giving this talk was to tell everyone about the LayerOne Demoparty next year just a few miles from the Hackaday Hackaspace. It coincides with the LayerOne conference, and the board itself will soon be available for sale in the Hackaday store.

Blink(1) and How To Kickstarter

When it comes to electronics and tech Kickstarters, Blink(1) defines what it means to have a minimum viable product. It’s a USB plug, a small microcontroller, and an RGB LED. That’s it. [Tod] wanted to take this simple project and learn how to turn it into a product. [Tod] emphasised the ‘learn’ part of his plan; the alternate title for this talk was, “How to Fail Multiple Times and Still Ship 20,000 Units.”

The Blink(1) started as a standard My First Arduino Sketch, blinking three LEDs, quickly moving over to a USB LED device. This rather large USB dongle sat there for a few years until he decided to turn this into a product. It turned out building a product is a lot more involved than building a kit, with considerations to the enclosure, the packaging, and the inevitable CNC mold fails. Assembly – and the success of his first Kickstarter – was also an issue. [Tod]’s friends ended up assembling most of the kits.

Despite these problems, [Tod] was still able to ship a few thousand units and is now working on another production run with SeeedStudio. It’s a remarkable story, with the Blink(1) used by Google, Disney, Microsoft, Facebook, and a whole bunch of other huge companies. The Blink(1) is also in the mainline Linux kernel, something you can’t say about a lot of Kickstarters out there.

Hackaday 10th Anniversary: Non-Binary Computing

When [Thundersqueak] was looking for a project for The Hackaday Prize, she knew it needed to be a special project. IoT devices and microcontrollers are one thing, but it’s not really something that will set you of from the pack. No, her project needed to be exceptional, and she turned to logic and balanced ternary computing.

[Thundersqueak] was inspired to design her ternary computer from a few very interesting and nearly unknown historical computing devices. The first was the [Thomas Fowler] machine, designed all the way back in 1838. It could count to several thousand using a balanced ternary mechanical mechanism. The [Fowler] machine was used to calculate logs, and the usual boring mathematical tasks of the time.

A bit more research turned up the Setun, an electronic computer constructed out of vacuum tubes in 1958. This computer could count up to 387,000,000 with eighteen ternary digits. On the binary machine you’re using right now, representing that would take twenty-nine binary digits. It’s about a 2.5 times more efficient way of constructing a computer, and when you’re looking for the right vacuum tubes in 1950s USSR, that’s a great idea.

[Thundersqueak] isn’t dealing with vacuum tubes – she has a world of semiconductors at her fingertips. After constructing a few truth tables for ternary logic, she began designing circuits to satisfy the requirements of what this computer should do. The design uses split rails – a negative voltage, a positive voltage, and ground, with the first prototype power supply made from a 741 Op-amp. From there, it was just breadboarding stuff and checking her gates, transistors, and truth tables to begin creating her ternary computer.

With the basic building blocks of a ternary computer done, [Thundersqueak] then started to design a basic ALU. Starting with a half adder, the design then expanded to a full adder with ripple carry. We’re sure there are plans for multiplying, rotating, and everything else that would turn this project into a CPU.

THP Hacker Bio: Neil Jansen

If we were running a contest to give away a trip to space for building the most innovative open hardware project a few years ago, the winner would inevitably be a 3D printer. Times have changed, 3D printing is reaching the limits of what can be done with simple plastic extrusion, and there are new hardware challenges to be conquered. One of the challenges facing hardware designers is the ability to create and assemble electronic circuits quickly. For that, there are a few pick and place machines being developed, the lowest cost being the FirePick Delta. It sells itself as a $300 pick and place machine borrowing heavily from the RepRap project, enabling tinkerers and engineers to assemble PCBs quickly.

[Neil Jansen] is the project lead for the FirePick Delta, and along with team members ranging from software developers in the bay area, to electronics technicians and high school students, they’ve created what will become the lowest cost and most capable pick and place machine available. Already the machine has tape feeders, tray feeders, a vision system, and modules to dispense solder paste. It’s an astonishing accomplishment, and were it not for some damage in shipping, we would have a video of [Neil] demoing the FirePick at Maker Faire NY.

In lieu of that, we do have a bio on [Neil] and what challenges he’s faced in building the FirePick. You can read that below, or check out their second demo video for The Hackaday Prize:

https://www.youtube.com/watch?v=46pLeLBYVTs

Continue reading “THP Hacker Bio: Neil Jansen”

Pain Machine Brings Pleasure, Too

Pain is a good thing. It tell us to pull our hand away from the stove and to stay off a turned ankle. But we all have different experiences of pain, and chronic pain degrades our quality of life. A person’s reports of pain will vary from one day to the next based on many factors, so the 1-10 scale isn’t universally effective in determining a person’s pain level. [Scott]’s entry into The Hackaday Prize is based on the classic cold pressor testing device, which measures changes in heart rate and blood pressure in a patient while their hand is immersed in ice water for one minute.

[Scott] has tentatively dubbed his device The Pain Machine, but it does more than the typical cold pressor apparatus; it also delivers simulated pain relief in the form of warm water when the valves are reversed. In addition, the subject under testing can push a button when they’ve had enough. While his original plan used external sources of hot and cold water, [Scott] pulled a couple of Peltier coolers from some wine chillers for a more contained design.

The Pain Machine uses an Arduino ATMega 2560 to control gravity flow solenoids, collect temperature data, and send the data cloudward. A couple of 110V pumps circulate the water. [Scott] will open up the code once he has finished commenting it and fleshed it out with use cases. For now, you can check out his two-minute entry video after the break.


SpaceWrencherThis project is an official entry to The Hackaday Prize that sadly didn’t make the quarterfinal selection. It’s still a great project, and worthy of a Hackaday post on its own.


Continue reading “Pain Machine Brings Pleasure, Too”

THP Semifinalist: OSHWatch

No, it’s not a finely crafted wrist accessory from Cupertino, but [Jared]’s OSHWatch, but you’re actually able to build this watch thanks to an open design and reasonable, hand-solderable layout.

Built around a case found on DealExtreme that looks suspiciously similar to enclosures meant to hold an iPod Nano, [Jared]’s smartwatch includes a 128×128 RGB OLED display, magnetometer, accelerometer, Bluetooth 4.0 transceiver, and a lithium-ion charger and regulator circuit. Everything is controlled with a PIC24, which should mean this watch has enough processing power to handle anything a watch should handle.

As for the UI and what this watch actually does [Jared] is repurposing a few Android graphics for this watch. Right now, the watch can display the time (natch), upcoming appointments on his schedule, accelerometer and magnetometer data, and debug data from the CPU. It’s very, very well put together, and repurposing an existing watch enclosure is a really slick idea. Videos below.


SpaceWrencherThe project featured in this post is a quarterfinalist in The Hackaday Prize.

Continue reading “THP Semifinalist: OSHWatch”