VGA Output On A Freescale

Even though VGA is an outdated and becoming somewhat deprecated, getting this video output running on non-standard hardware is a rite of passage for some hackers. [Andrew] is the latest to take up the challenge. He got VGA output on a Freescale i.MX233 and also got some experience diving into the Linux kernel while he was at it.

The Freescale i.MX233 is a single-board computer that is well-documented and easy to wire up to other things without specialized hardware. It has video output in the form of PAL/NTSC but this wasn’t quite enough for [Andrew]. After obtaining the kernel sources, all that’s needed is to patch the kernel, build the kernel, and build a custom DAC to interface the GPIO pins to the VGA connector.

The first thing that [Andrew] did was load up the Hackaday home page, which he notes took quite a while since the i.MX233 only runs at 454 MHz with just 64 MB of RAM. While our retro page may have loaded a little faster, this is still an impressive build and a great first step to exploring more of the Linux kernel. The Freescale i.MX233 is a popular chip for diving into Linux on single-board computers, and there’s a lot going on in that community. There are some extreme VGA hacks out there as well if that’s more your style.

Hackaday Links: January 24, 2016

The RepRap wiki was spammed this week. Everything is fine now, but I feel I should call attention to the fact that the RepRap wiki needs some people to contribute, organize, and maintain everything. The wikis for obscure anime shows are better than the RepRap wiki, so if you’re looking to contribute to an important open source project, there ‘ya go.

The 200cc, 5.5HP, 4-stroke OHV Honda GX200 engine is found in a whole lot of tools, and is a fantastic power plant to build a go-kart around. It also costs about $350. There are clones of this engine available direct from China for about $100. Here’s how you add a turbo to one of these clone engines.

Freescale makes some pretty cool sensors and [Juan Ignacio Cerrudo] figured they needed breakout boards. He has some boards for a low-power three-axis accelerometer, an accelerometer and magnetometer, and a pressure sensor.

The Tektronix TDS744A is an older but still extremely capable 500MHz, 2Gsps, 4-channel scope. You can upgrade it to the 1GHz TDS784A by desoldering a few resistors. Very cool if you’re looking for a cheap-ish 1GHz scope.

[TheBackyardScientist] hung out with some cub scouts a few weekends ago and launched a high altitude balloon over Florida. The payload included a game camera, APRS tracker, GoPro, and a few other bits and bobs. The balloon reached 106,000 feet and landed only a few miles from Cape Canaveral.

Big RC planes – UAVs especially – are a pain to launch. Flying wings above a certain size are just dangerous to launch by hand, and landing gear is heavy and for the most part unnecessary. What’s the next best solution? A trebuchet, of course. It mounts on a car and is able to give a UAV a little bit of altitude and some speed. A pretty good idea that could be easily implemented with some load-bearing PVC pipe.

Everybody likes the Game of Life, so here’s one built with a 6502. It’s built around a Western Design Center 65c816 board we’ve seen before, nine MAX7219 LED controllers mapped to the VIA, and nine 8×8 LED matrix displays. Here’s a video of it in action.

About a month ago, a search of AliExpress turned up Apple’s A8 CPU. I bought one. Here’s what I got. It’s a stupidly small pitch BGA, and I don’t have a datasheet. What am I going to do with it? Make a non-functioning board with a few ports, resistors, no traces, and the A8 chip planted square in the middle.

Fail Of The Week: Marginally Documented Pad Shorts To Maskless PCB

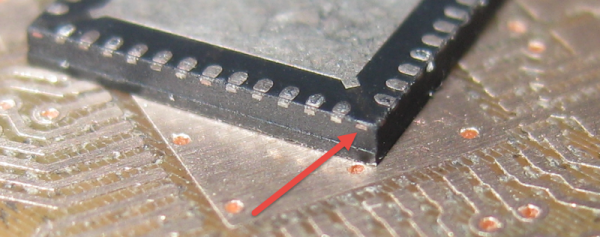
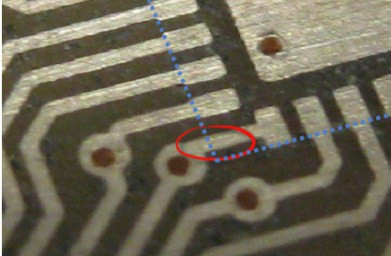
[Erich Styger] was bit by a nasty gotcha when soldering a QFN surface mount chip. The problem rears its ugly head when combining a chip possessing a padless conductor and a PCB without a solder mask. As you can see in the image above, there is a conductor exiting the side of the plastic QFN, but there is no pad associated with it. For this reason, you won’t see the conductor documented in the datasheet as a pin. It is documented in the mechanical drawing of the package, without any explicit reference to its existence. This is the Jason Bourne of package quirks.

The PCB layout just happens to have a trace exiting right under this conductor. The two aren’t touching, but without solder mask, a bit of melted metal was able to mind the gap and connect the two conductors. [Eric] notes that although the non-pad isn’t documented, it’s easy to prove that it is connected to ground and was effectively pulling down the signal on that trace.
In a recent article on Hackaday I talked about “dangling pointers” and the challenge when interrupts expose the bug. [Erich’s] covered a ton of posts about embedded software. I was doing some poking around and was delighted to find that he covered the same concept and a solution for it using a program called cppcheck.

50 Winners Using Freescale Parts

For the last few weeks we’ve been celebrating builds that use parts from our manufacturer sponsors of the 2015 Hackaday Prize. Today we are happy to announce 50 winners who used Freescale parts in their builds. Making the cut is one thing, but rising to the top is another. These builds show off some amazing work from those who entered them. In addition to the prizes which we’ll be sending out, we’d like these projects to receive the recognition they deserve. Please take the time to click through to the projects, explore what has been accomplished, and leave congratulations a comment on the project page.

Still Time to Win!

We’re far from the end of the line. We’ll be giving roughly $17,000 more in prizes before the entry round closes in the middle of August. Enter your build now for a chance in these weekly contests! This week we’re looking for things that move in our Wings, Wheels, and Propellers Contest.

One voter will win $1000 from the Hackaday Store this week as well! Anyone is welcome to vote in Astronaut or Not.  The drawing is this afternoon, Vote Now!

Continue reading “50 Winners Using Freescale Parts”

Micro:bit — BBC Gets A Million Kids Into Embedded Dev

In the Early 1980s, the BBC launched a project to teach computer literacy to a generation of British schoolchildren. This project resulted in the BBC Micro, a very capable home computer that showed a generation exactly what a computer could do. These children then went home, turned on their ZX Spectrums, and became a generation of software engineers. Still, the BBC Micro is remembered fondly.

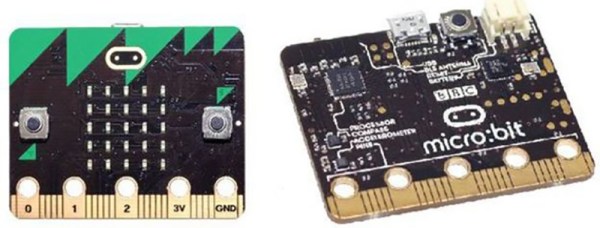
The computer revolution is long over, but today we suffer a sea change of embedded processors and microcontrollers. With Arduinos and Raspberry Pis, the BBC has decided it’s time to put the power of an ARM microcontroller into the hands of a million 11- and 12-year olds. The result is the Micro:bit. It’s a small microcontroller board with an ARM processor, an IMU, buttons, Bluetooth and a 5×5 LED array – exactly what you need if you’re teaching a million kids how to blink an LED.

Although the BBC has finalized the design for the Micro:bit, there are no specs at all. However, a few educated guesses can be made. The USB controller is provided by Freescale, who also provide the digital compass and magnetometer. Programming is done through a web-based, Arduino-like IDE with what appears to be a decent Micro:bit specific library. The board is also mbed compatible. Bluetooth, and apparently the ARM Cortex M0 core, is provided by a Nordic nRF51822. There are only three alligator clip-compatible I/Os, and its doubtful any student will be building anything that would be too complex for an entry level ARM. It’s also 3V logic; finally, the tyranny of 5V has fallen.

The Micro:bit is best seen as a tool that enables the relatively recent addition of a computer science curriculum in UK schools. There is now a requirement for seven-year-olds to understand algorithms and create simple programs. Previously computer education in the UK has consisted of PowerPoint. Now, secondary school students will be learning Boolean logic.

While the Micro:bit is utterly useless as a tool for doing real work, education is not real work. For blinking a few LEDs, having a device react to movement, playing with Bluetooth, and other lesser evils of electronics, the Micro:bit is great. Not everyone will become the digital technologists this initiative is trying to create, but for those who have an inclination towards semicolons and electrons, this is a great introduction to technology.

Hackaday Prize Entry: A Bit Dingus

There was a time when just about every computer – even laptops – came with a parallel port. That’s 25 pins of bit-banging goodness, accessible from every programming environment, that could control any random pile of electronics sitting on a desk. The days of parallel ports are behind us now, and if you want to blink a pin with a computer, you’re looking at controlling a microcontroller over USB or something.

[ajlitt]’s Tiny Bit Dingus is just that: a microcontroller stuffed into a USB plug with a few pin headers. With the right app, you can control these pin headers over USB. It’s the closest you’re going to get to a parallel port with modern hardware.

This bit dingus isn’t meant to replace the Bus Pirate, an Arduino, or anything else; it’s meant to be a small and simple way to connect random electronics to a computer with as few parts as possible. If you’re looking for a part to add to your electronic tinkerer everyday carry rig, this would be it.

There’s a few bits of interesting hardware inside the Bit Dingus. A while back, [ajltt] ran into the Freescale KL27, a Cortex M0+ that does USB without a crystal, has a USB bootloader, and doesn’t require many additional components at all. It’s the perfect size for the project at 5x5mm, and is unbrickable while still being flashable over USB.


The 2015 Hackaday Prize is sponsored by:

Building Super Small Linux Computers From Scratch

Conventional wisdom says small, powerful embedded Linux like the Raspberry Pi, Beaglebone, or the Intel Edison are inherently manufactured devices, and certainly not something the homebrew tinkerer can produce at home. [hak8or] is doing just that, producing not one, but two completely different tiny Linux computers at home.

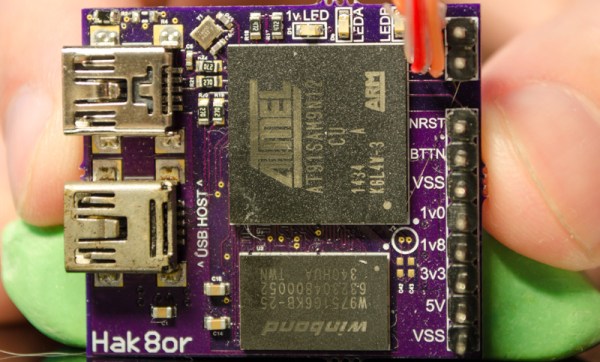
The first is based on Atmel’s AT91SAM9N12 ARM processor, but the entire board is just about two inches square. On board is 64 MB of DDR2 DRAM, a USB host and OTG port, and not much else. Still, this chip runs a stripped down Linux off of a USB drive.

The second board is based on the Freescale i.MX233. This board is similar in size and capabilities, but it’s not exactly working right now. There’s an issue with the DRAM timings and a capacitor underneath the SD card is a bit too tall.

The real value of [hak8or]’s project is the incredible amount of resources he’s put into his readme.mds for these repos. If you’ve ever wanted to build an embedded Linux device, here’s your one-stop shop for information on booting Linux on these chips.