Recursive Soldering Iron Hacking

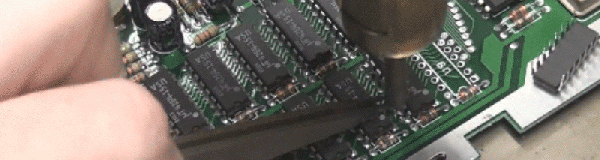
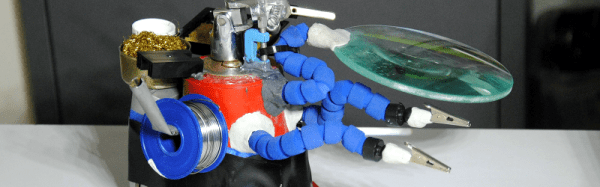
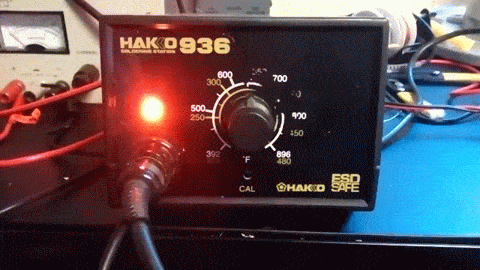
We’ve all done it. You’re walking out the door or maybe you’ve even gotten on the road when the question hits, “Did I leave the [coffee pot | stove | hair curler | soldering iron ] on?” [Daniel Johnson’s] problem was even worse. He couldn’t tell if his Hakko-936 soldering iron was off because the LED indicator wasn’t always on. Instead it flashed. He fixed that problem and along the way hacked his battery powered soldering iron since he was out of batteries. Now that’s perseverance.

Hacked Soldering Iron to Hack Soldering Iron
Soldering Iron Hack Recursion

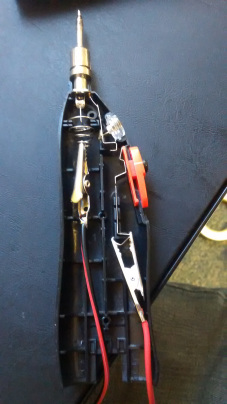
The Hakko’s LED turned on whenever the power turned on to heat the tip. That was about every 5 seconds once the tip was hot. But just as a watched pot never boils, a watched LED never seems to flash. After determining the LED was driven by a comparator he decide to unsolder it as part of his hack. He wisely decided using the Hakko on itself was not a good idea so reached for the battery-powered portable iron, which was sadly battery-free. Undaunted, he wired the portable to a power supply and when 4.5 volts didn’t melt the solder cranked it up to 6 volts.

Back to the Hakko, he replaced the red LED with a RBG LED but used only the red and green leads. The green was tied to the 24v power supply through a hefty 47k ohm resistor, and the red was tied to the comparator. A little masking tape to hold things in place and provide insulation finished the job. Now when the Hakko is on the green LED is lit and the red LED shows the heating cycle. Quite clever.

Rehabbing An Historic Tool From Champion Blower And Forge Co.

Here’s a tale that warms our hearts. [Gord] is helping out the local living-history museum by rehabbing a historic woodworking tool that they want to add to their live demo woodshop. It’s a hundred-year-old manual drill press that has seen a ton of use.

acme-rod-tig-repairThere are three things that [Gord] has going for him. First off, the Champion Blower and Forge Co. built them to last. Second, he’s not really working on a deadline; the museum doesn’t need it back until May. And third, [Gord] has the tools he needs to do this right.

After cleaning and blasting [Gord] gets down to the really interesting repairs. First off, it wouldn’t be a drill press if someone hadn’t tried to drill through the table at some point. TIG welding filled it up and some milling brought it back. This same method was used again to make a beautiful custom replacement ACME rod. Throwing in a custom bushing replacement, turned wooden handle, and a several other fabricated parts, and [Gord] had the press working again. Check out the mechanism in the video below that shows the crank action turns the bit and a cam advances it through the work piece.

Continue reading “Rehabbing An Historic Tool From Champion Blower And Forge Co.”

Desolder DIP Packages Like A Pro

Looking for a quick way to desolder those pesky DIP chips? Check out this handy little tip in the video after the break. [Clay Cowgill] shows you the easy way to do it.

Normally, before you desolder a Dual In-line Package (DIP) chip, you have a decision to make: Are you interested in saving the chip or the PCB? The repeated cycles of heating and reheating the PCB while using solder wick, or even a “solder sucker”, can cause a real problem for the PCB. You run the risk of delamination of the PCB traces. Some phenolic based PCBs can barely handle one extra heat cycle, while as a top-quality PCB might be fine with 4 or even 6 rework attempts – but we’ve lifted off tracks with less. And all that thermal stress isn’t exactly the best thing for the chip itself.  You risk ending up with a dud.

The other trick commonly used is to cut the pins of the DIP and then you can treat each pin as a single through hole part – and that is generally less aggressive to the PCB, there by saving your board, but destroying the chip.

In the video [Clay Cowgill] is using a Hakko 850 hot air rework station to desolder parts from an Atari 130EX motherboard. He’s able to effortlessly remove the chips, and save the PCB, all without applying and re-applying heat over and over again. That’s something we’ve seen before – the interesting part is where he then uses the air flow to blow the through hole openings clean – making for some of the fastest and cleanest DIP removal we’ve ever seen without using a dedicated desoldering gun.

[Thanks [wblock] via Eevblog]

Continue reading “Desolder DIP Packages Like A Pro”

Laser Cutting A Bread Knife

What started out as simply a question of whether or not they could… [G2AS] decided to try making a laser cut serrated bread knife — out of plastic.

Now from a distance this may look like they just took their laser cutter and cut out the pattern of a knife, with a jigsaw edge. But no, they actually laser cut a jig which allowed them to cut the serrated edge on an angle, creating an actual sharp edge. It’s quite the setup, but a pretty awesome result. Continue reading “Laser Cutting A Bread Knife”

Make PCBs With DLP, OMG!

There’s so many ways to skin the home-fabrication-of-PCBs cat! Here’s yet another. [Nuri Erginer] had a DLP projector on hand, and with the addition of some reducing optics, managed to turn it into a one-shot PCB exposer.

If you’ve ever used photo-resist PCB material before, you know the drill: print out your circuit onto transparency film, layer the transparency with the sensitized PCB, expose with a UV light for a while, dissolve away the unexposed resist, and then etch. Here, [Nuri] combines the first three steps in one by exposing the board directly from a DLP projector.

The catch is that the projector’s resolution limits the size of the board that you can make. To fab a board that’s 10cm x 10cm, at XGA resolution (1024×768), you’ll end up with a feature size of around 0.004″ in the good direction and 0.005″ in the other.

For DIP parts, that’s marginal, but for fine-pitch or small SMT parts, that won’t do. On the other hand, for a smaller board, optimally one in the same 4:3 ratio, it could work. And because it exposes in one shot, you can’t beat the speed. Cool hack, [Nuri]!

When you need more precision, strapping a UV laser to an accurate 2D robot is a good way to go, but it’s gonna take a while longer.

Using Acetone To Create Print Transfers

Looking for an easy way to print transfer a logo or image? Don’t have time to get transfer paper? Did you know you can use… regular paper? Turns out there’s a pretty awesome method that just uses Acetone to transfer the ink!

Using a laser printer, print off your desired logo or image. Don’t forget to mirror it! Place the paper onto the material you would like to transfer the graphic to, face down. It works best on wood and cloth, but can also be done on metal, glass and even plastic!  Continue reading “Using Acetone To Create Print Transfers”

Helping Gorilla Hands

Helping hands are a common soldering aid. These inexpensive devices usually have a substantial base, a pair of alligator clips to hold a workpiece, and sometimes a magnifying glass. [Yonatan24] (who happens to be 13 years old) built his own set using a siren horn as a base. Lately, however, he decided to enhance it quite a bit to use Gorillapod arms and incorporate a solder cleaning and a variety of other features. Of course, there is a magnifier along with a solder waste collection bin.

The build is well-detailed, although since [Yonatan24] salvaged some of the parts, you might have to make adjustments to match the parts you use. The Gorillapod arms are from a cheap tripod, but a lot of the material was left over or stripped from junk (like the lead weight).

We’ve seen workbench PCB holders before (including a 3D printed one), of course, but you have to admire the look of this one, as well as the overboard set of features.