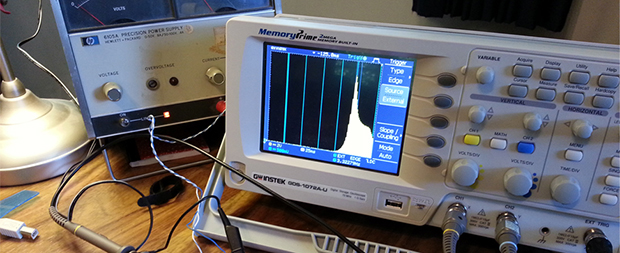
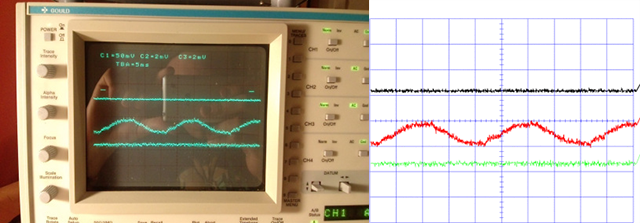
Semi-automatic Pick And Place Machine

semi-automatic-pick-and-place

This is a fascinating take on building your own pick and place machine. It does an amazing job of automating the hardest parts of hand assembly, while relying on human dexterity to achieve the hardest parts of automation. It’s a semiautomatic pick and place machine driven by an Arduino and controlled by an Android tablet.

The machine is built in two parts. The portion in the upper left feeds components from reels and is fully automated. The portion on the lower right consists of a padded arm-rest which slides smoothly along two axes. A mechanical arm with multiple articulations is attached to the end, culminating in a tip connector for some vacuum tweezers. Right handers are the only ones who will find this convenient, but oh well. The clip after the break shows it in action. The assembly technician first selects the component from an icon on the Android tablet. The reel machine then dispenses that part, which is picked up by the vacuum tweezers using the left hand to switch the vacuum on and off again. If the part orientation needs to be rotated it can done using the jog wheel on the Android app. It smooth, quick, and best of all, clever!

Continue reading “Semi-automatic Pick And Place Machine”

Stapler Hack Fastens Infinitely Large Sheets Of Paper

infinity-stapler

It’s not called the infinity stapler, but we think it should be. This magnetic hack allows you to use a plain old stapler to fasten very large pieces of paper.

The limiting factor has always been the distance between the stapler’s hinge and where the staples come out. To get around this, the crimped connections between the base and the dispenser were drilled out. Larger holes were then drilled in both the top and bottom halves to accept a set of magnets. These were held in place temporarily with some tape while the super glue had time to set up.

The result is two halves which are placed on either side of the over sized paper. The magnets are responsible for aligning the staples with the die which bends them to their final shape. The whole process is shown in the video clip after the break.

Continue reading “Stapler Hack Fastens Infinitely Large Sheets Of Paper”

Melting Metal With A DIY Foundry Furnace

Foundry Furnace

If you want to do casting at home, you’ll need a way to melt metal. [Jake]’s DIY foundry furnace gets hot enough to melt aluminium, and is built out a mix of scrap parts.

The chamber of the furnace is built out of a water heater tank which has been lined with a special cement that refracts heat. The furnace is heated by a Babington burner. This type of burner works by atomizing the fuel and injecting it into the furnace. They are good for burning waste oil to achieve high heats.

A scrap Volkswagen oil pump and a cordless drill are used to feed oil into the burner. Once it’s fired up, the furnace takes about 10 minutes to melt the 11 pounds of metal that it can hold. [Jake] melted about 40 pounds of aluminium alloy from scrap alloy wheels in 2 hours, which should be more than enough for a home casting project.

After the break, check out the overview of the device and a demo of melting aluminium.

Continue reading “Melting Metal With A DIY Foundry Furnace”

Microscope Ring Light With A Number Of Different Features

microscope-ring-light

Microscopes magnify light. It makes sense that having more light reflecting off of the subject will result in a better magnified image. And so we come to Aziz! Light! It’s [Steve’s] LED light ring for a stereo microscope. It’s also a shout out to one of our favorite Sci-Fi movies.

He’s not messing around with this microscope. We’ve already seen his custom stand and camera add-on. This is no exception. The device uses a fab-house PCB which he designed. It boasts a dual-ring of white LEDs. But the controls don’t simply stop with on and off. He’s included two rotary encoders, three momentary push switches, and three LEDs as a user interface. This is all shown off in his demo video after the break.

An ATtiny1634 is responsible for controlling the device. When turned on it gently ramps the light up to medium brightness. This can be adjusted with one of the rotary encoders. If there are shadows or other issues one of the push buttons can be used to change the mode, allowing a rotary encoder to select different lighting patterns to remedy the situation. There are even different setting for driving the inner and outer rings of LEDs.

We haven’t worked with any high-end optical microscopy. Are these features something that is available on commercial hardware, or is [Steve] forging new ground here?

Continue reading “Microscope Ring Light With A Number Of Different Features”

Cooling A Photomultiplier Tube

photomultiplier-tube-cooling-rig

A photomultiplier tube is a device used to measure very low levels of light. It’s a common tool of particle physics when trying to detect just a few photons. It turns out that running a tube at room temperature will not provide the best results. To improve the accuracy and sensitivity of his equipment [David Prutchi] built this thermoelectric photomultiplier tube cooling rig.

You can’t actually see the tube in this image but it looks similar to a vacuum tube or Nixie tube. The difference being that the components inside the glass dome make up the detector instead of an amplifier or filament display. To make a physical interface with the glass [David] wrapped it in magnetic shielding and finished with a layer of aluminum foil tape. This cylinder was then snugly fit inside of an aluminum heat sync. two Peltier coolers were attached to the outside of the heat sync, using Arctic Silver thermal compound to help transmit heat. A thermocouple was also added to monitor the temperature of this first stage of cooling. All of this fits into an aluminum enclosure which was filled with expanding spray foam before having a trio of fan-cooled heat syncs attached to it.

Add Features (that Should Have Already Been There) To An EPROM Programmer

extending-an-eprom-programmer

[Morten Overgaard Hansen] has a cheap EPROM programmer which he uses to program chips for retro gaming (among other things). He was surprised that although the device includes a 40-pin ZIF socket it seems to lack the ability to program 16-bit chips. He figured he could get it to play ball if he put in a little effort. Above you can see that a few add-on parts enabled 16-bit programming on the device.

If you look inside the case you may be surprised to find it uses an FPGA. [Morten] searched around and found a few others online who had been looking to stretch the functionality of these types of programmer. Specifically, he came across a Python program for this programmer’s bigger bother that already implemented the functions necessary to program the larger chips. He used it as a guide when writing his own programming application.

On the hardware side of things he needed to feed a higher voltage to the VCC pin, which is done with the boost converter seen to the right. He also added some jumper wires to manage the output enable signal. To make the whole thing modular he ordered a ZIF socket with long pins and soldered the alterations in place. Look closely and you’ll see two levers for ZIF sockets. The one on the right is for the original socket, the one on the left is for the adapter.

Building A Wooden Air Raid Siren

siren

A while back, [Matthias] was working on a dust collector for his shop. Being the master woodsmith he is, he decided to build a dust collection system out of wood. Everything worked out in the end, but in creating wooden impellers and blowers, he discovered his creations made a lot of noise. For this project, instead of trying to quiet his blower, he decided to make one as loud as possible in the form of an air raid siren.

The basic idea behind [Matthias]’ air raid siren is to make two impellers that force air through two stators along the perimeter of the rotor. As the siren spins, the air coming from the impellers is either blocked or passes through the stators, creating an alternating high and low pressure; to be more accurate, it creates a ton of noise. Stack two of these impellers together and you’ve got a two-tone air raid siren made out of wood.

For something that’s spinning very fast, we’re surprised [Matthias] didn’t have more problems with balancing his siren than he did. There are a few useful tricks to be picked up from his tutorial, though: balancing everything on a marble really seemed to help with the build.

As for how loud the siren is, [Matthias] can’t give us a decibel volume. From the video after the break, though, we can tell you it’s really, really loud.

Thanks [Dimitar] for sending this in. [Matthias], it’s alright if you send projects in yourself. You’ve earned the right to say, “I am so cool!”

Continue reading “Building A Wooden Air Raid Siren”