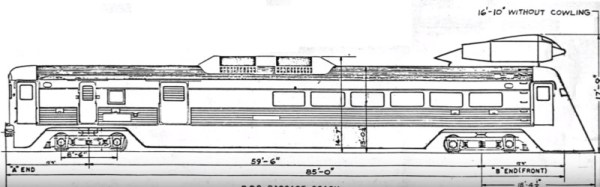
![The front of the Soviet jet train on a monument in Tver, Russia. By Eskimozzz [PD], via Wikimedia Commons.](https://hackaday.com/wp-content/uploads/2016/09/576px-d181d182d0b5d0bbd0b0.jpg)
Continue reading “Retrotechtacular: Railroads In The Jet Age”
Continue reading “Retrotechtacular: Railroads In The Jet Age”

Step one to most electric longboard builds is typically the acquisition of a foot operated longboard, with step two being the purchase of a ready-made motor bracket to electro-convert the strenuous vehicle. Not so [Matt Carl’s] scratch-built electric longboard, which starts out with four 1/8″sheets of baltic birch.
Continue reading “Building An Electric Longboard From Scratch”
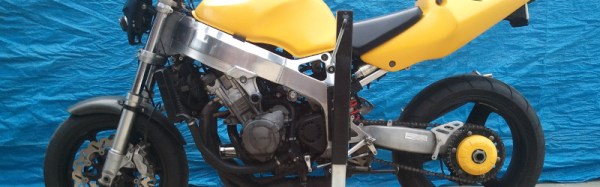
If you have ever worked on a motorcycle on a regular basis with a limited workshop, you’ll know the challenge of taking off one or other of the wheels. You’ll probably have plenty of tales of bikes balanced precariously on blocks or suspended from the ceiling on a web of cargo straps, and if you are really unlucky you’ll have the Dented Tank Of Shame from the whole edifice tumbling down.
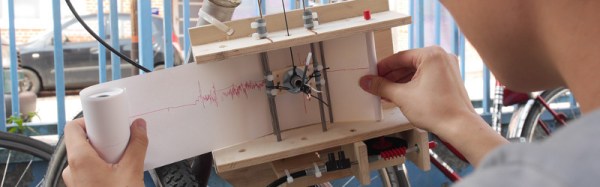
Riding the streets of the Netherlands on a bicycle is a silky-smooth experience compared to doing the same on those of Germany. So says [Kati Hyyppä], who made the move with her trusty Dutch bike. The experience led her to record the uneven cobblestones and broken asphalt of the German roads on a home-made seismograph, a paper chart recorder driven by the bike’s motion and recorded upon by a pen free to vibrate as it passed over any bumps.
The resulting instrument is a wooden frame with a ballpoint pen mounted in a sliding holder weighted with some washers and kept under some tension with elastic bands. The paper roll is driven from the motion of the bike by the drive from a mechanical speedometer feeding a set of FischerTechnik gears, and the whole unit is suspended from the crossbar.
You can see it in action in the video below the break, and if you would like to build one yourself she has put the project up on Instructables as well as posting the description linked above.

Home-made transportation is a thriving area for makers to flex their skills. Looking to shorten their university commute, [doublecloverleaf] modded his penny board by adding a motor that can have him zipping along at 40 Km/h!
The electric motor is mounted to the rear truck and delivers power to the wheel gear using a HTD 5 m pulley belt. Finding the deck too flexible to mount the battery pack under, [doublecloverleaf] strengthened it with a pair of carbon-fiber tubes bracketed on the underside. A few custom PCB boards connect ten 5 Ah LiPo battery cells in series to create two, five-cell packs which are kept safe by a thick housing mounted between the board’s trucks. [doublecloverleaf] calculates that they could make up to a 15 km trip on a single charge.

Want to get somewhere safely, but all you have is a Segway? An afternoon spent tinkering can turn your Segway into a lounging cruiser with this hoverseat attachment, just like YouTuber [Inflatable Boats]’s hot new ride.
The backbone of the cart is the Segway Mini Pro. An aluminium frame attaches to the Segway via an eye-bolt and two carabiners, the larger of which has some tape wrapped around it to reduce wear. A swivel caster is attached with u-bolts to support the weight of the rider along the middle of this makeshift go-cart. Pushing on a t-handle made of pvc — connected to the Segway’s knee brace with a simple strap — engages the motor in lieu of the normal lean-to-go-forward action. Turning is simply done by swinging the handle or pressing with your feet.
Continue reading “Hoverchair For Your Hoverboard Turns Your Segway Into A Go-Kart”
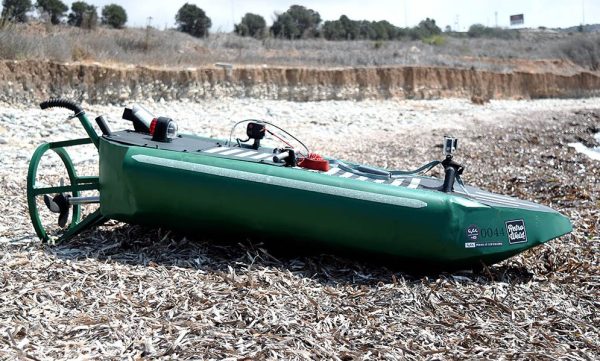
It’s the water-borne equivalent of building a minibike out of steel pipe and an old lawnmower engine. Except it’s a DIY personal watercraft made out of aluminum and an old chainsaw, and it has that same garage build feel – and the same disappointing results.
When we first saw the video below, we were hoping for one of those boats that let you water ski by yourself, or a wave-hopping, rooster tailing DIY jet ski. Alas, the chainsaw [MakeItExtreme] chose to power this boat is woefully underpowered, and the boat barely has enough oomph to make a wake. [MakeItExtreme] acknowledges the underwhelming results and mentions plans to fix the boat with a more powerful engine and a water jet drive rather than the trolling motor propeller they used. Still, whatever improvements they make will probably leverage the work they put into the hull, which is a pretty impressive display of metalwork. We’re used to seeing [MakeItExtreme] work in steel, so it was interesting to watch aluminum panels being cut, bent, and welded into a watertight hull. Looks like there’s plenty of room in there for more power, and we’re looking forward to version 2.0 of this build.
If you like rough and ready metalworking videos, there are plenty of them on [MakeItExtreme]’s YouTube channel. We’ve covered quite a few before, including this all-terrain hoverboard and a spot welder that’s more-or-less safe to use.
Continue reading “Garage-built Aluminum Miniboat Tears Up The Surf. Or Not.”


