Hackaday Prize Entry: A Portable Environmental Monitor

There are a lot of environmental monitors in the running for this year’s Hackaday Prize. Whether they’re soil moisture sensors for gardens or ultraviolet sensors for the beach, the entrants for The Hackaday Prize seem to grasp the inevitable truth that you need information about the environment before doing anything about the environment.

But what about sharing that information? Wouldn’t it be handy if there were an online repository where you could look up environmental conditions of any location on the planet? That’s where [radu.motisan]’s Portable Environmental Monitor comes in. It’s a small, pocketable device that measures just about everything and uploads that data to the Internet.

This project is a continuation of [radu]’s entry for The Hackaday Prize last year, the Global Radiation Monitoring Network. This was more than just a Geiger tube connected to the Internet; [radu] has a global network of Geiger counters displaying counts per minute on a nifty live map.

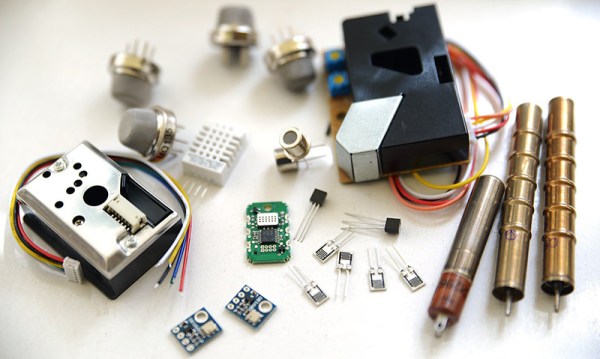
[radu]’s latest project expands on the capabilities of the Global Radiation Monitoring Network with more sensors and portability. Inside the Environmental Monitor are enough sensors to look at Alpha, Beta and Gamma radiation, dust and toxic gas, and other types of pollution. With the addition of an ESP8266 WiFi module, this portable device can upload sensor readings to the Internet, greatly expanding [radu]’s uRADMonitor network.

The 2015 Hackaday Prize is sponsored by:

Secret Keyboard Stash

Hide in plain sight is an old axiom, and one that [Kipkay] took to heart. His sneaky keyboard hack takes the little-used numeric keyboard and converts it to a handy (and secret) hiding hole for small objects you want to keep away from prying eyes.

You might have to adapt the hack to your specific model, but [Kipkay] cuts out the membrane keyboard, secures the numeric keypad keys with hot glue, and then cuts it out with a Dremel. Some cardboard makes the compartment and once the fake keypad is in place, no one is the wiser.

As you can see in the clip after the break, the compartment isn’t very big. You aren’t going to hide your phone inside, but it is just the right size for some emergency cash, a credit card, or maybe an SD card or two.

Continue reading “Secret Keyboard Stash”

Forgotten Rock Band Drum Controller As A MIDI Instrument

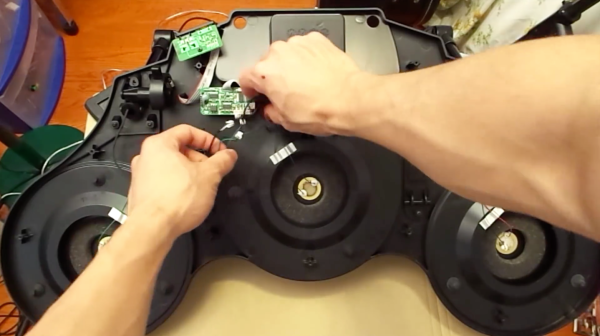
Happen to have an old Rock Band drum controller collecting dust in your living room? If you also have a spare Arduino and don’t mind parting with that plastic college memento then you’ve got the bulk of what could potentially be your new percussive MIDI instrument. In his project video [Evan Kale] outlines the steps necessary to turn that unloved plastic into a capable instrument for recording.

The whole process as outlined by [Evan] in under seven minutes. This looks like a great weekend endeavor for those of us just starting out with MIDI. After cracking the back of the Guitar Hero drum kit controller open, the main board within is easily replaced with a standard sized Ardunio (which matches the present mounting holes exactly). About 4:50 into the video [Evan] explains how to add a basic perf-board shield over the Arduino which connects the piezo sensors in each of the drum pads to the analog pins of the micro-controller. The MIDI jack that comes built into the back of the kit can also be reused as MIDI out when wired to the Arduino’s serial out pin. By adjusting [Evan’s] example code you can dial in the instrument’s feedback to match the intensity of each hit.

The video with all of the details is after the jump. Or you can check out a MIDI hack that goes the other way and uses a drum kit as a Guitar Hero or Rock Band controller instead

Continue reading “Forgotten Rock Band Drum Controller As A MIDI Instrument”

remote control

Hacking Amazon Echo Through Its Remote

This one’s crazy… literally one electronic device is talking to another. In spoken English. And it works.

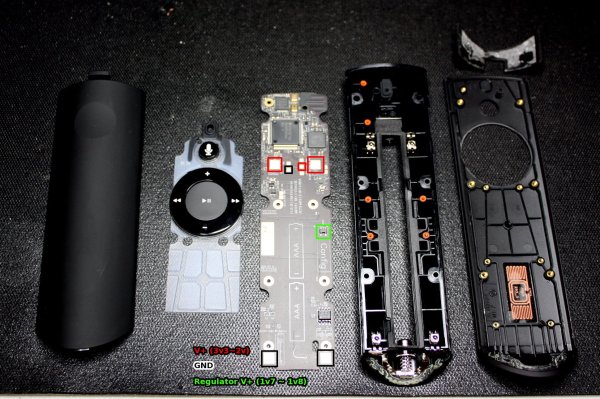
We’ve covered several hacks for the Amazon Echo, but some might be surprised to learn that there is another piece of interesting hardware that comes along with it – a remote control. Wire in a Raspberry Pi to it, and you’ve given yourself a way to automate control of the Echo without ever taking the Echo itself apart. [Gamaral] did just this and gave his Echo some significantly enhanced capabilities.

He started off by identifying the power rails of the remote. Then he wires in a 3.3v voltage regulator and uses a 100 ohm resistor as a voltage divider to bring it down to the 1.8 volt logic level used by the Echo remote. A single wire runs from the Raspi GPIO to one of the tactile switches on the controller.

For software, the Raspi is running RPi buildroot with Espeak and a cron scheduler compiled in. This allows him to send commands to the Echo which makes it say just about anything he wants. But any voice commands accepted by the Echo should work. If you want to go outside of those boundaries check out the method of spoofing WeMo devices we saw the other day.

Be sure to check out the [gamaral’s] entertaining video below to see the hack in action.

Continue reading “Hacking Amazon Echo Through Its Remote”

Get Your Kicks With This New PIC Development Board

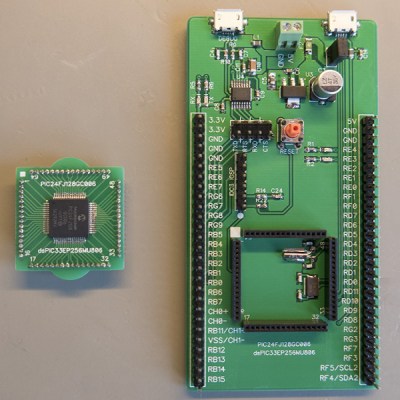
While development boards for micro controllers are nothing ground breaking, they can be expensive, and often times overkill for what you’re doing when they try to put everything you might use … including the kitchen sink. when [Brian] noticed his projects were starting to use Microchip PIC24 more and more, the time came to have a dev board on hand. 

top-viewThe result is a small board with breakouts for USB, UART (via FTDI), of course tons of GPIO pins, and a socket which mates with a daughter board to swap out either a PIC24FJ128GC006, or a DSPIC33EP256MU806, with the potential for more. Also packed on the board is a power regulator system and dual crystals allowing full speed operation or power sipping modes.

Schematics and PCB layout are available (in Diptrace format) along with a board template file to use with MPLAB on github.com. Once you have everything together you will need a PIC programmer, [Brian] is using a trusty Microchip MPLAB ICD 3 programmer, but naturally, others are available.

Microchip recently announced a new development board of their own for the PIC16F series. The Curiosity board has built-in support for programming and debugging (no chipKIT needed). The engineer who designed that board, [John Mouton] is going to join us on July 30th for a live chat about the design process. We’re also going to be giving away some of the first boards to come off the production line… more about that this coming week.

Caption CERN Contest – Smile!

Week 23 of the Caption CERN Contest has been laid to rest. Thanks to all the entrants who stopped by to pay their respects and leave captions for the dearly departed SC-1. CERN engineers and scientists are a crafty bunch, so we’re betting that SC-1’s spirit (and many if its components) lived on in newer CERN projects. We have to thank CERN’s unnamed photographer for capturing these events. It’s always great to see the people and the personalities behind the science.

The Funnies:

  • “After many years of ignoring the pitiful meows, it was finally determined that Schrödinger’s cat was, in fact, dead.” – [Josh Kopel]
  • “We gather here to mourn the deaths of all those brave and noble components that left this world surrounded by magic smoke to reside forever in great the parts bin in the sky.” – [Kid Iccurus]
  • “CERN’s annual Halloween parade was a huge disappointment that year, which was probably due to the fact that they held it in June.” – [DainBramage]

This week’s winner is [Scott Galvin] with “Services were held today for SC-1. SC1’s life ended earlier
this week after a devastating head on collision” Scott describes himself as “Just a visiting Geek with dreams of universal domination”. We’d suggest you start small, [Scott]. Maybe dominating a Bluetooth personal area network with your new LightBlue Bean from The Hackaday Store is just what you need to set your plans in motion!

Week 24

cern-24-smThe scientists at CERN always take a personal stake in their work. Pushing mankind’s knowledge of science and high energy physics takes a special breed of person. Thankfully this special breed always seems to have a fun side as well. Here we see a CERN scientist posing behind a … a device. It looks to be some kind of coil or beam line part, though the actual use is thus far a mystery even to CERN’s own staff. We do know this photo was taken in June of 1973, the same month as one of the longest solar eclipses on record – over 7 minutes of totality! Was this part of some CERN solar experiment? Could it have been a section of a particle accelerator? Was this scientist just working on his latest art project – perhaps part of a dodecagon exploration? You be the judge!

This week’s prize is a Teensy 3.1 from The Hackaday Store. Add your humorous caption as a comment to this project log. Make sure you’re commenting on the contest log, not on the contest itself. As always, if you actually have information about the image or the people in it, let CERN know on the original image discussion page.

Tracking Nearly Every Aircraft With A Raspberry Pi

FlightAware is the premier site for live, real-time tracking of aircraft around the world, and for the last year or so, Raspberry Pi owners have been contributing to the FlightAware network by detecting aircraft flying overhead and sending that data to the FlightAware servers.

Until now, these volunteers have used Raspis and software defined radio modules to listen in on ADS-B messages transmitted from aircraft. With FlightAware’s new update to PiAware, their Raspberry Pi flight tracking software, Mode S transponders can also be detected and added to the FlightAware network.

Last year, FlightAware announced anyone with a Raspberry Pi, a software defined radio module, and an Internet connection would earn a free FlightAware enterprise account for listening to ADS-B transmitters flying overhead and sending that information to the FlightAware servers. ADS-B is a relatively new requirement for aviators that transmits the plane’s identification, GPS coordinates, altitude, and speed to controllers and anyone else who would like to know who’s flying overhead.

Mode S transponders, on the other hand, are older technology that simply transmits the call sign of an aircraft. There’s no GPS information or altitude information transmitted, but through some clever multilateration in the new PiAware release these transponders and planes can now be tracked.

To get the location of these transponders, at least three other PiAware boxes must receive a signal from a Mode S transponder. These signals, along with a timestamp of when they were received are then sent to the FlightAware servers where the location of a transponder can be determined.

The end result of this update is that FlightAware can now track twice as many aircraft around the world, all with a simple software update. It’s one of the most successful applications of crowdsourced software defined radio modules, and if you’d like to get in on the action, the FlightAware team put together a bulk order of ADS-B antennas.