Soviet-Era 7-Segment Display, Built Like A Tank

In a way, all 7-segment displays are alike; at least from the outside looking in. On the inside it can be quite another story, and that’s certainly the case with the construction of this Soviet-era 7-segment numerical display. From the outside it may look a bit sturdier than usual, but it’s still instantly recognizable for what it is. On the inside is an unusual mixture of incandescent bulbs and plastic light guides.
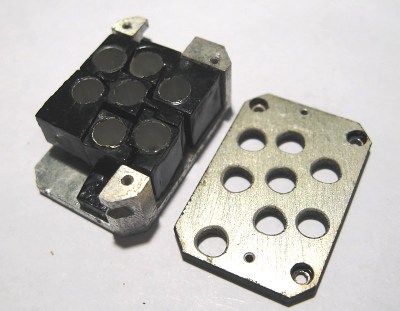
The black-coated blocks of plastic on the left (shown from the rear) act as light guides. The holes are for nesting the incandescent bulbs. Note the puzzle-like arrangement of the uniquely shaped pieces.

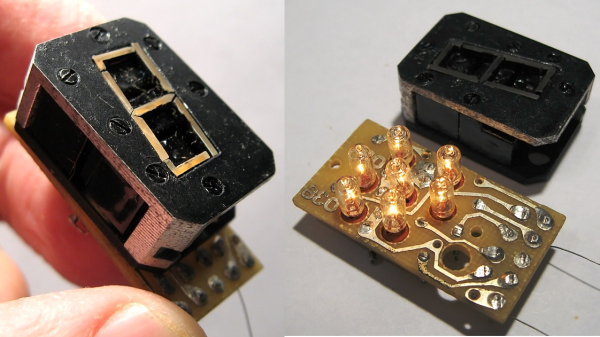
The rear of the display is a PCB with a vaguely hexagonal pattern of low-voltage incandescent bulbs, and each bulb mates to one segment of the display. The display segments themselves are solid blocks of plastic, one for each bulb, and each a separate piece. These are painted black, with the only paint-free areas being a thin segment at the top for the display, and a hole in the back for the mating bulb.

The result is that each plastic piece acts as a light guide, ensuring that a lit bulb on the PCB results in one of the seven thin segments on the face being lit as well. An interesting thing is that the black paint is the only thing preventing unwanted light from showing out the front, or leaking from one segment to another; usually some kind of baffle is used for this purpose in displays from this era.

More curiously, each plastic segment is a unique shape apparently unrelated to its function. We think this was probably done to ensure foolproof assembly; it forms a puzzle that can only fit together one way. The result is a compact and remarkably sturdy unit that shows how older and rugged tech isn’t necessarily bulky. Another example of small display tech from the Soviet era is this tiny 7-segment display of a completely different manufacture, which was usually used with an integrated bubble lens to magnify the minuscule display.

Lo-Fi Greeting Card Sampler

We’re all familiar with record-your-own-message greeting cards. Generally they’re little more than a cute gimmick for a friend’s birthday, but [dögenigt] saw that these cards had more potential.

After sourcing a couple of cheap modules from eBay, the first order of business was to replace the watch batteries with a DC power supply. Following the art of circuit bending, he then set about probing contacts on the board. Looking to control the pitch of the recorded message, [dögenigt] found two pads that when touched, changed the speed of playback. Wiring these two points to the ears of a potentiometer allowed the pitch to be varied continously. Not yet satisfied, [dögenigt] wanted to enable looped playback, and found a pin that went low when the message was finished playing. Wiring this back to the play button allowed the recording to loop continuously.

[dögenigt] now has a neat little sampler on his hands for less than $10 in parts. To top it off, he housed it all in a sweet 70s intercom enclosure, using the Call button to activate recording, and even made it light sensitive with an LDR.

We’ve seen a few interesting circuit bends over the years – check out this digitally bent Roland TR-626 or this classic hacked Furby.

Check out the video under the break.

Continue reading “Lo-Fi Greeting Card Sampler”

Retrofitted Retro Radio

In a world full of products that are only used for a brief time and then discarded, it gives a lot of us solace to know that there was a time when furniture was made out of solid wood and not particle board, or when coffee makers were made out of metal and not plastic. It’s hard to say exactly what precipitated the change to our one-time-use culture, but in the meantime there are projects that serve to re-purpose those old, durable products from another time so that they can stay relevant in today’s ever-changing world. [Jose]’s new old radio is a great example of this style of hack.

[Jose] had a 1970s-era single-speaker radio that he found in a thrift store. The first thought that he had to get the aesthetically pleasing radio working again was to install a Bluetooth receiver into the radio’s amplifier. This proved to be too time-consuming of a task, and [Jose] decided to drive the Bluetooth module off of the power circuit for the light bulb. He built a 6V AC to 4.2V DC circuit, swapped over the speaker cable, and started listening to his tunes. The modifications he made aren’t destructive, either. If he wants, he will be able to reconnect the original (and still functional) circuitry back to the speaker and pretend he’s back in 1970.

While this isn’t the most intricate hack we’ve ever featured, it’s always refreshing to see someone get use out of an old piece of technology rather than send it off to the landfill with all of our Pentium IIs or last year’s IKEA shelves that have already fallen apart. And even if the 70s aren’t your era of choice, perhaps something newer will inspire you to bust a move.

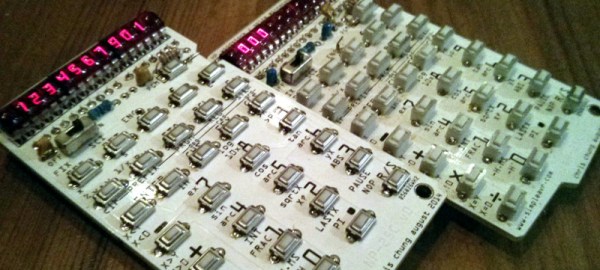
Hackaday Prize Entry: The 70s Called. They Want This Calculator

For those of us who grew up during TI’s calculator revolution, the concept of reverse polish notation (RPN) might be foreign. For other more worldly calculator users, however, the HP calculator was ubiquitous. Hewlett-Packard peaked (at least as far as calculators are concerned) decades ago and the market has remained dominated by TI since. Lucky for those few holdouts there is now a new microcode emulator of these classic calculators.

Called the NP25 (for Nonpariel Physical), the calculator fully emulates the HP-21, HP-25C and HP-33C. It’s a standalone microcode emulator, which means that these calculators work exactly as well as the original HP calculators of the 70s did. The new calculators, however, are powered by a low power MSP430G2553 processor and presumably uses many, many fewer batteries than the original did. It has an LED display to cut power costs as well, and was built with the goal of being buildable by the average electronics hobbyist.

Even if you didn’t grow up in the 70s with one of these in your desk drawer, it’d still be a great project and would help even the most avid TI user appreciate the fact that you don’t have to use RPN to input data into calculators anymore. Not that there’s anything wrong with that. This isn’t the only calculator we’ve featured here, either, so be sure to check out another free and open calculator for other calculator-based ideas.

Continue reading “Hackaday Prize Entry: The 70s Called. They Want This Calculator”