The relatively inexpensive K40 laser cutter/engraver machines from China have brought laser cutting to the masses, but they are not without their faults. Sure, they’re only powerful enough for the lightest cutting tasks, but on top of that, their bundled software is inflexible and disappointing. If your workshop or hackspace has one of these machines languishing in the corner, then the release of a new piece of software, K40 Whisperer from [Scorch], is an interesting and welcome development.
He tells us that the reverse engineering process required to understand the K40’s protocol was non-trivial, given that it does not use handy decimal numbers to issue commands. A spreadsheet was used to collate data packets and spot repeating patterns to analyse the inner workings. Feature-wise, the software reads SVG and DXF files, and can split SVGs by colour. It has a halftone algorithm for rendering grey scales, and cuts from the inside of each shape first to avoid pieces of work dropping out of the piece of material. Currently it works with the stock M2 Nano controller board and is available as a Windows download, though it can also be compiled for Linux distributions, or MacOS, and he is asking owners to test it with as many machines as possible to ensure compatibility with other boards.
He has posted a video of K40 Whisperer in action, which you can see below the break.
When you take an item with you on a camping trip and it fails, you are not normally in a position to replace it immediately, thus you have the choice of fixing it there and then, or doing without it. When his LED camping lantern failed, [Mark Smith] was in the lucky position of camping at a friend’s compound equipped with all the tools, so of course he set about fixing it. What he found shocked him metaphorically, but anyone who handles it while it is charging can expect the more literal variation.
The lamp was an LED lantern with built-in mains and solar chargers for its Ni-Cd battery pack, and a USB charger circuit that provided a 5 volt output for charging phones and the like. The problem [Mark] discovered was that the mains charger circuit did not have any mains isolation, being a simple capacitive voltage dropper feeding a rectifier. These circuits are very common because they are extremely cheap, and are perfectly safe when concealed within insulated mains-powered products with no external connections. In the case of [Mark]’s lantern though the USB charging socket provided that external connection, and thus access to a potential 120 VAC shock for anyone touching it while charging.
Plainly this lamp doesn’t conform to any of the required safety standards for mains-powered equipment, and we’re guessing that its design might have come about by an existing safe lamp being manufactured with an upgrade in the form of the USB charger. The write-up gives it a full examination, and includes a modification to safely charge it from a wall-wart or similar safe power supply. Definitely one to watch out for!
If you were wondering what the fault was with Mark’s lamp, it was those cheap NiCd batteries failing. He replaced them, but there are plenty of techniques to rejuvenate old NiCds, both backyard, and refined.
Ever on the lookout for creative applications for tech, [Andres Leon] built a solar powered battery system to keep his Christmas lights shining. It worked, but — pushing for innovation — it is now capable of so much more.
The shorthand of this system is two, 100 amp-hour, deep-cycle AGM batteries charged by four, 100 W solar panels mounted on an adjustable angle wood frame. Once back at the drawing board, however, [Leon] wanted to be able track real-time statistics of power collected, stored and discharged, and the ability to control it remotely. So, he introduced a Raspberry Pi running Raspbian Jessie Lite that publishes all the collected data to Home Assistant to be accessed and enable control of the system from the convenience of his smartphone. A pair of Arduino Deuemilanoves reporting to the Pi control a solid state relay powering a 12 V, 800 W DC-to-AC inverter and monitor a linear current sensor — although the latter still needs some tinkering. A in-depth video tour of the system follows after the break!
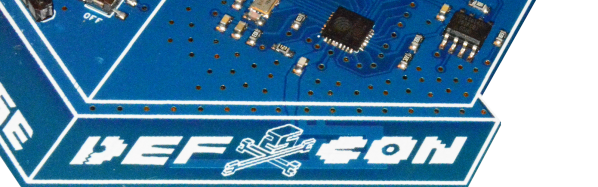
Badgelife is the celebration of independent hardware creators, working for months at a time to bring custom electronic badges to conferences around the world. This year at DEF CON, Badgelife is huge. It’s not just because this year was supposed to feature a non-electronic badge, and it’s not because the official badge imploded last month — Badgelife is all about people spending most of the year designing, and manufacturing hardware, culminating in one very special weekend.
[Garrett] owns Hacker Warehouse, a store providing all kinds of neat hacker tools ranging from software-defined radios to lock pick sets to side channel analysis toolkits. This year, [Garrett] decided he wanted to branch out his business and get involved in a little bit of hardware creation. He’s been curious about this for some time and figured a limited edition DEF CON badge made sense. What he wound up with is a beautiful little badge with games, blinkies, graphics, and potential to cause a lot of wireless mischief.
Would you look at that. RF design on an independent badge.
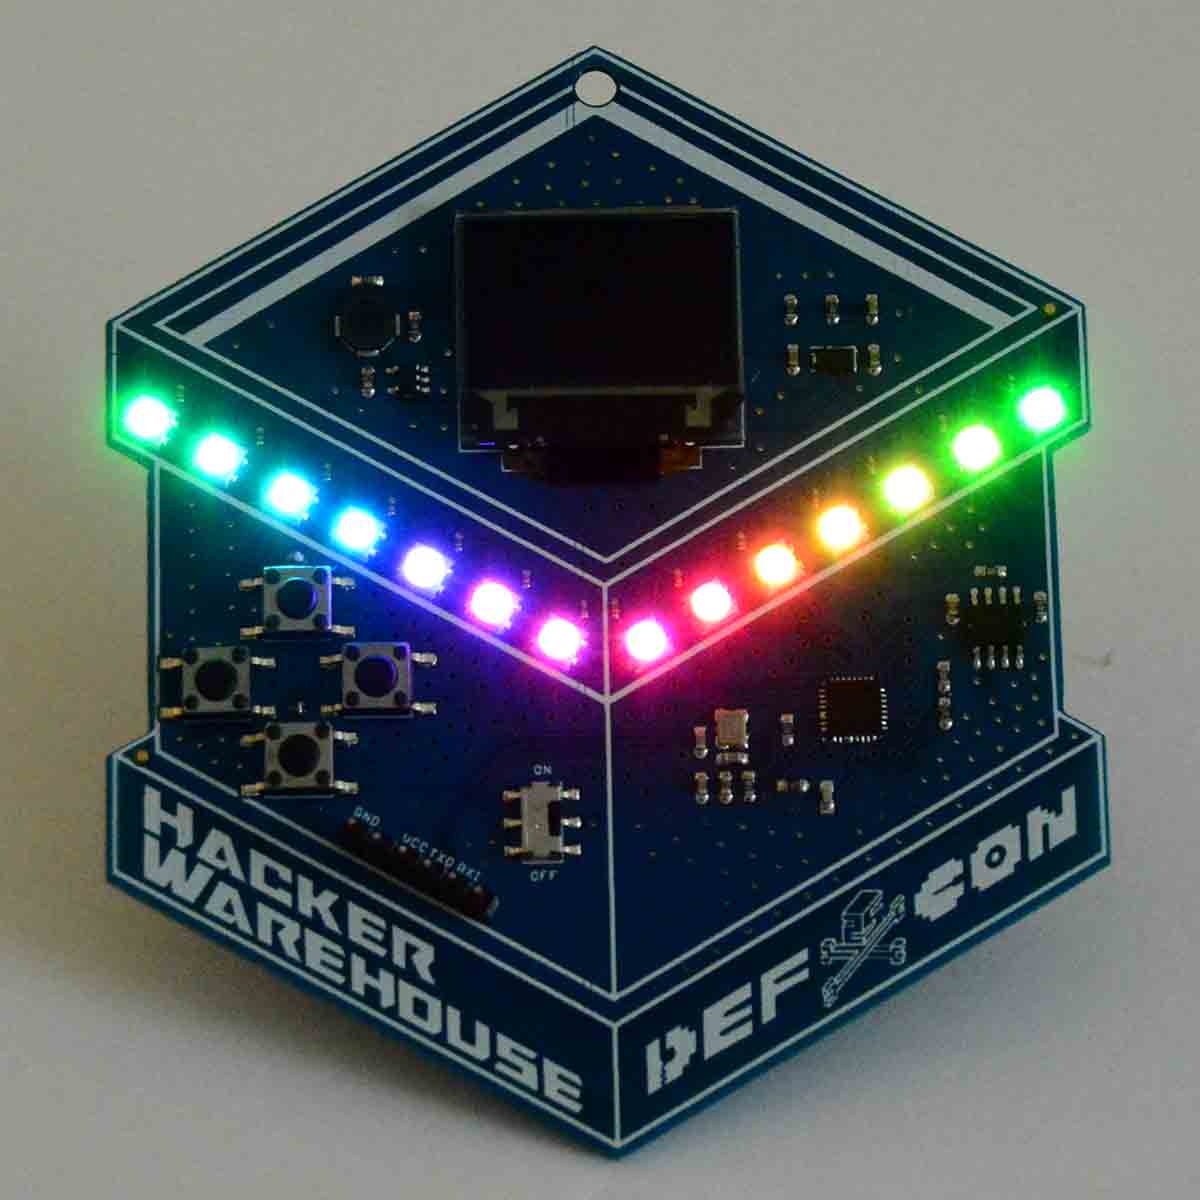
The design of the Hacker Warehouse badge is surprisingly simple compared to the Bender Badges and puzzling crypto badges that are also part of this year’s Badgelife hardware celebration. On board is an ESP8266 with a custom PCB implementation that includes a larger Flash chip. The other side of the board is loaded up with four tact switches in a D-pad arrangement. On top is a 96 x 64 pixel full-color OLED display, and blinkies are provided by fourteen mini WS2812 RGB LEDs. Power is provided by two AA cells and what looks to be a nice fancy switching regulator. This is real hardware, not just a few modules thrown together with a bunch of LEDs.
Oh, what wireless fun
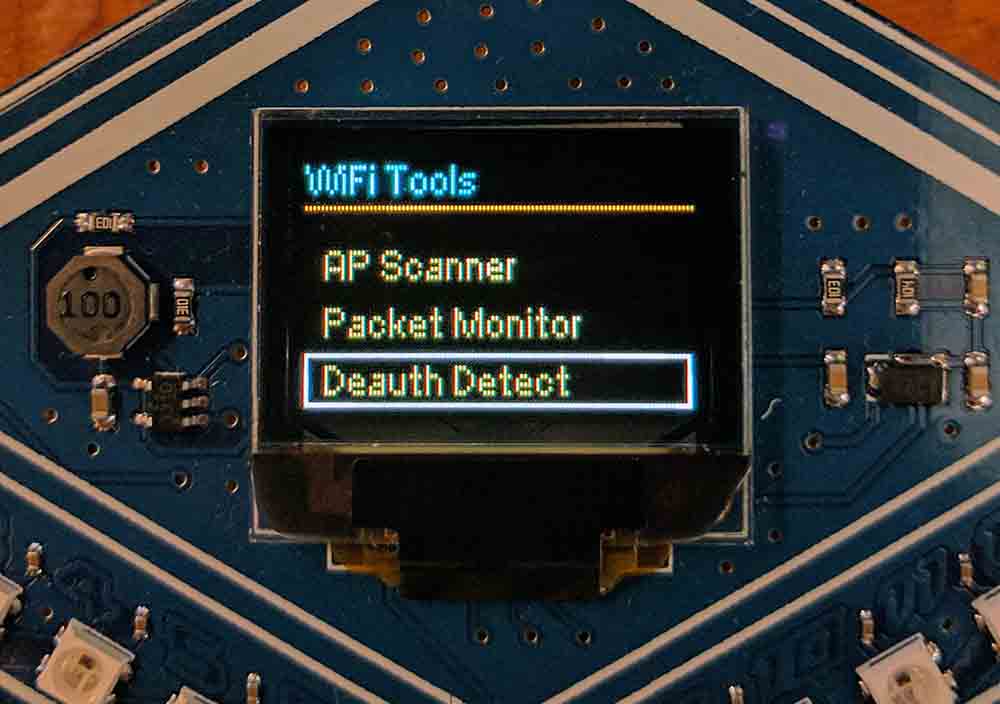
This badge is built around the ESP8266, a very interesting WiFi-enabled microcontroller that has more features than it should. [Garrett] is using the ESP as a WiFi scanner of sorts, allowing anyone with this badge to monitor WiFi channels, APs, packets, and — this is important — deauth packets.
Over the last year, there have been a number of projects around the Internet that take an ESP8266 and spew deauthorization frames into the spectrum. These frames cause a WiFi client to stop using an access point, and basically shuts down all the WiFi in an area. It’s well documented, and people have been doing it for years, but the ESP8266 makes deauth attacks so very, very easy. We’re going to see a lot of deauth frames this year at DEF CON, and the Hacker Warehouse badge will be able to detect them. It can also generate these frames, but that capability is locked for now.
Blinking and glowing
An electronic conference badge isn’t cool unless it has obnoxiously bright and glowy LEDs, and the Hacker Warehouse badge is very cool.
Onboard the Hacker Warehouse badge are 14 RGB LEDs, programmed with 46 different patterns that are certainly bright enough to annoy someone. This is what you need for a badge, and it’s beautiful.
This is a truly fantastic badge that’s also a great development board for the ESP8266. Everything you need for portable WiFi gaming fun is already there — you have blinky LEDs, an OLED, what seems to be a fairly nice power supply, and enough buttons to do something interesting. All you need to do to program this badge is attach a USB to serial adapter to the pre-populated header and you really have something. It’s a great badge, and we can’t wait to see the hacks for this great piece of hardware next week at DEF CON.
A few years ago, [Kumar] created the BeagleLogic, a 14-channel, 100 MSPS logic analyzer for the BeagleBone as an entry for the Hackaday Prize. This is a fantastic tool that takes advantage of the PRUs in the BeagleBone to give anyone with a BeagleBone a very capable logic analyzer for not much cash.
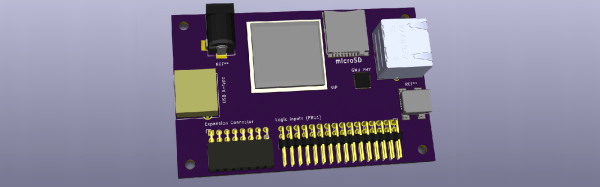
This year, [Kumar] is back at it again. He’s improving the BeagleLogic with a BeagleBone on a chip. This is the BeagleLogic Standalone, a 16-channel logic analyzer at 100 MSPS using a single chip.
Like the BeagleLogic from a few years ago, [Kumar] is relying on those fancy PRUs in the BeagleBone that make reading GPIOs and blinking LEDs so easy and fast. Unlike the BeagleLogic shield/cape/whatever, the BeagleLogic Standalone uses the Octavo Systems’ OSD3358 — the BeagleBone on a chip — for the hardware. This incorporates everything in a BeagleBone into a single package, making for a compact unit that still has all the capabilities of the bigger BeagleLogic.
On board this pocket-sized logic analyzer is the OSD3358 itself, the logic analyzer frontend, a gigabit Ethernet port, USB, an SPI Flash, SD card slot and eMMC, and an RTC. An expansion header breaks out a UART, I2C, SPI, two PWM outputs, 6 GPIOs, and a clock to a PRU for experimental synchronous captures.
With a web-based frontend for this Logic Analyzer, this looks like it’ll be a fantastic tool for any hardware hacker, and something that should be reasonably inexpensive.
The I/O capabilities built into most microcontrollers make it easy to measure the analog world. Say you want to build a data logger for temperature. All you need to do is get some kind of sensor that has a linear voltage output that represents the temperature range you need to monitor — zero to five volts representing 0° to 100°C, perhaps. Hook the sensor up to and analog input, whip up a little code, and you’re done. Easy stuff.
Now put a twist on it: you need to mount the sensor far from the microcontroller. The longer your wires, the bigger the voltage drop will be, until eventually your five-volt swing representing a 100° range is more like a one-volt swing. Plus your long sensor leads will act like a nice antenna to pick up all kinds of noise that’ll make digging a usable voltage signal off the line all the harder.
Luckily, industrial process engineers figured out how to deal with these problems a long time ago by using current loops for sensing and control. The most common standard is the 4-mA-to-20-mA current loop, and here we’ll take a look at how it came to be, how it works, and how you can leverage this basic process control technique for your microcontroller projects.
For this week’s Hack Chat on Hackaday.io, we’ll be talking with AnnMarie Thomas about making electronics for education. There’s a huge intersection between electronics and education, and whether you’re designing robots for a FIRST team or designing a geometry curriculum around 3D-printed objects, there’s a lot electronics can teach students.
AnnMarie Thomas is an associate professor at the School of Engineering and the Opus College of Business at the University of St. Thomas. She’s the founder of the Playful Learning Lab, and along with her students she’s created Squishy Circuits. AnnMarie is the author of Making Makers: Kids, Tools, and the Future of Innovation. Basically, if you’re looking for someone who knows how to make an educational product, you can’t do any better.
For this week’s Hack Chat, we’ll be talking about how to define how technology and education can intersect. There are ways to define a concept, build and sell an educational product, and how to find a market for a product. If you’ve ever wanted to know what goes into getting students to dive into electronics, this is the Hack Chat you have to sit in on.
Oh, AnnMarie is also a judge for this year’s Hackaday Prize. Neat.
Also on deck for this week’s Hack Chat will be Tindie. Tindie is Supplyframe’s (Hackaday’s parent company) answer to the question, ‘where should I sell my hardware product’. Think of it as ‘Etsy for electronics’, but with less furniture made out of pallet wood, but paradoxically more products that require a California prop 65 warning. Isn’t electronics fun?
Here’s How To Take Part:
Our Hack Chats are live community events on the Hackaday.io Hack Chat group messaging. This Hack Chat will take place at noon Pacific time on Friday, July 21st. Confused about where and when ‘noon’ is? Here’s a time and date converter!
Log into Hackaday.io, visit that page, and look for the ‘Join this Project’ Button. Once you’re part of the project, the button will change to ‘Team Messaging’, which takes you directly to the Hack Chat.
You don’t have to wait until Friday; join whenever you want and you can see what the community is talking about.