An Arduino Sickbay Display Worthy Of The Enterprise

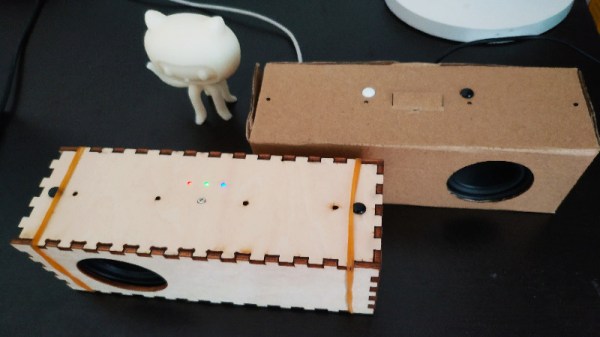
The various displays and interfaces in Star Trek, especially The Original Series, were intentionally designed to be obtuse and overly complex so they would appear futuristic to the audience. If you can figure out how Sulu was able to fly the Enterprise with an array of unlabeled buttons and rocker switches, we’d love to hear it. But one area of the ship where this abstract design aesthetic was backed off a bit was sickbay, as presumably they wanted the audience to be able to understand at a glance whether or not Kirk or Spock were going to pull through their latest brush with death (spoilers: they’re fine).

For his latest project, [XTronical] has recreated the classic displays from Dr McCoy’s sickbay with an Arduino Nano and a 2.8 inch LCD display. It even has a speaker and MP3 player module to recreate the “heartbeat” sound from the original show. The whole thing looks and sounds phenomenal, and would be a perfect desk toy for the classic Trek aficionado. But this isn’t just a toy, it’s a fully functional medical scanner.

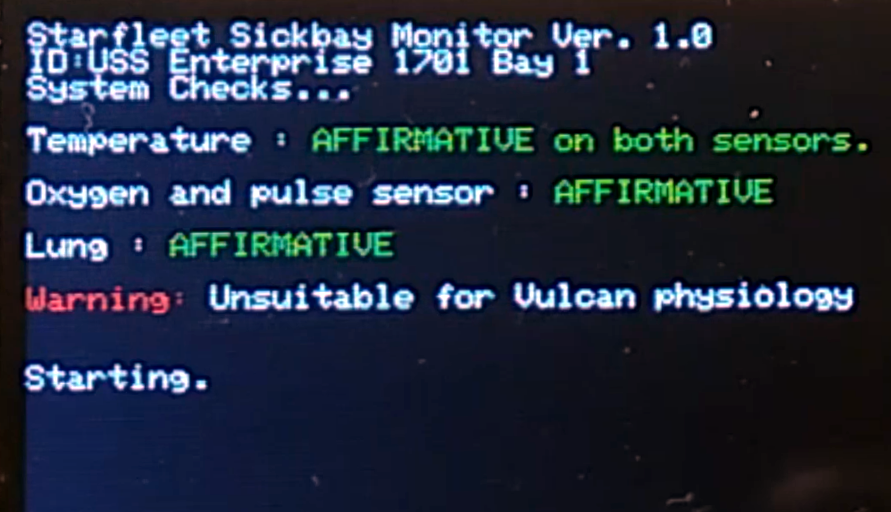
Of course, this little gadget can’t tell you if you’ve come down with a nasty case of Rigellian fever, but it can read your vitals using a MAX30100 pulse oximeter module and DS18B20 thermometer. In fact, it actually has two DS18B20 sensors: one to measure ambient temperature, the other to measure skin temperature. With those two figures, [XTronical] says it can calculate your core body temperature. The only thing that’s made up is the blinking “Respiration” indicator, that one’s just an estimate.

So where do we go from here? This project is presented as merely the first step in building a complete prop, perhaps in the form of a medical tricorder. We’ve seen some phenomenal TOS tricorder builds over the years, and some have even used the Raspberry Pi to shoehorn a bit of functionality into them. [XTronical] says he’s working on getting the source code and a step-by-step build guide put together, so keep an eye out for that in the near future.

Continue reading “An Arduino Sickbay Display Worthy Of The Enterprise”

Bringing FPGA Development To The Masses

The Field Programmable Gate Array (FPGA) is one of the most exciting tools in the modern hacker’s arsenal. If you can master the FPGA, you can create hardware devices that not only morph and change based on your current needs, but can power through repetitive tasks at phenomenal rates. The only problem is, working with FPGAs can be a bit intimidating for newbies. One could argue that the technology is waiting on its “Arduino” moment; the introduction of a cheap development board coupled with easy to use software that brings FPGA hacking into the mainstream.

If everything goes according to plan, the wait might soon be over. [Ryan Jacobs] believes his project WebFPGA is the easiest and fastest way to get your hands dirty with this incredible technology. Outwardly the hardware could pass for an Arduino Nano clone, with a bunch of GPIO pins and a couple of LEDs on a small breadboard-friendly PCB. Certainly a no-frills presentation. It’s the software side is where things get interesting: all you need to develop for this FPGA is a modern web browser.

Currently Chrome, Opera, and Edge are supported, even if they’re running on relatively low-end computers. [Ryan] says this makes it much easier and cheaper to roll out FPGA classes in schools, as students can do everything with their existing Chromebooks. As the video after the break shows, you can even get away with using a sufficiently powerful smartphone to do some FPGA hacking on the go.

So what’s the trick? Essentially the heavy-lifting is done remotely: all of the synthesis is performed in their cloud backend, with the final bitstream delivered to the user for installation through WebUSB. If you’re more comfortable on the command line, [Ryan] says they’re currently working on tools which will allow you to perform all the necessary interactions with their cloud service without the browser.

The more critical Hackaday reader will likely be concerned about lock-in. What happens if you buy one of these development boards without a license for the service, or worse, what happens if WebFPGA goes belly-up down the road? To that end, [Ryan] makes it clear that their hardware is completely compatible with existing offline FPGA development tools such as the open source IceStorm.

We’ve seen considerable interest in low-cost FPGA development platforms, with readers perhaps recalling the excitement surrounding the fire sale of the Pano Logic thin clients. Despite efforts to make developing for these systems even easier, it’s hard to imagine the bar getting much lower than what WebFPGA is shooting for. Their Kickstarter campaign is close to crossing the finish line, and we’re very interested to see where the product goes from here.

Continue reading “Bringing FPGA Development To The Masses”

How To Turn A Chainsaw Into A Chopsaw

If you’re doing a lot of metal working, a chop saw is a great tool to have. It’s an easy and quick way to do a lot of neat, clean accurate cuts. [Making Stuff] wanted to do just that, but didn’t have a chop saw lying around. Instead, an old Stihl chainsaw was placed on the bench, and hacking ensued (Youtube link, embedded below).

To achieve this, it was necessary to source some parts and make some modifications to the chainsaw. The clutch bell was removed, and modified to mount a roller chain sprocket. An arm was then built, which mounted a pair of journal bearings at the far end. Another sprocket was installed at this end, along with a shaft which mounts the cutting wheel. Finally, a guard was fitted over the cutting wheel to give the build a semblance of safety.

[Making Stuff] notes that the chainsaw can readily be converted back to its standard purpose, needing only to refit the original parts and replace the modified clutch bell with a stock one. It’s a great way to get two tools out of one, and we’re sure it will prove useful in future projects.

If you’ve got a taste for wacky chop saws, check out this hard drive build. Video after the break.

Continue reading “How To Turn A Chainsaw Into A Chopsaw”

Building A Smart Speaker From Scratch

Smart speakers have proliferated since their initial launch earlier this decade. The devices combine voice recognition and assistant functionality with a foreboding sense that paying corporations for the privilege of having your conversations eavesdropped upon could come back to bite one day. For this reason, [Yihui] is attempting to build an open-source smart speaker from scratch.

The initial prototype uses a Raspberry Pi 3B and a ReSpeaker microphone array. In order to try and bring costs down, development plans include replacing these components with a custom microphone array PCB and a NanoPi board, then implementing basic touch controls to help interface with the device.

There’s already been great progress, with the build showing off some nifty features. Particularly impressive is the ability to send WiFi settings to the device using sound, along with the implementation of both online and offline speech recognition capabilities. This is useful if your internet goes down but you still want your digital pal to turn out the lights at bed time.

It’s not the first time we’ve seen a privacy-focused virtual assistant, and we hope it’s not the last. Video after the break.

Continue reading “Building A Smart Speaker From Scratch”

Fly A Pi On Your Next Model Rocket

From time to time, we see electronics projects for model rocket instrumentation. Those who have been involved in the hobby for many years may remember when 8-bit microcontrollers like the PIC16F84 were the kind of hardware you might fly on a mission. These days, however, there’s little reason not to send a high-powered processor. This is exactly what [Mohamed Elhariry] has done with his PiX project, which turns a Raspberry Pi Zero W into a neat little flight data recorder.

The hardware has what you might expect from a flight recorder, including accelerometer, gyroscope, and pressure sensor. In addition, it carries temperature and humidity sensors, and of course, a camera. A 64 GB microSD card provides the storage, while a LiPo SHIM board allows the whole thing to run from a 150 mAh battery. All of the components are off-the-shelf breakouts, which makes assembly as easy as soldering a few connections and securing the modules with a little tape.

The project is in GitHub, including python code, schematics for the hardware, and detailed instructions. If you ever wanted to get started with instrumenting a model rocket, this looks like a great resource. Also in the repo is a captured video from an actual flight [34 MB GIF] if you just want to see the view from one launch.

Using commercial modules seems pretty convenient, but if custom hardware is more your thing, check out these 22 mm round PCBs designed to fit inside rockets.

Project Egress: Casting The Hatch Handle

Every door needs a handle, even – especially – the door of a spaceship. And [Paul] from “Paul’s Garage” got the nod to fabricate the handle for the Apollo 11 Command Module hatch being built as part of Project Egress.

For those not familiar with Project Egress, it’s a celebration of the 50th anniversary of the first Moon landing that aims to recreate an important artifact from the mission: the Unified Crew Hatch, or UCH, from the Apollo 11 Command Module Columbia. Forty-four makers from various disciplines have been tasked with making the various pieces of the UCH, and each one is free to use whatever materials and methods he or she wants. [Paul] chose what will probably turn out to be the consensus material – aluminum – and decided to play to his strengths by casting the part.

The handle itself is a chunky affair, as one would expect from something designed to be handled by an astronaut. [Paul] started with a 3D-printed version of the handle and created a two-piece mold in casting sand. The original part was probably machined, which meant that it didn’t have the draft angle that cast parts are supposed to have to make removal from the molding medium easier. [Paul] lucked out and got a perfect mold, and a perfect pour from silicon aluminum to boot. All the casting needed was a little cleanup and some holes to bolt it to the door.

[Paul]’s handle will get shipped to the Smithsonian along with the other parts, like [Fran Blanche]’s latch assembly, so that [Adam] can assemble the hatch live during the 50th-anniversary celebration later this month. Stay tuned for more Project Egress coverage as the parts keep rolling in.

Continue reading “Project Egress: Casting The Hatch Handle”

Salty? Tip Canister To Rage Quit Games

Do you long for a more pronounced way to rage quit video games? Smashing buttons comes naturally, of course, but this hurts the controller or keyboard. You can quit your longing, because [Insert Controller Here] has an elegant solution that’s worth its salt.

The Salty Rage Quit Controller is simple. The cup is filled with distilled water. When you pour salt in it, the two bolt terminals tell the Arduino Micro that the resistance in the water has decreased. The Micro sends whatever keystrokes you want, so you could call out your deadbeat medic before quitting, or just plain leave. [Insert Controller Here] has example code on his site to get you started. Click calmly past the break to watch the demo and build videos, or we’ll have to ban you for aggro.

With the right tools, you can turn anything into a game controller. Check out this car controller that uses Python and CAN bus sniffing.

Continue reading “Salty? Tip Canister To Rage Quit Games”