Building A Hard Drive Scratch Controller

hard-disk-scratch-controller

If you’re reading this blog then chances are you have a dead hard drive hanging out somewhere in your house. Here’s a weekend project that will put it back into use. [Andreas] took on the popular project which combines a hard drive and optical mouse to build a scratch controller.

The gist of the build is that you use an optical mouse sensor to track the movement of the platter. But [Andreas] made things harder on himself by not using the USB capability of the mouse and mapping it in software for his needs. Instead he plucked the sensor from the mouse, reading it using an Arduino. After much trial and error with the best way to coat the underside of the platter to play nicely with the sensor he managed to get it up and running. The controller issues commands using the MIDI protocol, forming a strong foundation for future upgrades which could lead to a full-blown DJ console hack.

Continue reading “Building A Hard Drive Scratch Controller”

Turning Kerbal Space Program Into A Proper Space Simulator

Kerbal

Kerbal Space Program – the game of freakin’ space Lego and incompetent little green men – has seen a lot of popularity since it was on the Steam Summer sale. Now, in a bid to out do the flight sim aficionados who build 737 cockpits in their garage, a few enterprising Kerbalnauts are building custom controllers for this wonderful introduction to [Tsiolkovsky], [Goddard], and [Evel Kinevel].

[vladoportos] thought KSP could use custom gaming controllers to provide switches for staging, attitude hold, and reaction control system commands. In the game, these are toggled by keyboard input, but this unfortunately destroys the immersion of being a rocket-powered angel of death for your Kerbal volunteers. He rigged up an Arduino Leonardo to send USB HID commands to his computer whenever he pressed one of the buttons connected to his breadboard controller. It’s a work in progress, but [vladoportos] has some big plans that include a physical nav ball to show his ship’s orientation in space.

USB input is one thing, but that’s only half the problem. If you want to build a real Kerbal ship simulator, you’ll need to get data out of the game, and into your glass or analog displays. [voneiden] over on the KSP subreddit has the solution for you. He’s been working on a ‘mission control’ app that runs in Python, connects to a Kerbal Space Program plugin over TCP, and displays flight information such as speed, altitude, longitude, latitude, apoapsis, and periapsis.  The code is up on his git, ready for some individual to bring this over to a Raspi and a character LCD display.

A Video Game With Custom LCD Characters

LCD

[Nakul] wanted to build a video game, and with a few projects worth of Arduino experience decided he could finally attain his goal. He used a character LCD display to make his game, and instead of a text-based adventure, he went with a graphical side scroller.

The display for this space-based side scroller isn’t a graphical display like a CRT or a graphic LCD. Instead, [Nakul] is using the ubiquitous Hitachi HD44780 character LCD display. Normally these are used to display text, but they all have the ability to display custom 5 by 8 pixel characters. The code puts these custom characters – a spaceship, missile, and barrier – into the display’s memory and uses them as the sprites for the video game.

You can grab [Nakul]’s code over on his git or check out the action videos below.

Continue reading “A Video Game With Custom LCD Characters”

Popup Book Includes A Playable Piano Keyboard

pop-up-book-has-playable-piano

This popup book contains several interactive electronic elements. It’s the creation of [Antonella Nonnis] using mostly scrap materials she had on hand. Of course there are some familiar players behind the scenes that take care of the electronic elements.

Her photo album of the build process sheds light on how she pulled everything together. Instead of adding switches for interactivity she built capacitive touch sensors on the backs of the pages. Strips of copper foil serve as flexibly traces, moving the connections past the binding and allowing them to be jumpered to the pair of Arduino boards which control the show. That’s right, there’s two of them. One is dedicated to running the pop-up piano keyboard seen above. The other deals with Art, Math, and Science elements on other pages.

This continues some of the multimedia work we saw popping up in popups a few years back.

Continue reading “Popup Book Includes A Playable Piano Keyboard”

Fun With LED Matrix And Mouse

fun-with-LED-matrix-and-mouse

[Brad] just acquired a 32×32 RGB LED matrix and he jumped right into the deep end with his first project. To try out his skills on the device he used an Arduino to drive a slew of pixels with bouncing-ball physics.

The demo starts off with a hail storm of multi-colored falling pixels. In the center of the storm is the cursor, which he controls with a PS2 mouse. That happens to be a ball mouse which makes sense as we don’t remember having seen any optical mice as of late that weren’t USB. The PS2 protocol is easy to read using a microcontroller; more about that in [Brad’s] project write up.

By holding down the left mouse button he can draw persistent pixels on the screen. The falling balls then interact by bouncing off of the obstacles. The image above shows a frame on three sides of the screen which has trapped the pixels near the bottom. He can also erase pixels, which has the effect of draining the trapped balls like a hole in a bucket of water. Neat!

Bouncing ball physics are fun to experiment with. Here’s one being driven by an analog computer.

Continue reading “Fun With LED Matrix And Mouse”

[Massimo] Talks About Arduino Clones

pick one

Back in 2005, the Arduino was just a twinkle in they eyes of [Massimo Banzi] and the other core developers. Since then, you can’t go to any electronics site without hitting something beginning with ‘ard~’ or ending with ‘~duino’. The platform has become so popular, people everywhere are piggybacking on the name to the point of trademark infringement or simply outright counterfeiting one of the many official Arduino boards. Now [Massimo] has something to say about these clones, ripoffs, derivatives, and ‘duino-compatible boards.

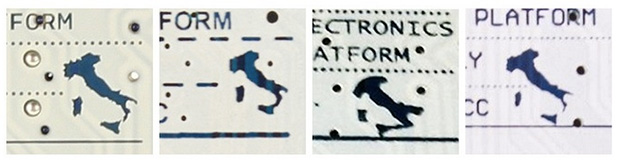
On the list of things bad for the open source ecosystem, [Massimo] points to direct clones of existing Arduino boards. While these boards are electrically identical to officially licensed boards, they simply don’t support the Arduino project financially and usually don’t contribute to the existing libraries and code. Even worse are counterfeits; these boards copy the trademarks of the Arduino project – sometimes terribly given the three examples above (guess which one is the real one) – and directly profit off of the Arduino project without giving any support in return.

There are other veins of Arduino that [Massimo] considers more acceptable. Arduino-compatible boards, seen by the dozen over on Kickstarter, usually add something of their own, be it a radio chip, or an entirely different microcontroller. Derivatives, like Teensy and Adafruit’s Flora actually bring new things to the table with improved hardware and new and interesting libraries.

As far as counterfeits and clones go, we can’t agree more with what [Massimo] has to say. You have to admire the folks in the Arduino project being so open about their creations and admiring the Arduino derivatives that bring some new hardware to the table. Then again, that’s the lesson of the Arduino project; you can make hardware open source and still be outrageously popular.

DIY Airbag, Explosions Included

AnAirbagSavedMyLife

Your car’s airbag is one of the major engineering accomplishments of the auto industry. In an accident, a whole host of processes must take place in sequence to keep your face from slamming into the steering wheel, and  everything must happen in just a fraction of a second. [Steve] over at Make thought it would be a cool idea to discover what actually goes in to saving a life with an airbag and decided to build his own.

The electronics of the build consisted of an accelerometer and an Arduino. A lot of research, development, and experimentation has gone into the algorithms that trigger airbags, but [Steve] decided to keep things simple: when a sudden acceleration is detected, set off a small charge of black powder.

The airbag itself is ripstop nylon reinforced with canvas, contained in a small wooded box fitted with hinged doors. All these components are put on wheeled aluminum test rig, manned with a honeydew melon crash test dummy, and pulled into a short wall at a few miles per hour.

Despite [Steve] not putting hundreds of thousands of man hours into the development of his airbag – unlike the ones you’ll find in your steering column – his device actually worked pretty well. While not a complete success, he did manage to come up with something that both looks and acts like the familiar device that has saved countless lives.