You Can Now Bootstrap Your Amiga Without A Floppy With This One Weird Trick

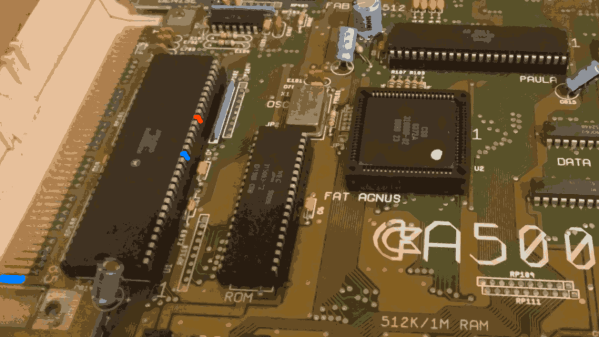
Traditionally, most Amigas were intended to boot from a floppy disk. . An Amiga can readily make its own boot floppy, but only once it’s already booted up. If you don’t have a floppy ready to go, you’re out of luck, as PCs can’t readily make them for Amigas. [Roc] whipped up the amigaXfer bootstrapping method to solve this very problem.

Shorting a couple of pins together can unlock a serial debug mode that can be used for bootstrapping the machine.

Available on Github, the amigaXfer tool is able to perform several tasks with an Amiga via its serial port. The Amiga must first be turned on while plugged into another computer running amigaXfer via serial connection. When the Workbench floppy prompt comes up, the CrashEntry feature on amigaXfer should be triggered, and the BERR and GND pins on the Amiga’s 68000 CPU should be connected just for a split second, triggering the Amiga to go into a special serial debug mode. This enables amigaXfer to take control, allowing a disk to be formatted and written with a debug bootblock, and this disk can then be used to boot the Amiga without the need for the hack.

It’s a nifty way to get your Amiga up and running if you’ve just bought it off eBay and it didn’t come with any disks. From here, you can use amigaXfer to load other programs onto the Amiga via the same serial cable you used for the bootstrapping process, too. The hack isn’t limited to just the Amiga 500, either. It should work on a range of machines, including AmigaOS versions 1.x, 2.x, and 3.x.

Unlike the Commodore 64, we probably won’t see brand new replica Amigas anytime soon, but we can dream. As always, if you’ve got ’em, send your hottest Amiga projects into the tipsline!

Beginning The Machine Shop Journey With A DIY CNC

Building a good quality machine shop may seem to present a chicken-and-egg problem, at least for anyone not willing to mortgage their home for the money needed to buy all of these tools new. Namely, that building good tools often requires good tools. To help solve this problem, [Ryan] designed and built this CNC machine which can be built with nothing other than common tools, hardware store supplies, and some readily available parts from the internet.

Since it’s being built from consumer-grade material, [Ryan] has the design philosophy of “buying precision” which means that most of the parts needed for this build are precise enough for their purpose without needing to be worked in any way before incorporation into the mill. For example, he uses a granite plate because it’s hard, flat, heavy, and sturdy enough at the time of purchase to be placed into the machine right away. Similarly, his linear guides do not need to be modified before being put to work with a high degree of precision and minimal calibration. From there, he applies the KISS principle and uses the simplest parts available. With this design process he is able to “bootstrap” a high quality mill for around $1500 USD without needing any extra tools than the ones you likely already have.

The RIG-CNC as it is known has also been made completely open source which further cements its bootstrapability, and there is a lot more detail on the project page and in the video linked below. This project is unique not simply for the mill build from common parts and tools, but because this design philosophy is so robust. Good design goes a lot farther in our builds than a lot of us might realize, and good design often results in more maintainable, hackable things that work for more uses than the original creators may have even thought about.

Continue reading “Beginning The Machine Shop Journey With A DIY CNC”

Scratch-built 3D Printer Shows Rock-solid Performance

scratch-built-3d-printer

These days it’s super-easy (not super-cheap) to go out and buy a 3D printer. But if you’ve got the mad skills like [Mario Lukas] maybe you can build a 3D print using a bunch of scavenged parts (translated). He’s published six posts on the build, and put together an overview video which you can watch after the break.

A pile of salvaged parts were found in a scanner and four different printers. He’s also powering the thing with an old PC PSU. The hot bed and extruder are brand new, which is a wise investment. We’re not sure about the threaded rod and bearings but we’d bet those are new as well. When it came time to work on the electronics he chose an Arduino board as the go-between for the printer and computer. It uses four stepper motor driver boards to drive the axes. Connections can be a bit complicated and he actually ‘smoked’ one of the boards during the development phase.

One of the mechanical build posts shows a belt routed in a T-shape. We wonder if it’s function is similar to what this H-bot style printer uses?

Continue reading “Scratch-built 3D Printer Shows Rock-solid Performance”

Minimalist AVR Programmer Is Just Fab!

Whether you’re burning a new bootloader to an Arduino board, or doing away with a bootloader to flash Atmel chips directly, an in-system programmer (ISP) is an indispensable tool for working with AVR microcontrollers. If cost has held you back, it’s no longer an excuse: FabISP is a barebones USB-based AVR programmer that can be pieced together for about ten bucks.

FabISP was created by [David Mellis] as a product of MIT’s Fab Lab program, which provides schools with access to design and manufacturing tools based around a core set of fabrication capabilities, so labs around the world can share results. But the FabISP design is simple enough that you don’t need a whole fab lab. It’s a small, single-sided board with no drilling required; the parts are all surface-mounted, but not so fine-pitched as to require reflow soldering. Easy!

There’s still the bootstrap problem, of course: you need an AVR programmer to get the firmware onto the FabISP. This would be an excellent group project for a hackerspace, club or school: if one person can provide the initial programmer to flash several boards, each member could etch and assemble their own, have it programmed, then take these out into the world to help create more. We must repeat!

[Thanks Juan]