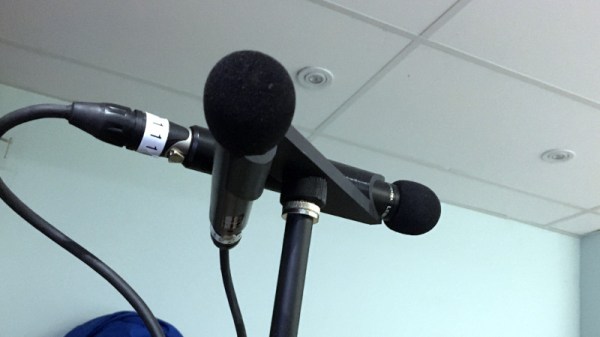
Aesthetic DIY Bluetooth Speakers

DIY Bluetooth speaker projects are always a staple here at Hackady. In our latest feature of DIY audio builds, we have [Patrick’s] vinyl cylindrical speaker.

He found a pretty inexpensive Bluetooth audio amplifier on AliExpress. However, the amplifier module oddly enough had a few missing components that were critical to its operation, so he had to do a little bit of re-work. Not something you generally expect to do when you purchase a pre-made module, but he was certainly up to the task.

He noticed the board amp module was missing a battery protection circuit even though there was space on the board laid out for those components (maybe an older board revision?). To remedy this problem, he added his own battery protection circuit to prevent any unwanted catastrophes. Secondly, he noticed a lot of distortion at high volumes and figured that some added capacitance on the power supply would help fix the distortion. Luckily, that did the trick.

Finally, and not quite a mistake on the manufacturer’s part this time, but an improvement [Patrick] needed for his own personal use. He wanted the amp module’s board-level LED indicator to be visible once the enclosure was fitted around the electronics. So, he used the built-in status trigger as a digital signal for a simple transistor circuit powering a much brighter ring LED that could be mounted onto the enclosure. That way, he could utilize the firmware for triggering the board-level status indicator for his own ring LED without any software modifications to the amp module.

Now, all that was left was to construct the enclosure he had 3D-printed and fit all the electronics in their place. We’ve gotten pretty used to the always impressive aesthetics of [Patrick’s] designs, having covered a project of his before, and this build is certainly no exception. Great job!

While you’re here, take a look at some other DIY Bluetooth speaker projects on Hackaday.

Continue reading “Aesthetic DIY Bluetooth Speakers”

3D Printed Speaker Uses DSP For Ultimate Performance

Speaker design used to be as much about woodwork as it was about advanced acoustic mathematics. In recent decades, technologies such as digital signal processing and 3D printing have changed the game significantly. Leaning heavily on these techniques, [ssashton] developed a design called Mr. Speaker.

The speaker contains a 3″ woofer for good bass response, and twin tweeters to deliver stereo audio. Using WinISD to help do the requisite calculations on porting and volume, [ssashton] designed a swooping 3D printed enclosure with a striking design. Sound comes into the unit through an off-the-shelf Bluetooth module, before being passed to an ADAU1401 digital signal processing unit. From there, it’s passed to a mono amp to drive the woofer and a stereo one for the tweeters.

To get the flattest frequency response possible and maintain linear phase, it’s all about DSP in this case. RePhase software was used to design a DSP filter to achieve these goals, helping the speaker to produce the desired output. The ADAU1401 DSP was then programmed using Sigma Studio, which also allows the designer to do things such as split outputs for seperate woofer and tweeter drives.

[ssashton] does a great job of explaining both DSP principles and old-school speaker design tricks, from phase plugs to reflections. The use of 3D printed parts to rapidly iterate the design is impressive, too. We’d love to see the final enclsoure get an acetone smoothing treatment to really take it over the edge.

If you’re into serious speaker design and want more, be sure to check out this advanced transmission line design. For those of you with your own builds with some nifty tricks, drop us a note on the tipline.


This Tube Preamp Has A Nixie Volume Display

The pursuit of audiophile hi-fi is one upon which many superlatives and perhaps a little too much money are lavished. But it’s also a field in which the self-builder can produce their own equipment that is as good or often better than that which can be bought, so it provides plenty of interesting projects along the way. [Justin Scott]’s tube preamplifier is a great example, with its novel use of a pair of Nixie tubes to indicate the volume to which it has been set.

The audio side of the preamp comes courtesy of a four-tube kit from tubes 4 hi-fi, in which we notice another tube as power supply rectifier. The case is a beautifully made wooden affair with a professional front panel, but it’s the Nixies which make it a bit special. A high quality motorised potentiometer is used as a volume control, one of its multiple outputs is used as a simple potential divider to provide a voltage. This is read by an Arduino, which in turn drives the Nixies via a BCD-to-decimal decoder. The attention to detail in the whole project is at a very high level, and though he’s not shred any of its audio measurements with us, we’d expect it to sound as good as it looks.

If tube amplifiers interest you, we’ve delved into their design in the past, and it’s worth directing you to Justin’s matching amplifier, as well.

ESP32 Becomes Music Player In Under 40 Lines Of Code

The demo code for [XTronical]’s ESP32-based SD card music player is not even 40 lines long, though it will also require a few economical parts before it all works. Nevertheless, making a microcontroller play MP3s (and other formats) from an SD card is considerably simpler today than it was years ago.

Part of what makes this all work is I2S (Inter-IC Sound), a format for communicating PCM audio data between devices. Besides the ESP32, at the heart of it all is an SD card reader breakout board and the MAX98357A, which can be thought of as a combination I2S decoder and Class D amplifier. The ESP32 reads audio files from the SD card and uses an I2S audio library to send the I2S data stream to the MAX98357A (or two of them for stereo.) From there it is decoded automatically and audio gets pumped though attached speakers.

A few economical components, and only a handful of connections between them.

It’s amazing how much easier audio is to work with when one can take advantage of shuffling audio data around digitally, and the decoder handles multiple formats with an amplifier built in. You can see [XTronical]’s ESP32 player in action in the video embedded below.

Continue reading “ESP32 Becomes Music Player In Under 40 Lines Of Code”

How Did They Get Sampled Sounds From An SN76489 8-bit Sound Chip?

If you were lucky and had well-off parents in the early 1980s, your home computer had a sound chip on board and could make music. There were a variety of chips on the market that combined in some form the tone generators and noise sources of a synthesiser, but without the digital-to-analogue converters of later sound chips designed for sampled audio. They gave birth to chiptune music, but that was all they were made to do. The essence of a hack lies in making something perform in a way it was never intended to, and some game developers for the Acorn BBC Micro had its SN76489 producing sampled audio when it should never have been possible. How did they do it? It’s a topic [Chris Evans] has investigated thoroughly, and his write-up makes for a fascinating explanation.

So, how can a set of audio tone generators be turned into a sampled audio player, and how can it be done when the CPU is a relatively puny 6502? There’s no processor bandwidth for clever Fourier transform tricks, and 1980s tech isn’t set up for high data bandwidths. The answer lies in making best use of the controls the chip does offer, namely frequency and volume of a tone. A single cycle of a tone can be given a volume, and thus can be treated as a single sample of an unintended DAC. By using a tone frequency well above the audio range a suitable sample frequency can be found, and thus an audio stream can be played. The write-up has links to some examples in an emulator, and while they’re hardly hi-fi they’re better than you might expect for the hardware involved. Still, even at that they don’t approach this amazing 48kHz playback on a Commodore 64.

Header: SN76489, on a Colecovision console motherboard. Evan-Amos / Public domain.

Pulling Data From News Feed Telemetry

We are used to seeing shots from TV news helicopters every day, they are part of the backdrop to life in the 21st century. But so often we hear them overlaid with studio commentary, so it’s interesting to hear that their raw audio contains telemetry. It caught the attention of [proto17], who took some audio pulled from a news helicopter video and subjected it to a thorough investigation to retrieve the data.

The write-up is at a very in-depth level, and while there’s an admission that some of the steps could have been performed more easily with ready-made tools, its point is to go through all steps at a low level. So the action largely takes place in GNU Radio, in which we see the process of identifying the signal and shifting it downwards in frequency before deducing its baud rate to retrieve its contents. The story’s not over though, because we then delve into some ASCII tricks to identify the packet frames, before finally retrieving the data itself. It still doesn’t tell you what the data contains, but it’s a fascinating process getting there nonetheless.

It’s easy to forget that GNU Radio has signal processing capabilities far beyond radio, but it was the subject of a fascinating Superconference talk. We even jumped on the bandwagon in the non-foolish part of our April Fool this year.

Swap Your Microwave For A High Voltage Stereo

When building a new project, common wisdom suggests to avoid “reinventing the wheel”, or doing something simple from scratch that’s easily available already. However, if you can build a high-voltage wheel, so to speak, it might be fun just to see what happens. [Dan] decided to reinvent not the wheel, but the speaker, and instead of any conventional build he decided to make one with parts from a microwave and over 6,000 volts.

The circuit he constructed works essentially like a Tesla coil with a modulated audio signal as an input. The build uses the high voltage transformer from the microwave too, which steps the 240 V input up to around 6 kV. To modulate that kind of voltage, [Dan] sends the audio signal through a GU81M vacuum tube with the support of a fleet of high voltage capacitors. The antenna connected to the magnetron does tend to catch on fire somewhere in the middle of each song, so it’s not the safest device around even if the high voltage can be handled properly, but it does work better than expected as a speaker.

If you want a high-voltage speaker that (probably) won’t burn your house down, though, it might be best to stick to a typical Tesla coil. No promises though, since working with high voltages typically doesn’t come with safety guarantees.

Continue reading “Swap Your Microwave For A High Voltage Stereo”