A 23 Feet Tall Pyramid With 0.31 Mile Of LED Strips

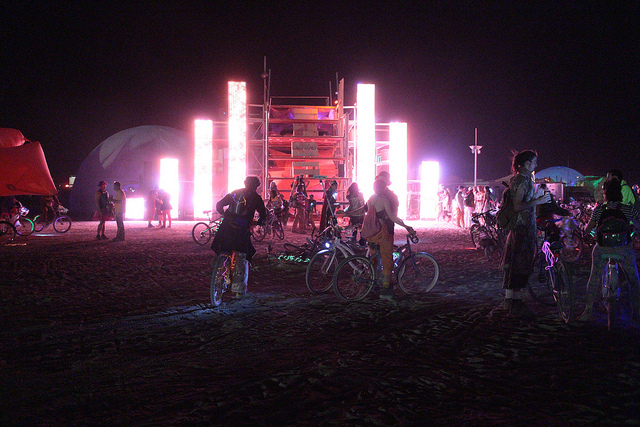
This year the Disorient Camp at Burning Man built a 7m tall pyramid with over half a kilometer of LED strips. For this special occasion several artists had developed patterns for this massive LED display, animating the parties happening every night in front of this build.

To handle the dusty environment, a Toughbook was running the pyramid’s main code, which was rendering the animation frames to 24-bit bitmaps and sending them over UDP to the network. For each face of the pyramid, a $45 BeagleBone Black running a dedicated program was slicing the images into the individual panels. Finally, each panel composed of eight WS281x LED strips was driven by a Teensy 3.0 microcontroller, receiving the piece to display by USB from the BeagleBone. To power the pyramid, 5V 40A power supplies were used for the tall panels, 5V 30A power supplies for the smaller ones.

Unsurprisingly, many of the power supplies failed due to the heat and dust.  The adhesive holding the LED strips also failed, and some screw terminals rattled loose from the 25KW sound system, requiring constant maintenance. Nevertheless, the sixteen thousand LEDs sure made quite an impression.

If anyone attending Burning Man managed to capture video of this thing in action we’d love to see it. Leave a link in the comments.

An RTL-SDR Spectrum Analyzer

With the combination of small, powerful, and pocketable computers and cheap, off-the-shelf software defined radio receivers, it was only a matter of time before someone built a homebrew spectrum analyzer with these ingredients. This great build is the project of [Stephen Ong] and he’s even released all the softwares for you to build this on your own.

The two main components of this build are a BeagleBone Black and its 7″ Touchscreen cape. The BeagleBone is running Angstrom Linux, a blazingly fast Linux distro for small embedded devices. The radio hardware consists of only a USB TV tuner supported by RTL-SDR. In his demo video, [Stephen] shows off his project and by all accounts it is remarkable, with a UI better than most desktop-oriented SDR software suites.

You can grab the BeagleBone image [Stephen] is using over on his blog, but for more enterprising reader, he’s also put up the source of his ViewRF software up on GitHub.

Turning A Tiny Linux Box Into A Synthesizer

waveforms

For all the cool things the Raspberry Pi, BeagleBone, and other low-power Linux boards can do, there’s one thing we haven’t seen much of: creating music with software synthesizers. Yes, soft synths have been around for ages now, but compiling them for these ARM boards is something we haven’t seen much of (to say nothing of the Linux audio system). Luckily, [Paul] and [Trev] have put together a tutorial for making synthesizers on these small Linux boards using Csound, the premier audio programming language for Linux.

[Paul] and [Trev] have already put together a few Csound instruments that include a Vangelis-inspired synth, a Lorenz Strange Attractor FM synth, a drum machine, and a classic monophonic style synth. All these instruments are ready to play on a Raspi or BeagleBone and we’re sure we’ll see a few more applications of this great tool for creating musical instruments as more musicians are turned onto these small Linux boards.

Designing A Pressure Sensitive Floor

ccm_activefloor8

[Sean] and his team at Adobe were asked to build “something new” for the Children’s Creativity Museum in San Francisco, so in several months they managed to build a digital/physical environment for kids called “Sense It”.

Part of this project involved designing and building a pressure-sensitive electronic floor which could detect if children were sitting, walking or running. As a camera based detection system couldn’t give them the type of precision they wanted, [Sean] decided to use pressure-sensitive resistors placed under MDF panels.

There are a total of twenty-one 2’x4′ tiles, each one including 8 pressure-sensitive resistors and an ATtiny84 based platform. All the microcontrollers digitize their 8 sensor signals and send their conversion results to a beaglebone over a shared i2c bus in a RJ45 CAT5 cable. As it is [Sean]’s first project, we will cut him some slack but several design mistakes have been made in our opinion:

  • Using i2c instead of RS485 / CAN for long distance data transmission
  • Digitizing the sensor voltages so far from them, as noise is added before the ADC
  • Sending the +5V required by the ATtiny in the RJ45 cable instead of a higher voltage (which would involve putting an LDO on the platforms)
  • Separating the digital and analog ground planes as the platform current consumption is low and transmission speeds slow

But the children who can now play with the complete system certainly won’t care. And you… what do you think of [Sean]’s work? Don’t hesitate to let us know in the comment section below.

LED Strip Cape Drives Kilometers Worth Of LEDs

led-strip-cape

[Hudson] is looking to drive a lot of LEDs. A driver that effectively addresses kilometers worth of LED strips isn’t an easy thing to come by. So he’s in the process of designing his own BeagleBone Cape to do the work. Above you can see the board layout he’s working with. Notice the set of repeating red footprints in the center? Those are pads for 32 RS485 connectors!

Of course this is all in preparation for Burning Man where the mantra seems to be: he who has the most LEDs wins. Well, unless you’re the sort that likes to work with flames. But we digress. The scaling problem that [Hudson] is dealing with hinges around his desire not to include ridiculous numbers microcontrollers and the need to beef up the 3.3V logic levels of the BeagleBone to travel further on the data bus of the strips. By leveraging the RS485 protocol — which is designed to carry data over long distances — he can get away with a single processing unit by adding an RS485 translator at each remote strip connector. He plans to use the BeagleBone’s Programmable Realtime Units feature to address the eight drivers on the cape. But first he has to solve what looks like a doozy of a trace routing problem

BeagleBone SensorCape Lets You Measure Just About Anything

beaglebone-sensor-cape

Here’s another entry in the 2013 Intern Design Challenge which motivates summer Interns at Texas Instruments to build something cool for one of a handful of embedded platforms. This entry, developed by [Michael Leonard] is a cape for the BeagleBone Black which has footprints for a bunch of different sensors.

Use it to turn your BeagleBone into a weather station by populating the temperature, pressure, and humidity sensors. Or perhaps you’d prefer an IMU for your next quadcopter by populating the MPU-9150 chip on the pad labeled ‘9-Axis’. This part is an accelerometer, gyroscope, and digital compass all in one. There’s also room for a light sensor and an IR remote control receiver, with the large square pads on the right servung as breakouts for input buttons. If you want all the nitty-gritty on the sensors he designed for [Michael’s] done a great job of compiling a reference manual for the board.

[Michael] didn’t send us a link until he saw the retro-gaming cape we featured on Tuesday. Come on people! Don’t hide in the basement and build stuff unless you’re going to tell us about it.

Continue reading “BeagleBone SensorCape Lets You Measure Just About Anything”

Blackhat: IOS Device Charger Exploit Installs And Activates Malware

ios-charger-malware

A team of researchers from Georgia Tech unveiled their findings yesterday at the Blackhat conference. Their topic is a power charger exploit that installs malware on iOS devices. Who would have thought that there’d be a security hole associated with the charging port on a device? Oh wait, after seeing hotel room locks exploited through their power jack this is an avenue that should be examined with all device security.

The demonstration used a charger and an BeagleBoard. Plugging in the charger is not enough to trigger the exploit, the user must unlock the screen while charging for it to go into action. But once that’s done the game is over. Their demo removes the Facebook app and replaces it with an infected impostor while leaving the icon in the same place on your home screen. They notified Apple of their findings and a patch will roll out with iOS7. So when would you plug your device into an untrusted charger? Their research includes a photo from an airport where an iPad is connected to the USB port of a public charging station.

The summary on the Blackhat site has download icons for the white paper and presentation slides. At the time of writing we had a hard time getting them to download but succeeded after several tries.