StickerBOM For KiCad

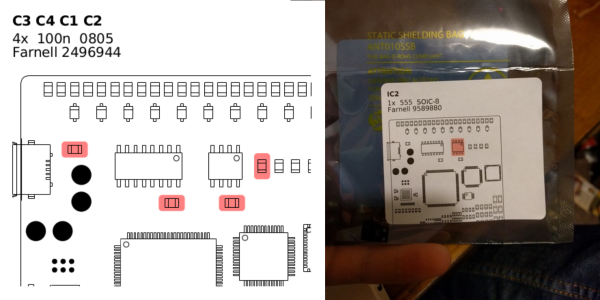
When boards were larger and components mostly through hole, designers could put a lot of information on the silk legend – reference designator, values, additional text and so on. But with surface mount components becoming smaller and board real estate at a premium, modern boards do not have a lot of information marked on the silk layer. If you are building and distributing a short run of kits, perhaps for a round of beta testing, then [Adam Greig]’s StickerBOM python script for KiCad can be really handy. StickerBOM is a KiCad BOM exporter designed for people stuffing boards by hand. It generates a PDF for printable sticky labels, where each label reflects one BOM line from a supplier. You then stick these labels on the bags from your supplier, and they show you where the parts go.

The labels get printed with the reference designator, quantity, component value, package, vendor and part number. It also adds a drawing of the PCB with the relevant parts highlighted for easy location identification. To use it, schematic symbols must have the supplier field and part number added. The script can be run from the command line, or from the BOM manager in eeschema. The script is set up for Avery L7164 labels, but this setting can be changed. It’s still work in progress so there’s a couple of bugs to be aware of. It cannot process the bottom layer of the board, and the result is only as good as the data you provide. And if you have a large board with components spread all over, the resultant graphic printed on the label may not be ideal.

We are hoping this, and other scripts such as the Part generator and Cost spreadsheets or the script for mechanical CAD export, get added to future releases of KiCad. The KiCad version 5 Developer’s road map document already has some really nice feature additions in the works.

KiCad Utilities Generate Parts; Track Costs

The popularity of KiCad keeps increasing, and not only are more people converting to it and using it for their projects, but there’s also a growing number of folks actively contributing to the project in the form of libraries, scripts and utilities to improve the work flow.

KiPart

[Dave Vandenbout] a.k.a [xesscorp] has written a couple of utilities for KiCad. When working with large multi pin parts such as micro-controllers, creating a schematic symbol from scratch using the traditional KiCad schematic library editor can be quite tedious. KiPart is a python script that uses a CSV table as its input to generate the KiCad schematic symbol and is able to create multi-part symbols too. Usage is quite simple. The csv file needs a part name on its first row. The next row contains the headers. ‘Pin’ number and Pin ‘Name’ are the minimum required. Additionally, you can add in ‘Unit’, ‘Side’, ‘Type’, and ‘Style’. Unit is used when defining multi-unit parts. Side decides the location of the pin, Type its function, and Style is its graphic representation. Running the KiPart python script then results in a nice KiCad schematic symbol. Besides, KiPart can specifically generate schematic symbols for the Xilinx 7-Series FPGAs and the Cypress PSoC5LP. There are a whole host of options to customize the final output, for example ordering pin placement based on pin number, or pin name or pin function. Source files can be obtained from the [xesscorp] Github repository.

KiCost

KiCost
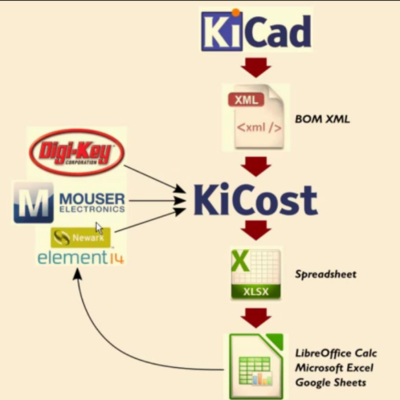
Another useful utility from [xesscorp] is KiCost. It is intended to be run as a script for generating part-cost spreadsheets for circuit boards developed with KiCad. The one piece of information you need to add to your schematic parts is a manufacturers part number. The KiCost Python script then processes the BOM XML file, reading the manufacturer part number, scraping the web sites of several popular distributors for price and inventory data, and creating a costing spreadsheet. You can grab the source files from the KiCost Github repository.

Check the two videos below where [Dave] walks through the two utilities.

Thanks to [RoGeorge] for sending in this tip by commenting on the Open Source FPGA Pi Hat built by [Dave] that we featured recently.

Continue reading “KiCad Utilities Generate Parts; Track Costs”

[Bunnie Huang’s] Hardware Talks Top Your Watch List

When [Bunnie] talks, we listen. He is a fount of product engineering knowledge, having seen many of his own products through from concept to market, and frequently helping others do the same. Of course having the knowledge is one thing, but he is also an accomplished speaker who knows what is important and how to share it in a way which is meaningful to others. The latest example of this is a pair of Engineering Talks he gave at Highway 1.

It’ll take you less than twenty minutes to get through the two videos. The first focuses on documentation for manufacturing. What do you need to include on a bill of materials sent to the factory? [Bunnie] has a set of gotchas which illustrate how vital this is. He also discusses how to handle design changes once the manufacturing wheels are already in motion. The second clip covers how Design for Manufacture relates to the actual cost of a production run. We hope there are more of these clips in the publishing pipeline so we’re keeping our eye on this channel.

The two videos are embedded below and at the time of writing had just a couple dozen views each and only one comment between the two of them. It seems sacrilege to say this, but we agree with that YouTube comment; these videos are gold.

Want to check out one of [Bunnie’s] latest projects? It’s a radio-based interactive badge.

Continue reading “[Bunnie Huang’s] Hardware Talks Top Your Watch List”

Hackaday Links Column Banner

Hackaday Links: November 30, 2014

Tired of wiring up the power rails and serial adapter every time you build something on a breadboard? [Jason] has you covered. He put his Breadboard Buddy Pro up on Indiegogo, and it does everything you’d expect it to: power rails, USB to UART bridge, and a 3.3 V regulator. Oh, he’s not using an FTDI chip. Neat.

With Christmas around the corner, a lot of those cheap 3-channel RC helicopters are going to find their way into stockings. They’re cool toys, but if you want to really have fun with them, you’ll need to add a penny.

Here’s a crowdfunding campaign for a very interesting IoT module. It’s a UART to WiFi adapter that has enough free Flash and RAM to run your own code, GPIOs, SPI, and PWM functions. Wait a second. This is just an ESP8266 module. Stay classy, Indiegogo.

Mankind has sent space probes to the surface – and received pictures from – Venus, Mars, the Moon, Titan, asteroids Itokawa and Eros, and comet Comet 67P/Churyumov–Gerasimenko. In a beautiful bit of geological irony, every single one of these celestial bodies looks like a rock quarry in Wales. That quarry is now for sale.

Here’s something exceptionally interesting. It’s a browser plugin that takes a BOM, and puts all the components into a cart. Here’s the cool bit: it does it with multiple retailers. The current retailers supported are Mouser, Digikey, Farnell/Element14, Newark, and RS Components.

Want a death ray? Too bad, because it’s already been sold.

Hackaday Links: January 19, 2014

hackaday-links-chain

[Nick] wrote in to tell us about his first blog post. He’s showing off a PWM LED driver he build around a 555 timer. This project uses a lot of basics; some 555 experience, PCB etching, and surface mount soldering. We’d like to know more about the blue substrate on his circuit board!

After seeing the BOM spreadsheet with KiCAD integration a couple of weeks back, [Vassilis] sent in a link to his own Excel-based Bill of Materials helper. We’re wondering if anyone has a similar tool that will work with Open Office?

While we’re on the topic of downloadable documents, here’s a reference PDF for all types of DC measurements. The collection is a free offering from Keithley. [Thanks Buddy]

Since you’re brushing up on your knowledge you may also be interested in a free online microcontroller course offered by UT Austin. They’re targeting the Tiva C Launchpad as the dev board for the class.

This website seems to be a little creepy, but the teardrop shaped 3D printed music box which is being shown off is actually rather neat.

Hackaday Alum [Phil Burgess] threw together a point and shoot camera for Adafruit. It’s a Raspberry Pi, camera board, touchscreen display, and USB battery all rubber banded together. The processing power of the RPi is used to add image processing effects which are shown off in the demo video.

We don’t own a DeLorean. If we did, we’d probably follow the lead of Queen’s University Belfast and turn it into and electric vehicle. [Thanks Jake]

The 3D photocopiers are coming. Here’s a hacked together proof-of-concept from [Marcelo Ruiz]. After laser scanning the part is milled from floral foam.