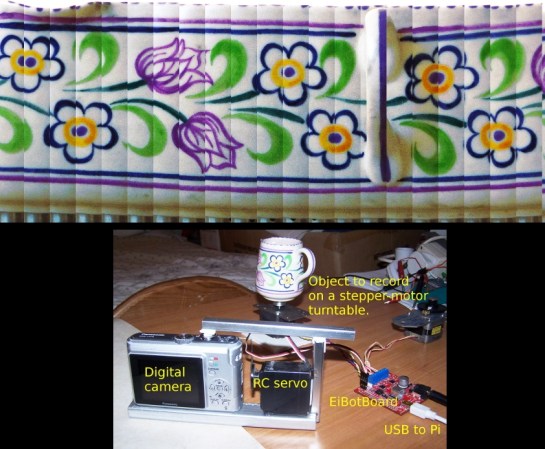
Raspberry Pi Camera Board Coming Early Next Year

We’ve seen hundreds of builds tinker around with the GPIO pins on the Raspberry Pi. They’re great for bridging the gap between physical sensors and a virtual world, but there are a few more unused and ignored pins on the Raspberry Pi. The folks at the Raspberry Pi foundation are finally giving these unused pins a life of their own with the new camera module for our favorite single board computer.

The specs for the camera are fairly impressive – it can record H.264 video at 1080p and 30 frames per second. Best of all, it costs only $25.

There are a few more hurdles to pass before the Raspi foundation can send this board out to manufacturers. They still need to make sure the ribbon cable doesn’t emit any interference, but if all goes right the camera module should be available early next year.

You can see the camera in action in the video after the break. If you listen closely you can hear [Rob Bishop] of the Raspi foundation say they’re also working on a display add on for the other  unused pins on the Pi, something we can’t wait to see.

Continue reading “Raspberry Pi Camera Board Coming Early Next Year”

Beefing Up A Smoke Alarm System With Video, Temperature, And Connectivity

Here’s a little smoke detector hack which [Ivan] has been working on. He wanted to extend the functionality of a standard detector and we’re happy to see that he’s doing it with as little alteration to the original equipment as possible (this is a life-saving device after all). He sent all the build images for the project to our tips line. You’ll find the assembly photos and schematic in the gallery after the break.

As you can see his entry point is the piezo element which generates the shrill sound when smoke as been detected. He connected this to his own hardware using an optoisolator. This allows him to monitor the state of the smoke alarm on his server. It then takes over, providing a webpage that display’s the board’s temperature sensor value and streams video from an infrared camera.

Of course this is of limited value. We’ve always made sure that our home was equipped with smoke detectors but the only time they’ve ever gone off was from normal cooking smoke or after an extremely steamy shower. But still, it’s a fun project to learn from and we’ve actually got several of the older 9V battery type of detectors sitting in our junk bin.

Continue reading “Beefing Up A Smoke Alarm System With Video, Temperature, And Connectivity”

Optimizing Your Electronics Projects With A Camera

What do you do when you have a microcontroller you’re trying to optimize? One method is using a debugger, but for AVRs and such that’s not a very common technique. For lower-level electronics projects, it’s nearly impossible, even. [Cnlohr] built a small Minecraft server that listens to in-game redstone circuits, but the performance of his real-world to block-world bridge wasn’t what he hoped. He came up with a pretty clever way of figuring out what was slowing his server down without any special gear at all.

[cnlohr]’s Minecraft server is just a simple AVR microcontroller, Ethernet adapter, and SD card affixed to a beautiful glass PCB. The performance of his server wasn’t what he expected; downloading a largish file from the server resulted in a download rate of about 55kbps, much slower than he expected. He wasn’t quite sure what the hangup was, so he took a camera and with a long exposure time took a very blurry picture.

The Minecraft server has a blue LED to show when the SD card was being accessed. In the picture above, [cnlohr] saw that SD card access was taking far too long, and if he wanted to optimize the code this would be the place to start.

Not bad for a dead-simple method of seeing where the code on your microcontroller project is slowing down.

Continue reading “Optimizing Your Electronics Projects With A Camera”

Making An Overhead Camera Gantry, Take 2

Last week we saw [Todd]’s solution to getting a tripod out-of-the-way when filming a few DIY videos. It’s an overhead camera gantry that allows him to move a camera around his garage workshop without a tripod getting in the way. This weekend, he’s back with a new and improved version. It’s a vast improvement over his Mk 1 gantry system, and it much simpler to build, to boot.

[Todd]’s new and improved overhead camera gantry builds is a vast improvement on his previous build. In the original build, [Todd] used only one cross piece between the overhead garage door tracks, and the carriage suspending the tripod overhead was extremely clunky.

Version 2 of [Todd]’s camera gantry again makes use of unused garage door tracks to suspend a tripod above his workshop. This time, though, he’s using two rails between these garage door tracks making pushing the tripod around his workshop much easier – even when not pushing it from the middle.

To move the camera across the workspace, [Todd] did away with the square tube between the garage door tracks and used another set of garage door tracks. It’s a beautiful system that moves very, very smoothly between his workbench and welding station, perfect for making a few high-quality DIY videos.

You can check out [Todd]’s build video after the break.

Continue reading “Making An Overhead Camera Gantry, Take 2”

Camera Gantry Rides On Garage Door Tracks

For as many garage and workshop videos we feature here on Hackaday, we’re surprised we haven’t seen this sooner.

[Todd] makes a bunch of videos in his garage shop, but using a tripod is a pain; he’s always tripping over his camera setup and it is just generally in the way all the time. His solution was to mount his camera to an overhead gantry, using the unused tracks for his garage door to move the camera around his workshop.

The build started with [Todd] taking his tripod and fabbing a mounting plate for it to be suspended in mid-air. This would leave the camera upside-down, so [Todd] also made a 90 degree bracket with a 1/4-20 bolt to hold the camera in position.

The actual gantry part of the build is fairly clever. First, [Todd] got a piece of square tubing the same length as the distance between his two garage door tracks. He made a truck that rides on six casters for this tube, then mounted this tube on garage door wheels.

The result allow [Todd] to move his camera anywhere within the footprint of his garage door tracks, including over his workbench and welding area. An ingeniously useful build that’s sure to provide a stable platform for his vlog-type thingies.

Vidia after the break.

Continue reading “Camera Gantry Rides On Garage Door Tracks”

A Beautiful Pinhole Camera Takes Wonderful Photos

With digital cameras in everything and film slowly disappearing from shelves, everyone loses an awesome way to learn about photography. Pinhole cameras allow anyone to build a camera from scratch and also learn about those crazy f-stops, exposure times, and focal planes that Instagram just won’t teach you. [Matt] put up a great tutorial for building your own pinhole camera, and the project looks easy enough for even those who are still playing around with their cell phone cameras.

For film, [Matt] used 120 film, a medium-format medium that is sill available for purchase and processing in some areas. Because [Matt]’s pinhole is relatively large and made out of very thin material, the camera could take very large pictures – much larger than standard 35mm fare. If you’re using a smaller camera projecting a smaller image onto the film, 35mm would be the way to go as it greatly decreases the difficulty of finding film and a processing center.

[Matt]’s camera is constructed out of laser-cut plywood. Because he’s producing extremely wide images with his camera (6 x 17cm), [Matt] needed to curve the film around the focal plane of the camera to keep the entire image in focus.

The mechanics of the camera are simple – just a pair of knobs to wind the film and a small metal shutter. [Matt] added a shutter release cable to open and close the aperture without moving the camera and had a wonderful camera perfect for capturing either sirs and madams or Civil War battlefields.

Magic Finger Input Device Is A Camera On Your Finger Tip

What if we could do away with mice and just wear a thimble as a control interface? That’s the concept behind Magic Finger. It adds as movement tracking sensor and RGB camera to your fingertip.

Touch screens are great, but what if you want to use any surface as an input? Then you grab the simplest of today’s standard inputs: a computer mouse. But take that one step further and think of the possibilities of using the mouse as a graphic input device in addition to a positional sensor. This concept allows Magic Finger to distinguish between many different materials. It knows the difference between your desk and a piece of paper. Furthermore, it opens the door to data transfer through a code scheme they call a micro matrix. It’s like a super small QR code which is read by the camera in the device.

The concept video found after the break shows off a lot of cool tricks used by the device. Our favorite is the tablet PC controlled by moving your finger on the back side of the device, instead of interrupting your line of sight and leaving fingerprints by touching the screen.

Continue reading “Magic Finger Input Device Is A Camera On Your Finger Tip”