DIY Tiny Single-PCB Synthesizer

[Jan Ostman] has been pushing the limits of sound synthesis on the lowly AVR ATMega microcontrollers, and his latest two project is so cute that we just had to write it up. The miniTS shares the same basic sound-generation firmware with his previous TinyTS, which we’ve covered here before, but adds a lot more keys, an OLED, and MIDI, while taking away some of the knobs.

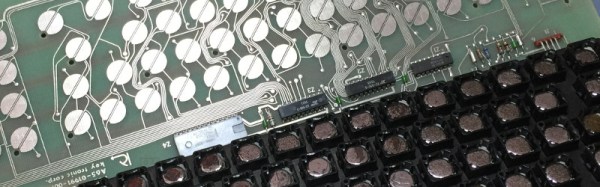
Both feature keyboards that are just copper pads placed over a ground plane, and the code does simple capacitive-sensing to figure out if they’re being touched or not. The point here is that you could pick up a PCB from [Jan] on the cheap, and experiment around with the code. Or you could just take the code and make a less refined version for yourself with a cheapo Arduino and some copper plates.

Either way, we like the combination of minimal materials and maximum tweakability, and think it’s cool that [Jan] shares the code, if not also the PCB designs. Anyone with PCB layout practice could get a clone worked up in an afternoon, although it’s going to be cheaper to get these made in bulk, and you’re probably better off just buying one from [Jan].

Metalized Gift Wrap Saves A Classic Keyboard

What do you do when you decide that running CP/M on a Commodore 128 with a 5.25″ drive “Isn’t CP/M enough”? If you are [FozzTexx], you reach for your trusty TRS-80 Model II, with its much more CP/M-appropriate 8″ drive.

There was one small snag with the TRS-80 though, its keyboard didn’t work. It’s a capacitive device, meaning that instead of each key activating a switch, it contains a capacitive sensor activated by a piece of aluminized Mylar film on a piece of foam. Nearly four decades of decay had left the foam in [FozzTexx]’s example sadly deflated, leaving the keys unable to perform. Not a problem, he cast around for modern alternatives and crafted replacements from a combination of foam weather strip and metalized gift wrap.

Care had to be taken to ensure that the non-metalized side of the gift wrap faced the capacitive sensor pads, and that the weather strip used had the right thickness to adequately fill the gap. But the result was a keyboard that worked, and for a lot less outlay and effort than he’d expected. We would guess that this will be a very useful technique for owners of other period machines with similar keyboards.

What is CP/M, I hear you ask? Before there was Linux, Windows, and MacOS, there was DOS, and before DOS, there was CP/M. In the 1970s this was the go-to desktop operating system, running on machines powered by Intel’s 8080 and its derivatives like the Zilog Z80 in the TRS-80. When IBM needed an OS for their new PC they initially courted CP/M creators Digital Research, but eventually they hired a small software company called Microsoft instead, and the rest is history. Digital Research continued producing CP/M and its derivatives, as well as an MS-DOS clone and the GEM GUI that may be familiar to Atari ST owners, but were eventually absorbed into Novell in the 1990s.

We’ve featured a few capacitive keyboards here at Hackaday before, including this similar repair to a Compaq from the 1980s, and this look at a classic IBM terminal keyboard.

Make A Capacitive Clothespin Keyboard For Your IPad

Even with all the optimization and style of new technology, the keyboard is a difficult thing to replace. Touch screens just don’t deliver the tactile feedback that connects us to the medium. [Adam Kumpf] remedies this by building his own keyboard interface to work with an iPad piano app, all from craft materials you’d likely find lying around in the kitchen.

To make your own, you’d first need a bunch of clothespins which will ultimately act as your keys. [Adam] shows how to stitch the separated halves of the clothespins onto a piece of cardboard with some basic rubber bands. These tension the keys so that they can rock back and forth over a pen or pencil placed beneath them. When you press down on one end, the other lifts causing an opposing pin to press the corresponding key of the iPad, just like a hammer inside a piano. With a little aluminum foil for conductivity wrapped around the side making contact, you’ve got yourself a quick solution for your itch to rock some Chopin.

You can see how well the project works in action below in his video:

Continue reading “Make A Capacitive Clothespin Keyboard For Your IPad”