An Amstrad PCW For The 21st Century

If you were a computer-mad teen in the late 1980s, you were probably in the process of graduating from an 8-bit machine to a 16-bit one, maybe an Amiga, or an Atari ST. For the first time though you might not have been the only computer owner in your house, because there was every chance your parents might have joined the fun with a word processor. Maybe American home offices during this period might have had PC clones, but for Brits there was every chance that the parental powerhouse would have been an Amstrad PCW.

Amstrad were the masters of packaging up slightly outdated technology for electronic consumers on a budget, and the PCW was thus a 1970s CP/M machine for the 1980s whose main attraction was that it came with monitor and printer included in the price. [James Ots]’ parents had one that interested him enough that  he has returned to the platform and is documenting his work bringing it up to date.

It was the most recent progress in booting into CP/M from an SD card by hijacking the printer ROM that caught our eye, but reading all the build logs that is only the tip of the iceberg. He’s connected another monitor, made a joystick port and a soundcard, and added a memory upgrade to his PCW. Most of these machines would have only been used with the bundled word processor, so those are real enhancements.

We’ve featured quite a few projects involving Amstrad’s CPC home computers, such as this one with a floppy emulator. Amstrad are an interesting company for followers of consumer electronics of the ’70s and ’80s, they never had the out-there tech wackiness of their great rival Sinclair but their logo could be found on an astonishing variety of appliances. The “AMS” in Amstrad are the initials of the company founder [Alan Sugar], who is rather better known in 2017 as the British host of The Apprentice. It is not known whether he intends to lead the country.

The 1980s Called – Asking For The Z80 Membership Card

The ’80’s and early ’90’s saw a huge proliferation of “personal” computers, spawning an army of hacker kids who would go on to hone their computing chops on 8-bit and 16-bit computers from brands such as Sinclair, Commodore, Acorn, Apple, Atari, Tandy/RadioShack and Texas Instruments. Fast forward to 2017, and Raspberry-Pi, BeagleBone and micro:bit computers reign supreme. But the old 8-bit and 16-bit computer systems can still teach us a lot.

[Lee Hart] has built the amazing Z80 Membership Card — a Z80 computer that fits in an Altoids tin. His design uses generic through hole parts mounted on a PCB with large pads, thick tracks and lots of track clearances, making assembly easy. Add to this his detailed documentation, where he weaves some amazing story telling, and it makes for a really enjoyable, nostalgic build. It makes you want to get under the hood and learn about computers all over again. The Z80 Membership Card features a Zilog Z80 microprocessor running at 4 MHz with 32k RAM and 32K EPROM, loaded with BASIC interpreter and monitor programs. A pair of 30-pin headers provide connections to power, I/O pins, data, address and control signals.

To accompany this board, he’s built a couple of companion “shield” boards. The Front Panel Card has a 16-key hex pad, 7-digit 7-segment LED display and Serial port. [Lee] has packed in a ton of features on the custom monitor ROM for the front panel card making it a versatile, two board, 8-bit system. Recently, he finished testing a third board in this series — a Serial/SD-Card/RAM shield which adds bank-switchable RAM and SD-card interface to provide “disk” storage. He’s managed to run a full CP/M-80 operating system on it using 64k of RAM. The two-board stack fits nicely in a regular Altoids tin. A fellow hacker who built the three-board sandwich found it too tall for the Altoids tin, and shared the design for a 3D printable enclosure.

[Lee] provides detailed documentation about the project on his blog with schematics, assembly instructions and code. He’s happy to answer questions from anyone who wants help building this computer. Do check out all of his other projects, a couple of which we’ve covered in the past. Check out Lee Hart’s Membership Card — a similar Altoids tin sized tribute to the 1802 CMOS chip and how he’s Anthropomorphizing Microprocessors.

Finally, we have to stress this once again — check out his Assembly Manuals [PDF, exhibit #1] — they are amazingly entertaining.

Thanks to [Matthew Kelley] who grabbed one of [Lee]’s kits and then tipped us off.

CP/M 8266

Hands up if you’ve ever used a machine running CP/M. That’s likely these days to only produce an answer from owners of retrocomputers. What was once one of the premier microcomputer operating systems is now an esoteric OS, a piece of abandonware released as open source by the successor company of its developer.

In the 1970s you’d have seen CP/M on a high-end office wordprocessor, and in the 1980s some of the better-specified home computers could run it. And now? Aside from those retrocomputers, how about running CP/M on an ESP8266? From multi-thousand-dollar business system to two-dollar module in four decades, that’s technological progress.

[Matseng] has CP/M 2.2 running in a Z80 emulator on an ESP8266. It gives CP/M 64K of RAM, a generous collection of fifteen 250K floppy drives, and a serial port for communication. Unfortunately it doesn’t have space for the ESP’s party piece: wireless networking, but he’s working on that one too. If you don’t mind only 36K of RAM and one less floppy, that is. All the code can be found on a GitHub repository, so if you fancy a 1970s business desktop computer the size of a postage stamp, you can have a go too.

There’s something gloriously barmy about running a 1970s OS on a two-dollar microcontroller, but if you have to ask why then maybe you just don’t understand. You don’t have to have an ESP8266 though, if you want you can run a bare-metal CP/M on a Raspberry Pi.

An Eight Inch Floppy For Your Retrocomputer

For people under a certain age, the 8 inch floppy disk is a historical curiosity. They might just have owned a PC that had a 5.25 inch disk drive, but the image conjured by the phrase “floppy disk” will be the hard blue plastic of the once ubiquitous 3.5 inch disk. Even today, years after floppies shuffled off this mortal coil, we still see the 3.5 inch disk as the save icon in so many of our software packages.

For retro computing enthusiasts though, there is an attraction to the original floppy  from the 1970s. Mass storage for microcomputers can hardly come in a more retro format. [Scott M. Baker] evidently thinks so, for he has bought a pair of Qume 8 inch floppy drives, and interfaced them to his CPM-running RC2014 Z80-based retrocomputer.

He goes into detail on the process of selecting a drive as there are several variants of the format, and interfacing the 50 pin Shuggart connector on these drives with the more recent 34 pin connector. To aid in this last endeavour he’s created an interface PCB which he promises to share on OSH Park.

The article provides an interesting insight into the control signals used by floppy drives, as well as the unexpected power requirements of an 8 inch drive. They need mains AC, 24VDC, and 5VDC, so for the last two he had to produce his own power supply.

He’s presented the system in a video which we’ve put below the break. Very much worth watching if you’ve never seen one of these monsters before, it finishes with a two-drive RC2014 copying files between drives.

Continue reading “An Eight Inch Floppy For Your Retrocomputer”

Raspberry Pi Boots CP/M

Retrocomputing is an enjoyable and educational pursuit and — of course — there are a variety of emulators that can let you use and program a slew of old computers. However, there’s something attractive about avoiding booting a modern operating system and then emulating an older system on top of it. Part of it is just aesthetics, and of course the real retrocomputing happens on retro hardware. However, as a practical matter, retrocomptuters break, and with emulation, you’d assume that CPU cycles spent on the host operating system (and other programs running in the background) will take away from the target retrocomputer.

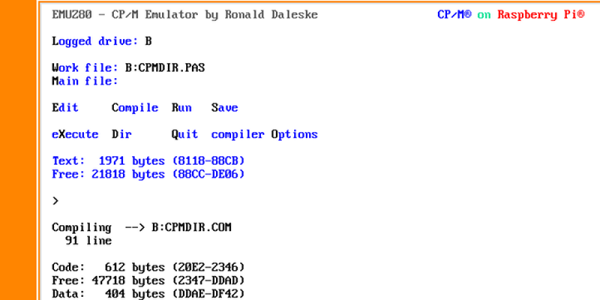
If you want to try booting a “bare metal” Z80 emulator with CP/M on a Raspberry Pi, you can try EMUZ80 RPI. The files reside on an SD card and the Pi directly boots it, avoiding any Linux OS (like Raspian). It’s available for the Raspberry Pi Model B, A+, and the Raspberry Pi 2 Model B. Unlike the significant boot times of the standard Linux distros on the earliest models of Pi, you can boot into CP/M in just five seconds. Just like the old days.

The secret to this development is an open source system known as Ultibo, a framework based on Open Pascal which allows you to create bare metal applications for the Raspberry Pi. The choice of Free Pascal will delight some and annoy others, depending on your predilections. Ultibo is still very much in active development, but the most common functions are already there; you can write to the framebuffer, read USB keyboards, and write to a serial port. That’s all you really need to make your own emulator or write your own Doom clone. You can see a video about Ultibo (the first of a series) below.

Continue reading “Raspberry Pi Boots CP/M”

Metalized Gift Wrap Saves A Classic Keyboard

What do you do when you decide that running CP/M on a Commodore 128 with a 5.25″ drive “Isn’t CP/M enough”? If you are [FozzTexx], you reach for your trusty TRS-80 Model II, with its much more CP/M-appropriate 8″ drive.

There was one small snag with the TRS-80 though, its keyboard didn’t work. It’s a capacitive device, meaning that instead of each key activating a switch, it contains a capacitive sensor activated by a piece of aluminized Mylar film on a piece of foam. Nearly four decades of decay had left the foam in [FozzTexx]’s example sadly deflated, leaving the keys unable to perform. Not a problem, he cast around for modern alternatives and crafted replacements from a combination of foam weather strip and metalized gift wrap.

Care had to be taken to ensure that the non-metalized side of the gift wrap faced the capacitive sensor pads, and that the weather strip used had the right thickness to adequately fill the gap. But the result was a keyboard that worked, and for a lot less outlay and effort than he’d expected. We would guess that this will be a very useful technique for owners of other period machines with similar keyboards.

What is CP/M, I hear you ask? Before there was Linux, Windows, and MacOS, there was DOS, and before DOS, there was CP/M. In the 1970s this was the go-to desktop operating system, running on machines powered by Intel’s 8080 and its derivatives like the Zilog Z80 in the TRS-80. When IBM needed an OS for their new PC they initially courted CP/M creators Digital Research, but eventually they hired a small software company called Microsoft instead, and the rest is history. Digital Research continued producing CP/M and its derivatives, as well as an MS-DOS clone and the GEM GUI that may be familiar to Atari ST owners, but were eventually absorbed into Novell in the 1990s.

We’ve featured a few capacitive keyboards here at Hackaday before, including this similar repair to a Compaq from the 1980s, and this look at a classic IBM terminal keyboard.

The RUM 80 – A Home Brew Z80 Computer Built From Scratch

[M] recently tipped us off about hacker [Lumir Vanek] from the Czech Republic. Between 1985 and 1989, [Lumir] built his own home brew, Z80 based computer. The list of home computers available in the 1980’s is extensive. Those living in western Europe and the Americas could choose offerings from Acorn, Apple, Commodore, Atari, Radio Shack, and Sinclair Research to name just a few. Even the erstwhile Czechoslovakia had home computers available from Didaktik and Tesla.

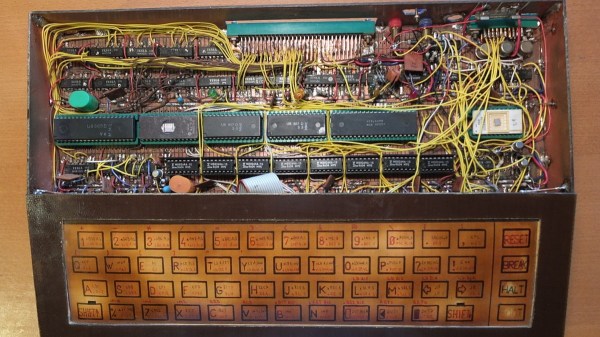
[Lumir]’s built was based around the Z80 processor and is built using regular, double-sided, prototyping board. It featured the 8-bit Z80 processor CPU, 8kB EPROM with monitor and BASIC, two Z80 CTC timers, an 8255 parallel interface for keyboard and external connector, 64kB DRAM, and Video output in black & white, 40×25 characters, connected to a TV. The enclosure is completely made from copper clad laminate. [Lumir] documented the schematics, but there is no board layout – since the whole thing was discrete wired. He even built the membrane keyboard – describing it as “layers of cuprextit, gum, paper with painted keys and transparent film”. When he ran out of space on the main board, he built an expansion board. This had an 8251 serial interface for cassette deck, one 8-bit D/A converter, and an 8255 parallel port connected to the “one pin” BT100 printer.

On the software side, he wrote his own monitor program, which allowed simple interactions, such as displaying and modifying registers, memory, I/O ports and to run programs. He wrote this from scratch referring to the Z80 instruction set for help. Later he added a CP/M emulator. Since the Z80 had dual registers, one was used for user interaction, while the other was reserved to allow background printing. Eventually, he even managed to port BASIC to his system.

Check out [Martin Malý]’s awesome article Home Computers behind the Iron Curtain and the follow up article on Peripherals behind the  Iron Curtain, where you can read more about the “one pin” BT100 printer.

Continue reading “The RUM 80 – A Home Brew Z80 Computer Built From Scratch”