Wireless IPod Charger Built From Scratch

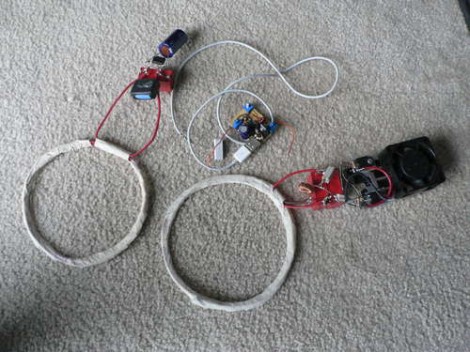
Despite the obvious use of a lot of wire, this project is actually a wireless charging system. [Jared] built it as a way to explore the concepts behind transferring power inductively. Alternating current on one of the white coils induces current on the other. This is then rectified, and regulated for use as a 5V charger. In this case it powers his iPod, but any USB device should work with the setup.

The transmitter uses the power supply from an old laptop as a source. Some filtering and a couple of MOSFETS are responsible for generating the AC current on the transmitting coil. The receiving coil feeds the bridge rectifier. In the writeup that voltage is fed to a 7805 regulator to provide a stable 5V output. However, in the video demo after the break [Jared] shows off the boost converter that he uses on his improved circuit. This way if the voltage drops due to poor alignment of the coils it will still be able to provide a steady output.

We’ve seen the same coil concept used to add wireless charging to cellphones too.

Continue reading “Wireless IPod Charger Built From Scratch”

Pros And Cons Of Replacing Tool Batteries With Lithium Polymer

[HammyDude] was tired of buying replacement batteries for his power tools. He had some Lithium Polymer batteries on hand and decided to take one of his dead drills and swap out the dead power pack.

The orange battery pack you see above has a deans connector on it for use with RC vehicles. By opening up the drill housing, [HammyDude] was able to add the mating deans connector. Now the replacement easily plugs into the drill, and it even fits inside the handle body.

This battery is made up of several cells, and an inexpensive charger is capable of topping off each individually for a balanced charge. In the video after the break [HammyDude] points out that the Makita charger applies voltage to all of the cells in series. It’s incapable of balance charging so when one cell dies the battery is toast. We’ve encountered this problem with Makita tools before.

One drawback to take note of in the end of the video: this replacement doesn’t have any low voltage cut-off. Running this battery pack down too low will permanently damage it. There must be a simple circuit that could be added as a safety measure. If you know of one, drop us a tip.

Continue reading “Pros And Cons Of Replacing Tool Batteries With Lithium Polymer”

Hackaday Links: November 6th, 2011

Build details for Raspberry Pi prototype

With the launch of Raspberry Pi approaching the development team released the details about the prototypes from about five years ago. The board was originally based on an ATmega644 and built on some perfboard.

‘Zero Energy Device’ challenge

We call BS on the title of this one, but the goal of finding devices that don’t use disposable energy sources is a good thing in our book. For instance, can we get more stuff that uses long-life capacitors instead of batteries?

Command adhesive for mounting bulletin boards, etc.

This seems like a no-brainer, but we’ve been using nails to mount bulletin boards and white boards for year. The problem is, when you stick a push-pin in one side, the other side pops off of the nail. [Zhanx] is using adhesive from 3M Command Hooks to keep his stuck to the wall.

Servo-driven gripping hand

[Navic] has been hard at work on this robot hand. There’s few details but he shows it can grip objects under one pound and he’s been taking amperage measurement during testing.

Emergency cellphone charging

It might not have been an emergency this time, but [Chris] did figure out a way to charge his cellphone after the snow storm in New England knocked out his power. He connected to lantern batteries to a 7805 regulator, then patched that into a USB hub to get his phone connected. Not bad in a pinch!

Cellphone Battery Booster Built At The Checkout Counter

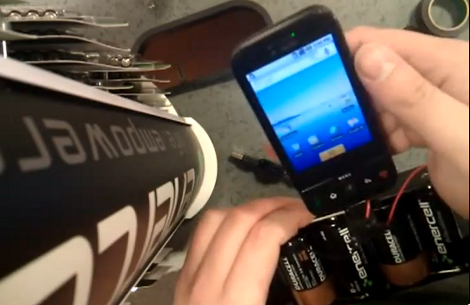
When you’re away from home and your cellphone runs out of juice it can be a real downer. Sure, you could find a store and buy a wall charger, but wouldn’t it be more fun to build your own battery booster without using tools? [Spiritplumber] did just that, popping into a Radio Shack for the parts, then making his how-to video (embedded after the break) while standing at the checkout counter. You can see he hust set his camera on top of the battery display case and got to work.

He’s using four D cell batteries to provide 6 volts of power. Assuming your phone charges at 5 volts this is going to be just a bit too high, even though there’s some tolerance with most phones. To overcome that obstacle he added a diode to the circuit, taking advantage of the 0.7 volt drop that it brings to the mix. Grab a plug adapter for your model and then just hand twist the connections. [Spiritplumber] admits it would be better to solder these, but in a bind you can get away with it. We looked up some prices for this method and we figure this would cost around $18 (batteries included) depending on the price of the plug adapter for your phone.

Of course if you’re just looking for a way to charge your phone without paying consumer prices there are ways of accomplishing that as well.

Continue reading “Cellphone Battery Booster Built At The Checkout Counter”

Makita Jobsite Radio Gets A Few Extra Bells And Whistles

[Jose] added several features to a Makita AM/FM jobsite radio, and did such a good job that you can’t tell they weren’t originally part of the design. The original radio has a compartment for a battery pack used with Makita’s line of rechargeable tools, and offers AM/FM radio, as well as auxiliary audio playback via a pair of speakers. [Jose] augmented those speakers by adding a pair of tweeters as well.

Next on his list of features were a couple of power bus add-ons. In the image on the right you can see the results of adding an automotive cigarette lighter to the side of the unit. Opposite this you’ll find a pair of USB ports that are activated by a lighted toggle switch. The ports are part of a USB car charger that is patched into the battery with a flip of that switch.

Finally, there’s a built-in Bluetooth audio receiver that connects to the auxiliary input. As shown in the image on the left, he can now play tunes from his cellphone without the need for a cord. See him showing off the device in the video after the break.

Continue reading “Makita Jobsite Radio Gets A Few Extra Bells And Whistles”

High Efficiency Solar Charger Circuit Tops Off Those Lead-acid Batteries

Make your next project solar-powered with this charging circuit. It’s completely through-hole, and there are no microcontrollers that need to be flashed. If you can source parts and are handy with a soldering iron building this will be a breeze.

Both the maximum system voltage and the low voltage drop out are configurable. After assembly, you just need to attach a regulated power supply to the load terminals. Tune the power supply to the max voltage and turn a potentiometer until an LED comes on, then repeat the process for the drop out voltage. Board artwork for the two-sided PCB and a schematic are available from the page linked at the top. If you’re not into etching your own circuit boards you can buy one for around $10.

[Thanks Murray]

DIY Portable Charger/generator

portable_charger_generator

[Glenn] from The Back Shed has built a lot of windmills and stationary generators over the years, but recently decided to try his hand at building something a bit more portable.

The charger is based of a relatively simple design, employing a 5.2 HP Kubota 4 stroke motor and a 12v car alternator to provide power. While you might be inclined to point out that his charger does exactly what an alternator and motor are built to do, there was a bit more to it than simply slapping the two parts together.

A laser cut adapter plate holds the motor and alternator together, but once [Glenn] wrapped things up and gave the motor a spin, he realized that he was driving the alternator backwards. This would eventually cause the alternator to overheat since the cooling fan was running the wrong way. He removed the fan and reversed the fins with a hammer so that he could get the cooling he needed without having to reinstall the alternator in the opposite orientation.

The whole kit was mounted on a hand truck for portability, and [Glenn] says that the charger/generator only needs to run about 5 minutes before a dead battery has enough juice to crank an engine.

[via HackedGadgets]