How Hardware Testing Got Plugged Into A Continuous Integration Framework

The concept of Continuous Integration (CI) is a powerful tool in software development, and it’s not every day we get a look at how someone integrated automated hardware testing into their system. [Michael Orenstein] brought to our attention theĀ Hardware CI Arena, a framework for doing exactly that across a variety of host OSes and microcontroller architectures.

The Hardware CI Arena allows testing software across a variety of hardware boards such as Arduino, RP2040, ESP32, and more.

Here’s the reason it exists: while in theory every OS and piece of hardware implements things like USB communications and device discovery in the same way, in practice that is not always the case. For individual projects, the edge cases (or even occasional bugs) are not much of a problem. But when one is developing a software product that aims to work seamlessly across different hardware options, such things get in the way. To provide a reliable experience, one must find and address edge cases.

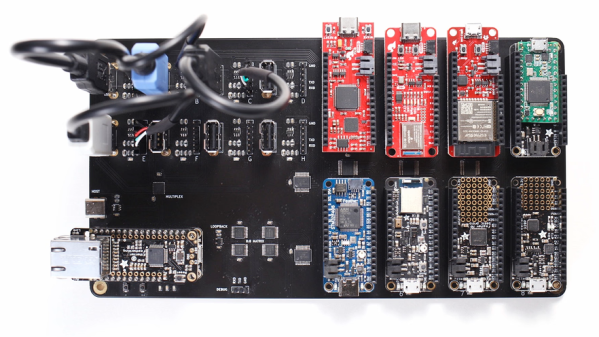
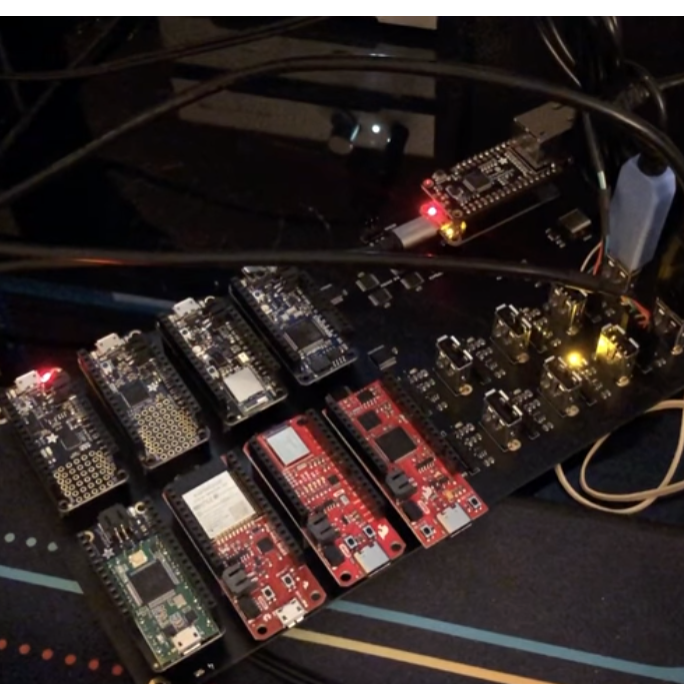
The Hardware CI Arena (GitHub repository) was created to allow automated testing to be done across a variety of common OS and hardware configurations. It does this by allowing software-controlled interactions to a bank of actual, physical hardware options. It’s purpose-built for a specific need, but the level of detail and frank discussion of the issues involved is an interesting look at what it took to get this kind of thing up and running.

The value of automatic hardware testing with custom rigs is familiar ground to anyone who develops hardware, but tying that idea into a testing and CI framework for a software product expands the idea in a useful way. When it comes to identifying problems, earlier is always better.

Picture of the miniJen structure on a presentation desk

A Jenkins Demo Stand For Modern Times

Once you’re working on large-scale software projects, automation is a lifesaver, and Jenkins is a strong player in open-source automation – be it software builds, automated testing or deploying onto your servers. Naturally, it’s historically been developed with x86 infrastructure in mind, and let’s be fair, x86 is getting old. [poddingue], a hacker and a Jenkins contributor, demonstrates that Jenkins keeps up with the times, with a hardware demo stand called miniJen, that has Jenkins run on three non-x86 architectures – arm8v (aarch64), armv7l and RISC-V.

There’s four SBCs of different architectures involved in this, three acting as Jenkins agents executing tasks, and one acting as a controller, all powered with a big desktop PSU from Pine64. The controller’s got a bit beefier CPU for a reason – at FOSDEM, we’ve seen it drive a separate display with a Jenkins dashboard. It’s very much a complete demo for its purpose, and definitely an eyecatcher for FOSDEM attendees passing by the desk! As a bonus, there’s also a fascinating blog post about how [poddingue] got to running Jenkins on RISC-V in particular.

Even software demonstrations get better with hardware, and this stood out no doubt! Looking to build a similar demo, or wondering how it came together? [poddingue] has blog posts on the demo’s structure, a repo with OpenSCAD files, and a trove of videos demonstrating the planning, design and setup process. As it goes with continuous integrations, we’ve generally seen hackers and Jenkins collide when it comes to build failure alerts, from rotating warning lights to stack lights to a Christmas tree; however, we’ve also seen a hacker use it to keep their firmware size under control between code changes. And, if you’re wondering what continuous integration holds for you, here’s our hacker-oriented deep dive.

Continuous Integration: What It Is And Why You Need It

If you write software, chances are you’ve come across Continuous Integration, or CI. You might never have heard of it – but you wonder what all the ticks, badges and mysterious status icons are on open-source repositories you find online. You might hear friends waxing lyrical about the merits of CI, or grumbling about how their pipeline has broken again.

Want to know what all the fuss is about? This article will explain the basic concepts of CI, but will focus on an example, since that’s the best way to understand it. Let’s dive in. Continue reading “Continuous Integration: What It Is And Why You Need It”

Tracking Binary Changes: Learn The DIFF-erent Ways Of The ELF

Source control is often the first step when starting a new project (or it should be, we’d hope!). Breaking changes down into smaller chunks and managing the changes between them makes it easier to share work between developers and to catch and revert mistakes after they happen. As project complexity increases it’s often desirable to add other nice to have features on top of it like automatic build, test, and deployment.

These are less common for firmware but automatic builds (“Continuous Integration” or CI) is repetitively easy to setup and instantly gives you an eye on a range of potential problems. Forget to check in that new header? Source won’t build. Tweaked the linker script and broke something? Software won’t build. Renamed a variable but forgot a few references? Software won’t build. But just building the software is only the beginning. [noseglasses] put together a tool called elf_diff to make tracking binary changes easier, and it’s a nifty addition to any build pipeline.

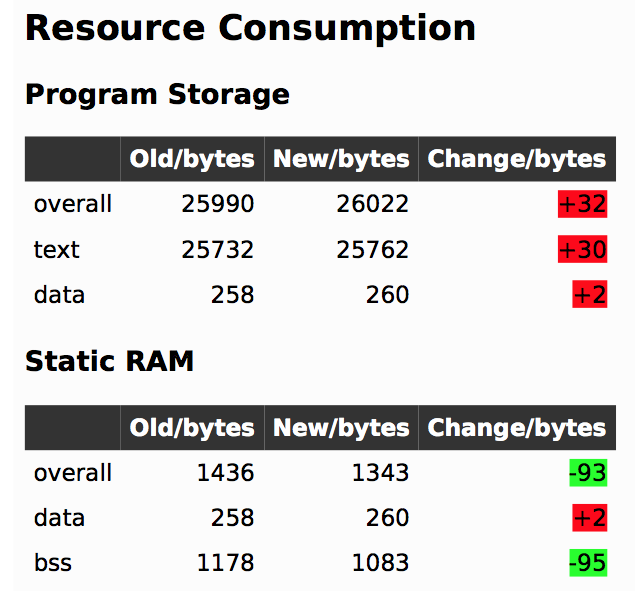
In firmware-land, where flash space can be limited, it’s nice to keep a handle on code size. This can be done a number of ways. Manual inspection of .map files (colloquially “mapfiles”) is the easiest place to start but not conducive to automatic tracking over time. Mapfiles are generated by the linker and track the compiled sizes of object files generated during build, as well as the flash and RAM layouts of the final output files. Here’s an example generated by GCC from a small electronic badge. This is a relatively simple single purpose device, and the file is already about 4000 lines long. Want to figure out how much codespace a function takes up? That’s in there but you’re going to need to dig for it.

elf_diff automates that process by wrapping it up in a handy report which can be generated automatically as part of a CI pipeline. Fundamentally the tool takes as inputs an old and a new ELF file and generates HTML or PDF reports like this one that include readouts like the image shown here. The resulting table highlights a few classes of binary changes. The most prominent is size change for the code and RAM sections, but it also breaks down code size changes in individual symbols (think structures and functions). [noseglasses] has a companion script to make the CI process easier by compiling a pair of firmware files and running elf_diff over them to generate reports. This might be a useful starting point for your own build system integration.

Thanks [obra] for the tip! Have any tips and tricks for applying modern software practices to firmware development? Tell us in the comments!