Get Great 3D Scans With Open Photogrammetry

Not long ago, photogrammetry — the process of stitching multiple photographs taken from different angles into a 3D whole — was hard stuff. Nowadays, it’s easy. [Mikolas Zuza] over at Prusa Printers, has a guide showing off cutting edge open-source software that’s not only more powerful, but also easier to use. They’ve also produced a video, which we’ve embedded below.

Basically, this is a guide to using Meshroom, which is based on the AliceVision photogrammetry framework. AliceVision is a research platform, so it’s got tremendous capability but doesn’t necessarily focus on the user experience. Enter Meshroom, which makes that power accessible.

Meshroom does all sorts of cool tricks, like showing you how the 3D reconstruction looks as you add more images to the dataset, so that you’ll know where to take the next photo to fill in incomplete patches. It can also reconstruct from video, say if you just walked around the object with a camera running.

The final render is computationally intensive, but AliceVision makes good use of a CUDA on Nvidia graphics cards, so you can cut your overnight renders down to a few hours if you’ve got the right hardware. But even if you have to wait for the results, they’re truly impressive. And best of all, you can get started building up your 3D model library using nothing more than that phone in your pocket.

If you want to know how to use the models that come out of photogrammetry, check out [Eric Strebel]’s video. And if all of this high-tech software foolery is too much for you, try a milk-based 3D scanner.

Continue reading “Get Great 3D Scans With Open Photogrammetry”

A Petite Pico Projector For Portable Pi

A few years ago, new, innovative pico projectors, influenced by one of the TI development kits, started appearing in Kickstarter projects and other various DIY endeavours. Those projects fizzled out, most likely due to the cost of the projectors, but we got a few laughs out of it: that wearable smartphone that projected a screen onto your wrist used the same technology.

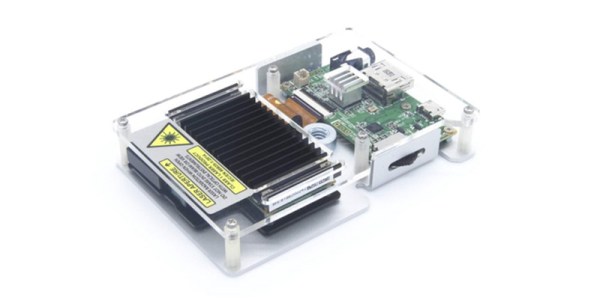
But there’s a need for a small projector, a pico projector, or in this case a femto projector. It’s the Nebra Anybeam, and it’s a small projector that uses lasers, and it comes in the form of a Raspberry Pi hat. We would like to congratulate the team for shipping the ideal use case of their product first.

The key features of this pico projector address the shortcomings of existing projectors that can fit in your pocket. This uses a laser, and there’s no bulb, and the power consumption can be as low as 3 Watts. Power is provided over a micro USB cable. The resolution of this projector is 720p, which is sufficient for a quick setup for watching a movie, but the brightness is listed as equivalent to 150 ANSI lumens, about the same as small projectors from a few years ago.

But of course the big selling point isn’t the brightness or resolution, it’s all about the smallness of the projector itself. There is a developer’s kit, a Pi Hat, a fit-in-your-pocket version with an enclosure, and a ‘monster ball’ version of the Anybeam.

Hackaday Links Column Banner

Hackaday Links: April 7, 2019

It’s April, which means all the people responsible for doubling the number of badges at DEF CON are hard at work getting their prototypes ready and trying to fund the entire thing. The first one out of the gate is Da Bomb, by [netik] and his crew. This is the same team that brought you the Ides of DEF CON badge, a blinky wearable multiplayer game that’s SPQR AF. Da Bomb is now a Kickstarter campaign to get the funding for the run of 500, and you’re getting a wearable badge filled with puzzles, Easter eggs, and a radio-based sea battle game that obviously can’t be called Battleship, because the navy doesn’t have battleships anymore.

Speaking of badges and various badge paraphernalia, there’s a new standard for add-ons this year. The Shitty Add-On V.1.69bis standard adds two pins and a very secure shrouded connector that solves all the problems of last year’s standard. [AND!XOR] just released a Shitty Brooch that powers all Shitty Add-Ons with a CR2032 battery. All the files are up on the Gits, so have fun.

You can 3D print anything if you don’t mind dealing with supports. But how to remove supports? For that [CCecil] has a great tip: use Chap stick. This is a print that used supports and it’s perfectly clean, right off the bed. By inserting a suspend (M600) command at the z-height of the top of the interface layer, then adding Chap stick on the top layer, everything comes off clean. Neat.

Speaking of 3D printing, here’s a project for anyone with the patience to do some serious modeling. It’s a pocket Soviet record player, although I think it’s more properly called a gramophone. It’s crank powered, so there’s a spring in there somewhere, and it’s entirely acoustic with zero electronics. Yes, you’re going to need a needle, but I’d be very interested in seeing somebody remake this using modern tools and construction materials.

Tracking Binary Changes: Learn The DIFF-erent Ways Of The ELF

Source control is often the first step when starting a new project (or it should be, we’d hope!). Breaking changes down into smaller chunks and managing the changes between them makes it easier to share work between developers and to catch and revert mistakes after they happen. As project complexity increases it’s often desirable to add other nice to have features on top of it like automatic build, test, and deployment.

These are less common for firmware but automatic builds (“Continuous Integration” or CI) is repetitively easy to setup and instantly gives you an eye on a range of potential problems. Forget to check in that new header? Source won’t build. Tweaked the linker script and broke something? Software won’t build. Renamed a variable but forgot a few references? Software won’t build. But just building the software is only the beginning. [noseglasses] put together a tool called elf_diff to make tracking binary changes easier, and it’s a nifty addition to any build pipeline.

In firmware-land, where flash space can be limited, it’s nice to keep a handle on code size. This can be done a number of ways. Manual inspection of .map files (colloquially “mapfiles”) is the easiest place to start but not conducive to automatic tracking over time. Mapfiles are generated by the linker and track the compiled sizes of object files generated during build, as well as the flash and RAM layouts of the final output files. Here’s an example generated by GCC from a small electronic badge. This is a relatively simple single purpose device, and the file is already about 4000 lines long. Want to figure out how much codespace a function takes up? That’s in there but you’re going to need to dig for it.
elf_diff automates that process by wrapping it up in a handy report which can be generated automatically as part of a CI pipeline. Fundamentally the tool takes as inputs an old and a new ELF file and generates HTML or PDF reports like this one that include readouts like the image shown here. The resulting table highlights a few classes of binary changes. The most prominent is size change for the code and RAM sections, but it also breaks down code size changes in individual symbols (think structures and functions). [noseglasses] has a companion script to make the CI process easier by compiling a pair of firmware files and running elf_diff over them to generate reports. This might be a useful starting point for your own build system integration.

Thanks [obra] for the tip! Have any tips and tricks for applying modern software practices to firmware development? Tell us in the comments!

DIY Air Conditioner Built From Weird Donor Appliance

There are some parts of the world where living without air conditioning borders on unthinkable. But in more moderate climates, it isn’t all that unusual. [Josh’s] apartment doesn’t have central air conditioning — the kind that connects to a forced-air heating/cooling system. It does, though, have a water circuit for air conditioning, so he decided to hack a few experimental air conditioners.

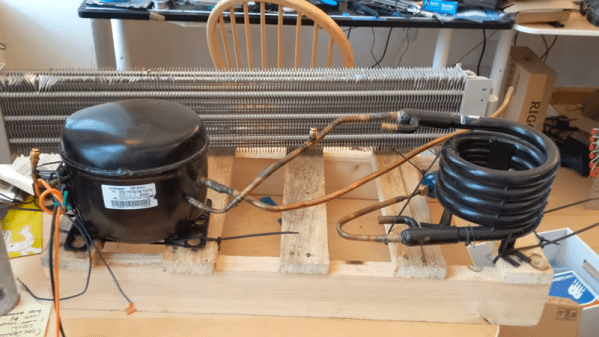
He’s not starting completely from scratch. The two attempts he made at building his AC came from donor parts. The successful one started out as a hot water heater. The very first attempt didn’t quite work as well, using a refrigerator compressor and an evaporator from a baseboard heater. The flow control through the heat exchanger turns out to be very tricky, so [Josh] claims he mostly got ice right at the inlet and minimal cooling through the evaporator.

The more successful one works better but still has a problem with the evaporator freezing that he’s trying to solve. He’s looking for suggestions on how to make it work better. As much as we like a good hack, our advice is to move to a different apartment building.

We’ve seen other homemade coolers, but they are more like swamp coolers. If you just need to cool your desk, you might just get some ice in a metal can.

Continue reading “DIY Air Conditioner Built From Weird Donor Appliance”

Restoring An HP LCZ Meter From The 1980s

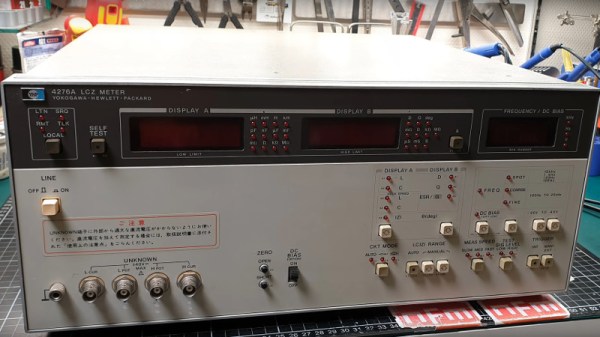
We are fantastically lucky not only in the parts that are easily available to us at reasonable cost, but also for the affordable test equipment that we can have on our benches. It was not always this way though, and [NFM] treats us to an extensive teardown and upgrade of a piece of test equipment from the days when a hacker’s bench would have been well-appointed with just a multimeter and a 10MHz ‘scope.

The Hewlett Packard 4276A LCZ meter is, or perhaps was, the king of component testers. A 19″ rack unit that would comfortably fill a shelf, it has a host of functions and a brace of red LED displays. This particular meter had clearly seen better days, and required a look inside just to clean up connectors and replace aged batteries.

In the case is a backplane board with a series of edge connectors for a PSU, CPU, and analogue boards. Aged capacitors and those batteries were replaced, and those edge connectors cleaned up again. The CPU board appears to have a Z80 at its heart, and we’re sure we spotted a 1987 date code. There are plenty of nice high-quality touches, such as the individual 7-segment digits being socketed.

An after-market option for this equipment included a DC offset board, and incredibly HP publish its full schematic and a picture of its PCB in their manual. It was thus a simple process and quick PCB ordering to knock up a modern replica, with just a few component substitutions and single resistors replacing an HP specific encapsulated resistor pack.

As a treat we get a ringside seat for the set-up and alignment of the machine. The DC offset board gives the wrong voltage, which he traces to a voltage reference with a different tolerance to the original HP part. [NFM] makes some adjustments to resistor values, and is able to pull the voltage to the correct value. Finally we see the instrument put through its paces, and along the way have a demonstration of how capacitance of a ceramic capacitor can vary with voltage close to its working voltage. Even if you never have the need for an LCZ meter or never see an HP 4276A, this should be worth a watch. And if you now have an urge to find a bench full of similar treasures, take a look at our guide to old test equipment.

Continue reading “Restoring An HP LCZ Meter From The 1980s”

Shop-Built Fixtures Reveal The Magic Of Switchable Permanent Magnets

Have you ever wondered how switchable magnets work? Not electromagnets, but those permanent magnet fixtures like the ones that hold dial indicators to machine tools, or the big, powerful chucks for surface grinders that can be mysteriously demagnetized at the flick of a lever. It seems like magic.

Thanks to [Andrew Klein] and this video on shop-built magnetic switches, the magic is gone. As it turns out, the ability to nullify the powerful magnetic field from a bunch of rare earth permanent magnets is as simple as bringing in another set of magnets to cancel out the magnetic fields of the first set.

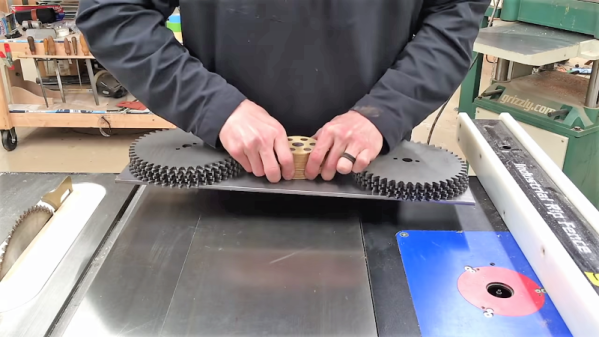
[Andrew]’s magnetic pucks are formed from two thick plywood discs with magnets set into the edges. These magnets alternate in polarity around the discs, and they match up with mild steel pole pieces set into the face of the discs. The two discs swivel on a common axis; when the top disc is swiveled so that the polarity of the top and bottom magnets align, the magnet is switched on. Swiveling the top 60° puts the opposing fields in line with each other, canceling out the powerful combined pull of all the magnets and releasing the fixture.

[Andrew] sells a set of plans for the magswitches, which he built using standard woodshop tools. We think the design is perfect for a CNC router, though, where the fussy boring and counterboring operations might be a little easier. Perhaps even a 3D-printed version would be possible. This isn’t the first switchable magnet we’ve seen, of course, but we like this one because it’s all mechanical.

Continue reading “Shop-Built Fixtures Reveal The Magic Of Switchable Permanent Magnets”